Long time member and good friend Ema has asked us for advice on how to use Windows Live Movie Maker to extract a portion of a video and save it as an independent clip. Here is what Ema posted on the forum:
I used to have XP and I was able to use window movie maker to cut a piece out of a video.
Now I have windows 7 and I am completely lost. I have lots of free programs but could always use more.
I am trying to make a copy of a movie and then take a few clips out and really need baby baby steps.
I know I have to change the movie to avi I think. But I cant do anything in windows 7
Well Ema, I don’t blame you in the least for being a little confused. Windows Live Movie Maker has fallen victim to Microsoft’s current penchant for adding ribbon style menus to their applications. To be honest, I much prefer the older style interface myself; it was straight forward and simple, nothing fancy but it wasn’t near as complex or confusing either.
Anyway, here is the guide as promised… pictures and all (click on images to view full size). I hope it helps you through the process, and anyone else who might be experiencing similar difficulties:
First thing you need to understand is that Windows Live Movie Maker will only accept video in certain formats, main ones are AVI, WMV, MPEG and MOV. You can view a full list of supported video formats HERE.
So, if the video is any other format than those supported you will first need to convert it; the most versatile and commonly used format would be AVI. There are several free and easy to use video conversion programs available, I would recommend either Any Video Converter or WinX Video Converter.
If the original video is already in a format supported by Windows Live Movie Maker you can just import as is. If not, then convert it and import the converted video into Windows Live Movie Maker and you are ready to begin:
Once the video has been imported, click on the Edit button in the top menu:
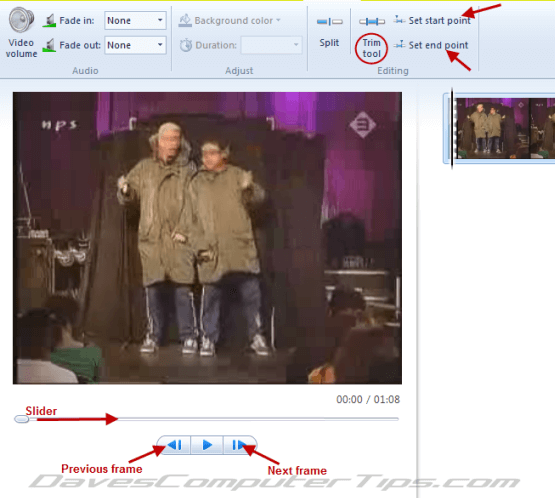
You will now be able to access the editing tools, the one we shall be using is the “Trim Tool”. Move the slider under the preview pane to approximately where you want the extracted clip to start. You can then access the exact starting point by clicking on the fame by frame buttons:
Once you have the exact frame displayed in the preview screen click on the Set start point button. Now move the slider across to the approximate end of the clip and use the frame by frame buttons to locate the exact end frame. Then click on the Set end point button.
If you wish, you can now preview your clip by clicking on the ‘play’ button. When you are satisfied you can then export (save) the clip; click on Home in the main menu across the top and you will now have access to all the export options (at the far right of the menu – under “Sharing”):
Click on the center button to toggle through the options or on the bottom button to view all at once. Hover the mouse cursor over each icon for details.
You will see that most have to do with quality and file size. Bear in mind, the higher the quality the larger the file size (high quality options are going to produce very large files). You also have options to publish your clip direct on YouTube or burn to DVD.


Jim,
Does it give you the option to make multiple edits and put them together into one video? I have to download it and check it out.
Use File Joiner, from https://sites.google.com/site/igorware/file-joiner. I use it to join video files that have been split by a DVD recorder. Easy to use (once you’ve mastered a couple of quirks) and works a treat.
Hey TeXaCo,
WLMM is more about collating videos and photo slideshows; the editing options in WLMM are pretty sparse and even more basic. You can; adjust audio volume, fade in and fade out. Split a video and/or trim video….that’s about it.
I guess you could create a number of clips and then import them all into WLMM and process them into one file. Don’t really know, I have never tried that.
If you want a greater range of better editing options I would be looking at more advanced specialist freeware. Avidemux is one of the best, bear in mind though, all these advanced video editing programs are a tad complex and can be quite confusing.
Cheers…..Jim
I have WLMM but I’ve run into a snag. How the heck do I do narration over a video nowadays?!
Jeffrey – You will need to record and save the narration separately. Then click on the ‘Add Music’ button in WLMM and select your saved narration.
Suggest you head on over to the DCT Forum and post this question there, it is a much more suitable platform for discussion and detailed replies.
Cheers……Jim
I just want to say that the quality of the produced movies from movie maker are very good.
I tried some paid programs and they all give ‘crappy’ results, even at ridiculous bitrates.
Dunno how WLMM does it, but the quality:filesize ratio is very good from my experience, the best so far for a program that doesnt crash when importing big files (4GB) and lets you add music and text.