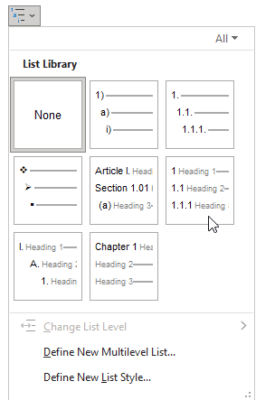
Why do you use multilevel lists? Good question! We use multilevel lists when we have a sequence of items that have a hierarchy, like policies or procedures. This means that each level will have some indication that it is a subheading of the item that it precedes (i.e., alignment, indentation, bullet style, number). These will all be determined by your list style. Multilevel lists can use numbers, bullets, or a combination of each. Any list that you have created can become a multilevel list and it can have up to nine levels.
Follow the steps below to learn how:
- To create a multilevel list, you will start with a standard ordinary list that you have created
- Select your previously made list
- Now do one of the following:
- On your Home tab, in the Paragraph group, click the Multilevel List button:
- You can find different styles by clicking the arrow next to Multilevel List on the Home tab, in the Paragraph group:
Create a numbered or bulleted list and then using your keyboard:
- Press Tab – Word indents a level in the list
- Press Shift+Tab – Word outdents a level in the list
Using the mouse:
On the Home tab, in the Paragraph group, click the Decrease Indent or Increase Indent button:
Note: If Word does not work the way you expected, (i.e., it does not indent and outdent a level of the list), it could be because this feature is turned off.
To add additional numbered items to your list, move the insertion point to the end of a line formatted and press Enter:
To stop entering items in the list, do one of the following:
- Press Enter as many times as many levels you have in your current position plus one
- Press Enter and click the Multilevel List button on your Home tab, in the Paragraph group, to turn off the formatting
—


