
Over the years I have been asked on many occasions how to put together a photo slide show using Windows Movie Maker. It isn’t all that difficult but, as with most things, is much easier when you know how. Assuming there are others among you who may struggle with this chore, what follows is a basic guide for making a simple slide show.
I shall be using the XP version of Windows Movie Maker. There are a few minor GUI changes in Vista/Windows 7 as well as an extra final option to burn to DVD using the native ‘Windows DVD Maker’.
Preparation:
This is the most important and often neglected aspect of the whole procedure, if your photos are not arranged, named and numbered correctly it can cause some major headaches.
Firstly, make sure all your photos are contained within the one folder. If you wish to use photos from a number of different folders then you should start off by creating a new folder in ‘My Pictures’. To do this; open ‘My Pictures’ and right click on any blank space, select ‘New’ and then ‘Folder’. Type an appropriate title into the dialogue box under the new folder and then hit ‘Enter’. Now just drag and drop or copy and paste all the required photos into the new folder.
Okay, next we need to arrange the photos in the same order as you would like them displayed in the slide show. Just drag and drop them around the folder until you have them in the desired sequence. Now we have to make sure they retain that order, Windows has a nasty habit of jumbling them all back up again: Select all the photos in the folder by either pressing the ‘Ctrl and ‘A’ keys simultaneously or left click on the first photo and then on the last photo while also holding down the ‘Shift’ key*. With all the photos now highlighted, right click on the first photo and select ‘Rename’. Type in an appropriate title followed by the number 01 in parenthesis, e.g. for the project used in this guide I typed in “Beautiful Tasmania (01)” without the quotes. Now just left click on any blank space or, alternatively, hit ‘Enter’. You will see that all the photos now bear the same name and are numbered sequentially. We are ready to make our slide show.
Windows Movie Maker:
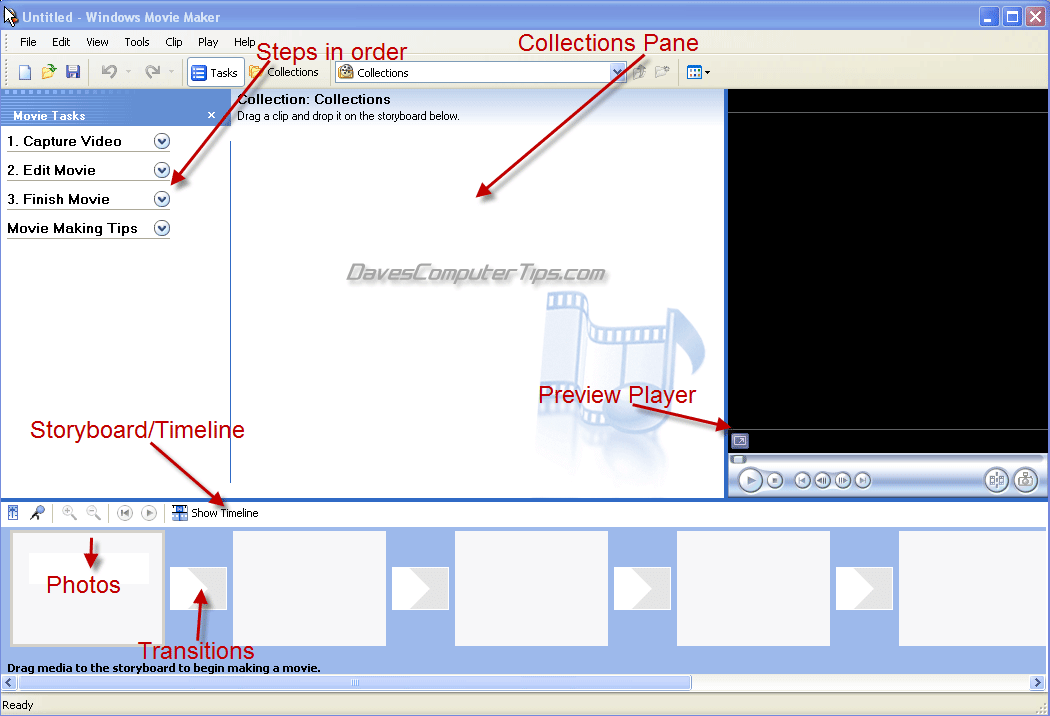
As you can see the GUI is clear and quite intuitive with all the necessary steps set out on the left hand side of the screen. Each of those sections should be expanded by clicking on the little ‘v’ icon, so they look like this:

The obvious first step is to import the photos into your project. Click on the ‘Import Pictures’ option and then browse to the location of the folder which contains your photos. Now ‘select all’ the photos in the folder (remember, ‘Crtl’ + ‘A’) and then click on the ‘Import’ button. All the photos should now be displayed within the ‘Collections Pane’:

Now we need to get those photos from the Collections Pane to the Storyboard/Timeline. To switch between the ‘Storyboard’ view and the ‘Timeline’ view just click on ‘Show Storyboard’ or ‘Show Timeline’. I always start off the project in ‘Storyboard’ mode, it is much easier to work with. The large squares are for your photos and the smaller squares for the transitions.
Okay, with the ‘Storyboard’ view enabled, highlight all the photos in the ‘Collections Pane’ using select all and then just drag and drop the first photo into the first big square on the Storyboard… all the rest will follow in order:

Now we can add in the transitions. Under ‘Step 2’ click on “View video transitions’ and all available transitions will be displayed in the ‘Collections Pane’, replacing the photos. You can preview the effect of each transition by highlighting one (left click on it) and then hitting the play button on the preview player.
Unfortunately there is no ‘Randomize’ option available so if you wish to use random transitions you have to insert them individually, one at a time. That is okay in a small project but once you get up to 100+ photos or more it can be a right pain. The project I am using for this guide includes only 22 photos so I dragged and dropped different transitions randomly into the Storyboard. For a larger project it is best to select and use just one transition effect which will then be inserted automatically into all the spaces; once you have selected the transition and duly highlighted it, click on ‘Clip’ in the menu bar and select ‘Add to storyboard’. All the small squares should now be filled with transitions and your Storyboard should look something like this:
Now we are going to add audio/background music to the slide show. Firstly, since we have finished with the transitions, click on the option to ‘Show Collections’ and the photos will now appear back in the ‘Collections Pane’. Now click on ‘Show Timeline’ to change the view so we can access the Audio/Music timeline:
Okay, now click on the option, under ‘Step 1’, to ‘Import audio or music’. Browse to the location of your mp3 or wma music files, select the one you want to add and then click the ‘Import’ button. You can also insert a music CD in the ROM drive, navigate to that location and import a track from there. Now drag and drop the song/music from the ‘Collections Pane’ to the very beginning of the ‘’Audio/Music’ timeline.
If your project includes lots of photos you will need to add the same track multiple times or import and add different tracks until such time as the audio timeline is past the video display timeline. After placing the first audio track on the timeline use the horizontal scrollbar to locate the end of that track and then drag and drop the next song so that the beginning of the second track abuts the end of the first track, and so on. You can shorten up the final song/music by hovering the mouse cursor over the end of the track until the cursor turns into opposing red arrows, then simply hold down the left button and drag it to a position just after the end of video display:
Now right click inside the last track and select the option to ‘Fade out’. You have just synchronized the audio and video:
All finished, you can preview the end product by clicking on the play button of the preview player (make sure you scroll back to the very beginning of the timeline beforehand). You can, of course, use the preview feature at any time during the process. When you are satisfied, click on the desired option under ‘Step 3’, which would generally be ‘Save to my computer’. In the first screen you can give the slide show. a unique title and select the save location for the video file (‘My Videos’ by default):

Next you can select the best output for your needs, ‘Best quality for playback on my computer’ is recommended but other options can be accessed by clicking in ‘Other settings’. There is a distinct relationship between output quality and video file size so you will need to strike a balance. The recommended option will produce a nice quality yet smallish .wmv file suitable for viewing on a computer. If you are planning on burning the file to DVD for viewing via television I would recommend using the option, ‘High quality video (large)’.

Additional settings can be accessed by clicking on ‘Tools’ in the menu bar; select ‘Options’ and click on the ‘Advanced’ tab. From there you can select duration time for photo display (5 seconds is default). You must be careful here, there is a fine line between everything flashing by too fast and putting everyone to sleep through sheer boredom. I have found 6 seconds provides a happy medium and 5 or 6 seconds to be the best settings. The default transition duration (1.25 secs) is fine. Other settings allow for adjustment of regional video format and aspect ratio. These options are best set before you start the project
Sir
I have used your procedure to create a slideshow with Windows Movie Maker and it was very simple to use. I want to thank you fir this. BUT I still have a problem: when I click on PLAY to have a first look at it before burning a DVD, the audio(music) is there but none of the picture appears on the right hand screen…… But when I simply click on a picture in the collection panel, it does appear.in the right hand screen. A) My slide show was saved in ”My pictures” instead of ”My videos” and B) I have 1172 pictures in my slideshow. (yes 1172 pictures no typing error)
Please help, this is a Christmass gift that I have been working on for over a month
Thanks
That is a heck of a lot of photos, far too many for WMM to process all in one go. What I suggest you do is break down the project into segments of around 100 – 150 images at at a time. Create each one separately and save to the hard drive. When finished open WMM again and, as a separate project, import all your previously saved movies back in, add them to the timeline and create a new single movie from all the parts.
Your issues with the preview player are most likely being caused by the excessive number of images overloading WMM. The ‘Save’ location for your finished project is irrelevant, and anyway you can change that yourself by simply choosing a destination folder from the available drop down menu.
Thank you for your tutorial…I pretty much have the pix and the video all done but my song is 4 minutes long and the pic slideshow is about 3 mins 20 seconds…isn’t there a quick way to make the slideshow last the length of the song?
Thanx for your help,
~Marie
Sir I want to make picture slide show of my college life and I follow all the Procedure as you told above but when I finish OR Save it in My computer, it can’t be saved and this message comes
Windows movie Maker can’t save thee movie to the specified location. Verify that the original source files used in your movie are still available, that the saving location is still available, and that there is enough free disk space available, and then try again.
but I have 61 GB free space and all the source files are in their actual positions
Now what can I do ????