This article covers versions 2007, 2010, 2013, 2016, 2019, and Word in Office 365.
Word, as you should know by now, allows you to add columns to your page layout. Occasionally you may decide to add vertical lines between each column on your page.
Follow the steps below to learn how:
- Place your cursor at the beginning of the text you would like to appear in your columns.
- Display the Page Layout tab of your Ribbon.
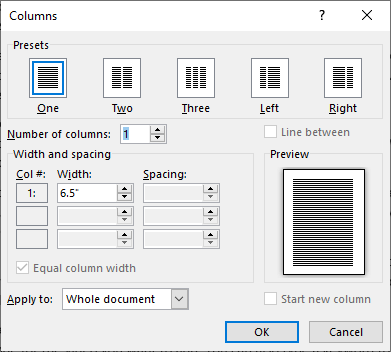
- Click Columns | More Columns to display the Columns dialog box.
- Specify the number of columns you would like as you normally would. There must be at least 2 columns, but if you are already using 2 or more columns in your layout and you do not want to change the number of columns, leave this setting unchanged.
- In the Apply To box, select whether you would like this change to apply to your entire document or just the current section. Alternatively, you can select This Point Forward, which will cause Word to apply columns beginning where your cursor is located.
- Click Line Between. (The checkbox will only be available if you select two or more columns.)
- Click OK.
Easy peasy!
—

