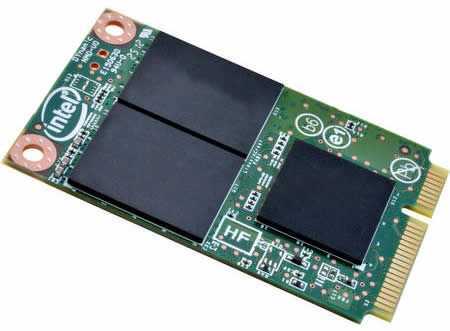
Solid State Drives (SSD) are the new kids on the block in the computer hardware neighborhood. As far as upgrades go, SSD’s and RAM are the best two to address if you want your computer to run faster– much faster.
SSD’s have dropped in price to the point where they are now competitive with regular mechanical hard drives (spinners). Techies have been rubbing their hand together in anticipation of sub-dollar-per-gigabyte prices for a long time. The cost has dropped to around half that and buying an SSD has become a no-brainer. RAM has always been a great “bang for the buck” value.
There are a few things I’d like to tell you about if you plan on buying an SSD. They not only behave differently, but you should also treat them differently than normal hard disk drives (HDD). Here are some pointers…
Older Operating Systems
If you are still running an older Windows version such as XP or Vista, then I would not recommend installing an SSD. These systems are not SSD-aware and will therefore treat them like ordinary HDD’s. Ultimately, the life of an SSD will be shortened because of this. Also, it won’t stay blazing fast for a long time, either.
Note: All the images in this article can be clicked to enlarge them. I know it helps my old eyes…
No Defrag!
Don’t defragment your solid state drive. This can’t be emphasized enough. SSD’s have a limited number of write cycles available before they die and defragmenting your SSD will definitely shorten its life span.
Turn it off:
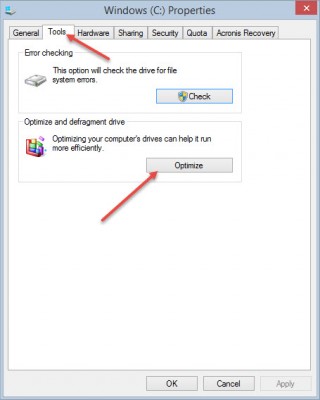
Open your favorite file manager and Right-Click the SSD and choose Properties in the menu
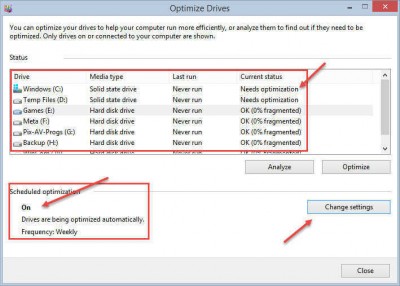
- In the window that opens, click the Tools Tab, then the Optimize Button
- In the next window, click the Change settings Button
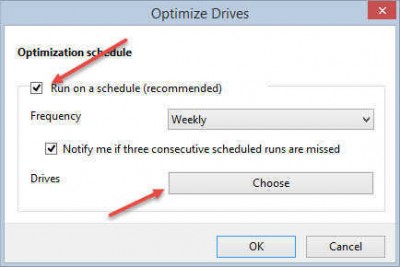
- In the next window, Uncheck the box labelled Run on a schedule
- You can click the Choose Button to mark which drives will be affected
No Indexing!
The Windows Indexing Service was a great idea on mechanical drives. It really helped to speed things up by creating and updating lists of file locations on the drive. Due to the way SSD’s work, this concept has become not only obsolete but damaging. Turn it off:
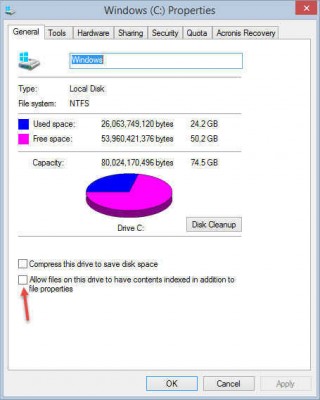
- Open your favorite file manager and Right-Click the SSD and choose Properties in the menu
- Uncheck the box labelled Allow files on this drive to have contents indexed…
- Click OK and wait for Windows to do its thing…
TRIM – Make Sure It Is Enabled!
TRIM is a method whereby your SSD will take full advantage of any free space it has available. TRIM basically allows the operating system to notify the SSD about data blocks that are no longer in use.
Erasing a file on a regular spinner involves a simple erasure of some pointers to a file. The file is actually still there, but Windows can no longer “see” it and presumes that drives space is now free for future use by another file or program.
Incidentally, this is why file un-delete programs can work their magic.
The process on an SSD works differently. When you erase a file, and TRIM is enabled, the “erasure” is postponed and is placed in the SSD controller’s “to do” list. If every erasure was done immediately, this would surely bog the drive down and all it’s speed benefits would be wasted on writes to the drive.
Note: Instead of re-inventing the wheel by explaining once again how to open an Administrator Command Prompt, there are instructions in this article right here on DCT: SFC Fails To Fix Errors – What Now?
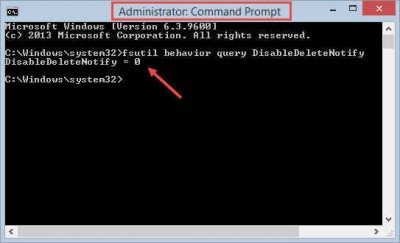
- Open an Administrator Command Prompt
- Type: fsutil behavior query DisableDeleteNotify and hit <Enter>
There are two possible results:
- DisableDeleteNotify = 0
- DisableDeleteNotify = 1
If the result is 0 (zero), then TRIM is enabled; if it is 1 (one), then it is not.
To enable TRIM use the command: fsutil behavior set DisableDeleteNotify 0
Note: If the Command Box coughs up an error, it is most likely a typo. You may not notice a small typing error, but I can guarantee Windows will. Check spacing, too. The devil is in the details.
Don’t Fill Up Your SSD -The 75% Rule
SSD’s work best when they have plenty of free space to work with. SSD controllers utilize a wear-leveling method to ensure the whole drive is being used in an even-handed manner. This prevents certain blocks on the drive to be continually over-written and over-used. It basically balances the write operations over the entire drive which extends its life span.
In order for wear-leveling to function at its best you should keep the free space at or above 25%. Conversely, not more than 75% of the drive should be used at any given time.
Final Words
SSD’s are great. I’ve been using two of them on my system for a couple of years now and I’d never go back to traditional “spinners” except for storage and backup purposes.
As with any new technology, new concepts and ways of thinking are required to maintain them properly and to keep them humming along at peek performance levels for as long as possible.
The above tips will help you do just that,
Richard
—


My win 7 won’t open administrator command prompt.
Gives search results?
cmd says I mees administrator priveledges.
HELP!
Thanks,
GBJim
Hi GBJim,
1. Click the Start Button
2. Go to the Accessories Menu and find the link to the Command Box
3. Right-click the link and choose Run as Administrator
—
Hope this helps,
Richard
I wonder if this advice pertains to SSD Hybrids, like the models offered by Seagate (e.x., ST1000LM014). They are a combo of spinning platter and NAND technology.
Hi MKlafter,
Seagate seems to condone the use of defragmentation programs on their hybrids; that’s just one example.
I think the right thing to do is follow the advice of your Hybrid manufacturer on any specific issue.
They should know, after all,
Richard
Hello Richard,
I have been using PrivaZer for over a year now-it’s been outstanding. I have the doners version. But, just recently, I needed to replace my hard drive on my Dell. I replaced it with Dell’s SSD Racer. I have Windows 7 which incorporates “Trim.” Would it be wise to still use PrivaZer on the SSD drive, or should I leave this to “Trim?”
Thanks for your time.
Hi Dan,
As long as you are not talking about defragmenting the drive, and simply cleaning up a bunch of junk and temporary files, then that’s OK.
TRIM has nothing to do with cleaning up your drive’s file system.
Richard
Great tips in this article sir!! Just got an SSD recently and really like it. I’ll be adding these tips to make it run even better. Thanks!
Hi Keith,
Thanks for the kind words and I’m glad you found it useful.
This article is over a year old now and a few things are a tad outdated.
For example, Windows 8.x and Windows 10 have gotten a lot smarter when it comes to SSDs. Both of those versions now ‘know’ to run a TRIM command instead of performing a true defragmentation operation on the drives.
If you are using those newer Operating Systems, it is now OK to schedule a weekly TRIM (defrag) on your SSDs.
One strange thing I’ve noticed on my system is that Windows 10 does not pay attention to the weekly schedule I have set up. Therefore, as part of my weekly backup routine, I manually run the TRIM command if Windows has been resting on its laurels.
Thanks again for your interest,
Richard
Thank you, Richard. I am learning Windows 10 Development with an MVA course, and emulators in the course kept crashing with out-of-memory errors, which I suspected was exacerbated by having the default small page file. However I was also almost totally out of free space with no room to expand it.
Today, I upgraded my original 128GB SSD to a new 500GB SSD, and my first housekeeping (after cloning) was to research how big I could/should increase my page file. That led me to your tips here, and, with only 4GB RAM and now almost 400GB free SSD, I went ahead and set it to 6144MB min and (with Hyper-V emulation in mind) a 12,288MB max.
I would appreciate any insight you might provide on my thinking; i.e., whether use of Hyper-V for emulators and virtual machines should be considered in setting min/max page file size.
P.S. In case it matters and wasn’t clear, I am doing all of this on a Lenovo Yoga ultrabook runing Windows 10 Pro (upgraded from Home to get Hyper-V for the MVA course). While the course is teaching and testing with emulators that require Hyper-V for mobile app development, I expect I’ll set up any full-scale Virtual Machines on Azure VMs rather than squeezing them onto my machine with Hyper-V.
Hi Walter,
Thank you for your comment and interest.
My only response can be that if you run out of memory, then you have one of two solutions:
1) Increase the amount of RAM on your system
2) Increase the upper limit of your virtual memory
Note: Choice number two will cause your computer to slow down due to disk access times. RAM is still faster than SSD or Flash access times.
Thank you for your comment,
Richard
Since you took the time to give me so much information, I thought I’d add a little bonus.
Hyper-V and VM are basically the same thing, done different ways. Computers are RAM vampires in much the same way that brains love oxygen and blood.
Thanks again for your interest and, given its ancient status in the tech world, I’m happy this article still proved useful to you,
Richard