Microsoft introduced a new feature in Word 2007 named Alignment Tabs, which are reminiscent of WordPerfect’s Relative Tabs feature. Alignment tabs have been retained in Word 2010, so let’s take a quick look.
Alignment tabs can be useful because they readjust automatically if you change your page margins in a manner that alters the location of the left, right and/or center points of your document.
Ok, now you know about them, but where the heck are they???
There is no reference to the Alignment Tabs on your Ribbon or in any of the dialog boxes in MS Word, unless you are working in Headers or Footers.
If you place your cursor in a Header or Footer, you will see a new tab on your Ribbon, called Header & Footer Tools. In the Position group, you will see the Insert Alignment Tab command.
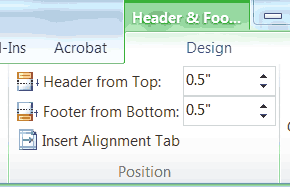
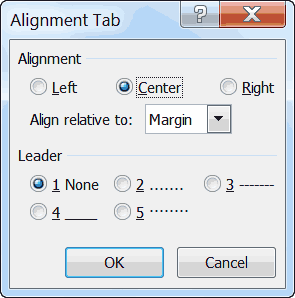
Clicking the command will open a dialog that allows you to set a left, right, or center tab, with or without a leader, in the Header or Footer of your document and align it to either the margin or an indent.
Tabs are a part of paragraph formatting so that means that when you insert an Alignment Tab on one line of your header or footer, the setting will apply to the paragraph your cursor is in only. You can, however, click your Enter key after inserting your Alignment Tab and the setting will carry over to your next paragraph.
Unlike left, right and center tabs built into Headers and Footers, Alignment Tabs do not appear on your Ruler. It is recommended that you remove any pre-existing tabs on your Ruler when you use Alignment Tabs.
The good news is that even though the Alignment Tab command only appears on the Header and Footer Tools tab, you can add it to your QAT or any Custom tab group that you may have created. Follow the steps below to learn how:
- Click into either the header or footer of a document.
- Right-click the Insert Alignment Tab icon and click Add to Quick Access Toolbar, OR
- Right-click your QAT and click Customize the Quick Access Toolbar or Ribbon.
- Change Popular Commands to All Commands.
- Scroll to the Insert Alignment Tab and click the Add button.
- Click OK to save your settings.
In Word 2010, when I click on Insert Alignment Tab, it automatically inserts a right aligned tab. No dialog box pops up to let me make a selection.
Anna,
If you read the article completely, you will see that you must be in the header or footer to see Insert Alignment tab. It should be on the far right of your Ribbon. When you click on it you should get a dialog box where you can select the tab you would like.
I hope this has been helpful to you. If not, please let me know and I will endeavor to help you.
I am sorry you misunderstood my comment. I do see and can click on the Insert Alignment Tab (which appears only when I am in my header or footer), but clicking automatically inserts a right alignment tab and no dialog box pops up.
As a workaround, I have manually added the Center Insert Alignment to my QAT.
Thank Anna—I have now done the same.
Odd thing is, I remember that I used to receive a choice when using the Insert Alignment feature, but it went away some time ago. I had been using pre-built parts for my needs for a while and had not noticed the manual way to insert a center alignment, as described by Brat, had disappeared for me.