 xternal Drive Letters
Easily one of the best devices available today is often taken for granted– the lowly USB thumb drive. We put our portable software on them, our pictures, our music, our all-important backups and just about anything else we can think of.
External drives, too, are incredibly handy to carry with us during our travels and while conducting the business of daily computer-based activities.
When you plug in one of those great thumb drives you don’t always know what letter Windows will assign to it. It may be ‘D’ today and ‘F’ tomorrow. This isn’t much of an issue unless some programs you use depend on a Static Drive Letter every time. Backup programs immediately come to mind.
To learn how to make these changing Drive Letter assignments persistent, read on…
How to Change a Drive Letter in Windows
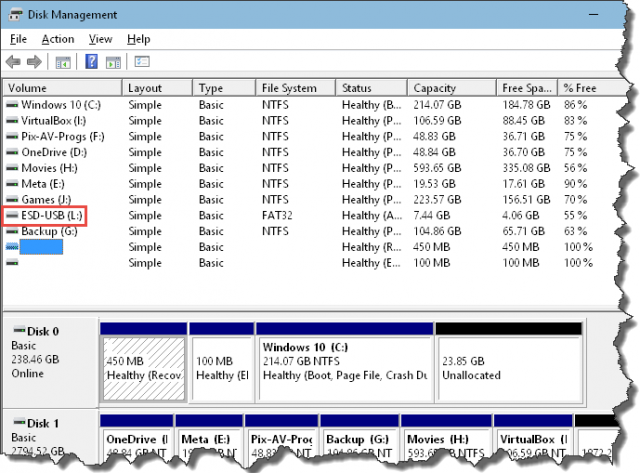
Use the hotkey combination Windows Key + X to open the Power Menu and choose Disk Management from the list.
That should bring you here:
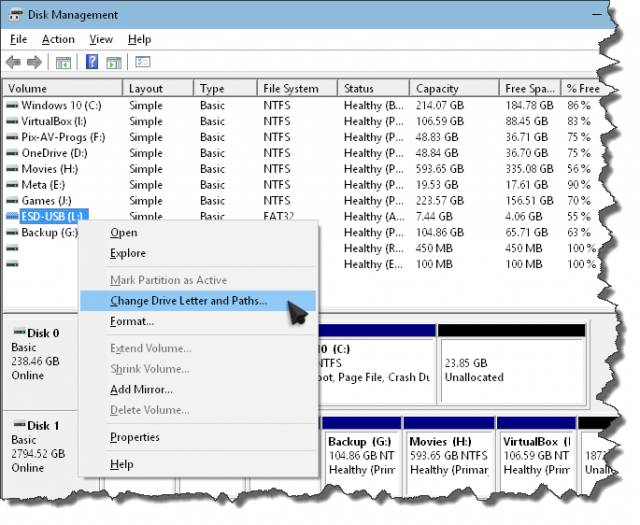
Right-click on the drive you want to change and choose Change Drive Letter and Paths… from the Context Menu that opens
Note: Changing your Internal Drive letters can really muck things up. Windows will be looking for software in particular locations. If they can’t be found, they will no longer work.
You should now see this:
Click the Change button to get here:
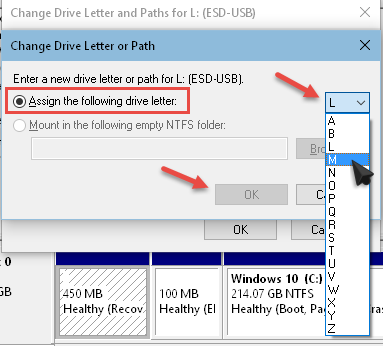
- Be sure Assign the following driver letter is selected
- On the right, use the Drop-down menu to select a new Drive Letter
- Click OK when you are happy with your choice
Windows will probably spit up a warning about how changing drive letters can really muck things up, but I already told you that, so just click OK or Yes or whatever it wants you to click in order to keep moving forward. Remember– internal drive letters are no-no’s.
Note: Drive letters ‘A’ and ‘B’ are expected by both Windows and many other programs to be Floppy Disk Drives and will be treated as such. You remember those, don’t you? It is advisable to choose a drive letter from ‘M’ through ‘Z’. Sometimes drives are hidden and this will help to avoid confusion within the system.
A Sense of Persistence, at Last
From now on, when you insert that particular USB stick, or plug in that particular external drive, it should be recognized with its new drive letter intact.
As always, if you have suggestions or comments, please let us know,
Richard
—


There are programs which will make Windows remember a specific drive letter for a specific drive, even after it’s been removed for some time (the downside is that the particular ‘reserved’ letter will no longer be available for other connected devices from then on); the one I use is “USB Safely Remove” (with a ‘heavier’ version as “Zentimo”).