
Microsoft’s OneDrive is a cloud-based service that can be used to store files for safekeeping. I use it as an off-site backup for some files that I wouldn’t want to lose in the event of fire, tornado, or some other “Act of God” (or a not-so-God-like thief). Since most of these tips are short and sweet, today’s Quick Tips article will share three of them with you.
Preliminaries
If OneDrive is not running on your computer, and you decide that you would like to try it out, then you will have to run it from the Start Menu and follow along with the instructions it gives you to set up your OneDrive account. This can be done with your existing Microsoft Username and Password.
There are basically two flavors of OneDrive: the free version, and the paid version. As with most if not all cloud storage systems, they come with a small gratis amount of storage space for you to use. If you want more storage space, then you have to pay for it. You might notice in some of the following images that I have 40GB of space available to me. That is because over the years I took advantage of several promotions that OneDrive offered and have since been grandfathered in. Normally, OneDrive offers 5GB of free storage to begin with unless that has changed since I last looked.
We’re no longer planning to offer unlimited storage to Office 365 Home, Personal, or University subscribers. Starting now, those subscriptions will include 1 TB of OneDrive storage
100 GB and 200 GB paid plans are going away as an option for new users and will be replaced with a 50 GB plan for $1.99 per month in early 2016
Free OneDrive storage will decrease from 15 GB to 5 GB for all users, current and new. The 15 GB camera roll storage bonus will also be discontinued. These changes will start rolling out in early 2016
Note: Things may have changed since that article was published in 2015.
Enable/Disable OneDrive Starting With Windows
I use OneDrive once a week to mirror some files to the Cloud. I don’t need it constantly running in the background all week long so it is set to not start running when Windows starts. It gets started manually on Saturdays for that purpose. When it’s done, I turn the thing right off again.
- Right-click on the OneDrive icon in the System Tray
- In the Context menu that opens, choose Settings
- In the window that opens, make sure the Settings tab is selected
That should bring you here:
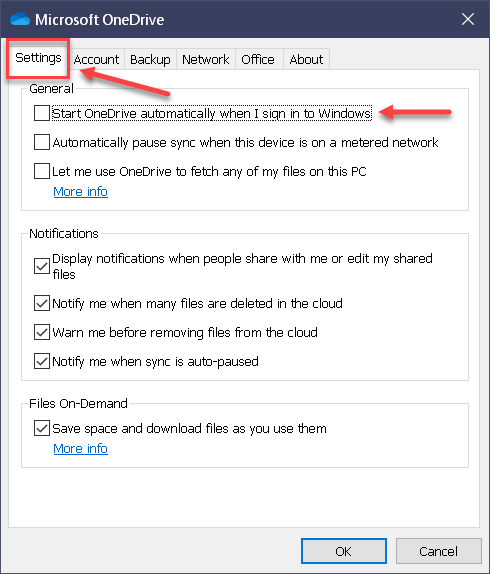
Check or Uncheck the indicated box to satisfy your desires.
Choose Folders To Sync In OneDrive
- Right-click on the OneDrive icon in the System Tray
- In the Context menu that opens, choose Settings
- In the window that opens, make sure the Account tab is selected
- Click the Choose folders button
That should bring you here:
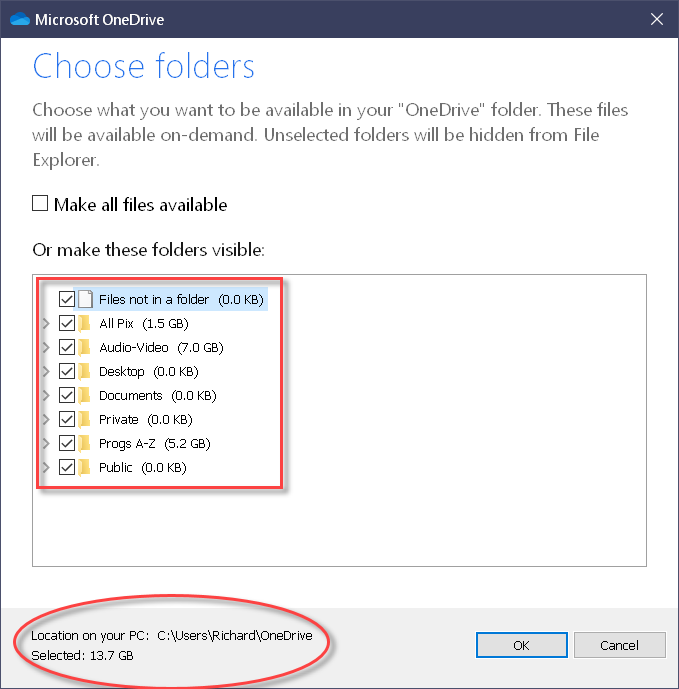
Normally, OneDrive will have the Library folders in this list. I don’t use those Libraries so I removed them from the OneDrive folder. I then copied over the folders that I do want there including the ones where I store pictures, audio-video files, program installers, and so on.
Note: I honestly don’t understand that checkbox labeled Files not in a folder. I’ve never tampered with it. If somebody out there knows how that works and/or what it’s referring to, then please enlighten me.
At the bottom of this window is displayed the current folder where OneDrive is located (you can change that if you want) and how much space is being used.
Tip: If you don’t remember how much space OneDrive is allotting you, you can once again right-click the OneDrive icon in the System Tray, and choose View online. This will open your online (in the Cloud) OneDrive in your default web browser. That page will tell you how much space you have left, too. Knowing one without the other isn’t very useful.
OneDrive “On-Demand” To Save Disk Space
The whole point of mirroring these files somewhere other than on my computer is defeated by the fact that OneDrive, by default, keeps a copy of those files in its OneDrive folder on your PC. This means that the files are not only in their original locations but are also copied to the OneDrive folder and there is also another copy of those files on the OneDrive servers (in the Cloud).
Using “On-Demand” is a way of keeping only pointers to those original files in the OneDrive folder thereby possibly saving mountains of local drive space. If you don’t need instant access to these files, then On-Demand is the way to go. You will still have access to them but they will need to be downloaded first, something OneDrive will do automatically, hence the name, “On-Demand”.
- Right-click on the OneDrive icon in the System Tray
- In the Context menu that opens, choose Settings
- In the window that opens, make sure the Settings tab is selected
That should bring you here:
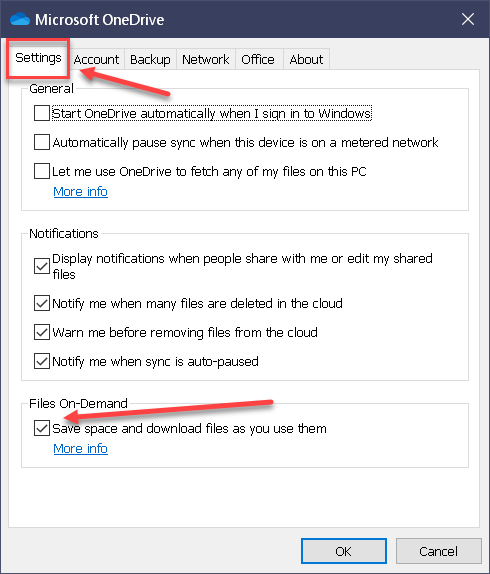
Check or Uncheck the indicated box. Checking it will only keep pointers to your files and not the whole kit and caboodle.
As always, if you have any helpful suggestions, comments or questions, please share them with us,
Richard
—
Cannot open systray. cannot open onedrive settings. Using Win10 Home.
Hi George,
I don’t recall ever having to open the System Tray. Maybe I am misunderstanding you.
If OneDrive is not in your Start Menu, you will have to install it.
Richard
Hello
I have One Drive and 5GB with 546mb used up. I can only save files to the Cloud by going to the One Drive icon on the desktop and clicking View online. This lets me save to the Cloud.
My query is that I have an ‘X’ before One Drive. Can you kindly advise me on this and what I should do about it?
Many thanks
Anthony Dundon
Hi Anthony,
I will need to know where this ‘X’ is showing up. A little screenshot would be helpful,
Richard
June 7, 2020
Hello Richard
Many thanks for your swift reply. I cannot attach a screen shot. Please can you advise.
Best
Anthony Dundon
If you do not have the option to inline a screenshot, then maybe you could provide a link to it on OneDrive, or GDrive, or DropBox, or any other Cloud service you prefer?
You could also take this to the Forum which might be a better place to continue this discussion.
Thank you,
Richard
Dear Richard
Many thanks. I am adding a link (Dropbox) that I hope will help to show where the ‘x’ in One Drive.
Anthony E Dundon
https://previews.dropbox.com/p/thumb/AA37mssMa_wpP-yFxBGhCHtyjXM_dELeBQ4fhVudyGrbzQyKTIwNEuaRZrCVnmfeGj4WtaOJTDzskq0QjYWjilxiFnF5QElU_qog_Af15VTHJqtnnUHqu3XQVFXs0VhKgl1Hm_HnCq7ZvbPP7QPCZF7Vu7d1xTxIgjQQL9FwCDDocrrJkNza9UpOHaxe0UiHoZDdsM97GDD9lBh7RxfVyKfZKVrBiImCcqxEvrr2qWt_yIZAACP_0ntdiSWQWY0Ux6VHh-PJTojjJuyT854j015ezcGDDo43EzFs954pfPH5_8AJGcISlaxKaGXqtjiJQ1JwZ-Z-FAJOJt7e5bjxw1BiwXPLmKAQidgZE-7XOiwBzw/p.png?fv_content=true&size_mode=5
The link you provided gives me a 401 error. Be sure to put the image in a Public/shared folder on DropBox. You may have to set one up, or DropBox might already provide one for you– I don’t know.
Check out this DCT article for more information: How To Share Large Files with DropBox.