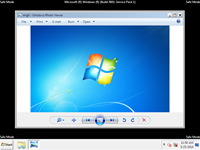
Classic Photo Viewer
Windows 10, by default, uses the new Photos App to view images. I don’t like it as well as the old desktop Photo Viewer that came bundled with older versions of Windows. The main reasons are twofold: it’s faster, and it uses less memory than the new version (read: App). I like the interface better, too. (Truth be told, in most cases I prefer the desktop programs and utilities to their UWP counterparts.) Forcing Windows 10 to use the legacy desktop version is not necessarily a straightforward task, but it can be done and this week’s Quick Tips article will show you how.
Two Methods
If you have upgraded your Windows 10 version from an older version, such as Windows 7, then the Photo Viewer is readily available to you and you won’t have to jump through too many hoops to use it as your default image viewing program. If you have a “clean installation” of Windows 10, then you will have to make some Registry changes to “fix” this problem.
Method 1
To find out if the desktop version of Photo Viewer is available to you, follow these simple steps:
- Right-click on an image (either .png, or .jpg)
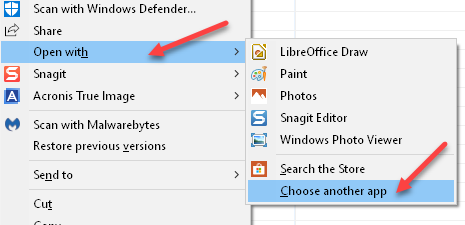
- In the Context Menu that opens, choose Open with, and look for Windows Photo Viewer
- If you don’t see it listed, select Choose another app
Note: In the above image, Windows Photo Viewer is in the list because I have already set this up on my system.
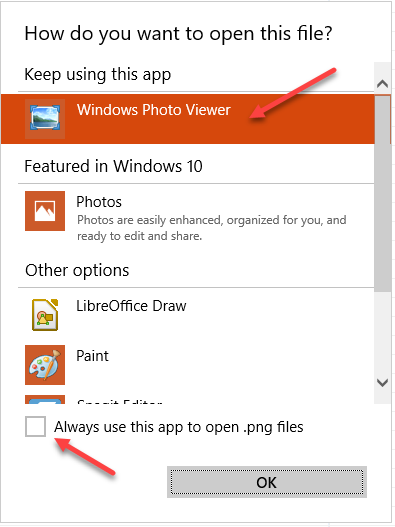
If it is in this list, then you can choose to use it to open your image files. To make it the default you must check the indicated box labeled, Always use this app to open .xxx files. Click OK, and you’re done.
Note: In the above image you will notice that it specifies .png files. Your results will vary depending on which format your chosen image is using.
If you still don’t see it, then you will have to use the following Method to get it to work for you:
Method 2
[message type=”warning”]
Standard Registry Editing Warning:
The following instructions will ask you to edit your Windows Registry. Be sure to make a backup of your Registry before you make any changes. Making mistakes in the Registry can cause hard-to-diagnose problems, or even keep Windows from functioning properly. If you don’t know how to back up your Registry, please read Windows Quick Tips – Backup/Restore Registry.
[/message]
Despite the above warning, I want to iterate that you should make a backup of your Registry before proceeding.
You may decide to enter these changes manually, but I strongly advise against it. This is a complicated change and it would be far too easy to make mistakes. Edwin, over at Windows TenForums, has posted the instructions to create a .reg file to automate the process for you.
If you prefer, I have already provided a download right here that you can use. Simply click this beautiful download button to get it:
Once you have downloaded this tiny 560-byte file, unZIP it, and click (or double-click) on the extracted photo.reg file. This will merge the file with your Registry. Windows will warn you with a familiar confirmation message which you should accept.
This won’t take but a second to complete, but you will have to restart your computer for the changes to take effect.
Other Things
Keep in mind that you always have other choices like using third-party software. There are many very good free ones to choose from. The only downside, from my perspective, is that they are generally overkill if all you want to do is quickly look at an image and maybe get a few details about it like dimensions and other meta-data.
For more in-depth solutions, you can check out a couple reviews by Martin Brinkmann at IrfanView, and FastStone Image Viewer. Thank you to Martin for his helpful articles and for a lot of the information included in this post.
As always, if you have any helpful suggestions, comments or questions, please share them with us,
Richard
—


Or Richard, you could use the best third party utility IrfanView
Mindblower! 🙂
Hi MB,
Or, MB, you could read the post, and see that I included a link to that very thing… if you need that sort of thing…
Thank you very much,
Richard
Extremely sorry for my error Richard. Cannot believe I missed those two links. Thanks for sharing and I should know better that you cover all the bases in your articles, Mindblower!
No apologies needed… 🙂 I miss stuff all the time.
Very useful post indeed – I absolutely hated the new image viewer and whilst I have other good photo software it is nice to have this simple viewer again
I’m glad you found it helpful. Thanks!
Hi Richard
I downloaded your registry hack, installed it, and checked the box to only use Windows Photo Viewer. Now my photos open with WPV instead of the W10 photo app. Thanks!!!!
You’re welcome! Pretty slick, huh…
My preference is still the old Microsoft Office Picture Manager. None of the others really work well for me. Is there a way to get that back? I somehow have it on my old Windows 10 computer but not my new one.
Hi Tony,
I’m sorry, but I don’t know a single thing about MS Office. Never owned it. Haven’t used it.
Maybe one of our readers can help you with that? Or you could try hunting on your favorite search engine?
I did that, and here is what I found:
How to Install and Get “Microsoft Office Picture Manager” Back in Office 2013 and 2016
Hope this helps,
Richard
Thanks for doing the research for me. Excuse my laziness!!
Now I understand the difference between my two Windows 10 situations. The old laptop was running Office 2010, while the new one runs Office 2016.
No problem, Tony. Glad I could help.