A Snappier Windows 10
 Does your Windows 10 computer seem a little sluggish? Does it take a long time to boot up and hit the desktop? Do the menu systems seem to respond poorly? Here are some ways to help infuse new life into an older Personal Computer. These tips may also help your older Laptop, as well.
None of the following hints will turn your machine into a state-of-the-art gaming rig, but each one will add a little pizzazz in its own way, especially on older systems already being taxed by modern operating systems and software. The old adage, “Intel giveth, and Microsoft taketh away”, still holds true. And it isn’t only Microsoft doing the “taketh-ing”; most modern software packages demand tremendous amounts of CPU resources.
People tend to forget that their poor CPU has to handle not only the software you are currently running, but must also deal with countless background tasks, each and every second. If we can eliminate one of those chores, it benefits the whole system, if only just a little bit.
All those little bits add up, though, so here are a few things you can do:
Transparency
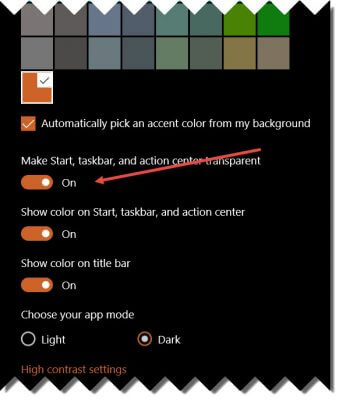
Windows 10 offers an option to turn on transparency for your Start Menu, Task Bar, and Action Center. Transparency may look sexy but it does take up a slight bit of computing power.
- Type the WinKey + I Hotkey combination to open Settings
- Choose Personalization
- Choose Colors
- Uncheck the box labeled Make Start, Taskbar, and action center transparent
Bare-bones Menu System
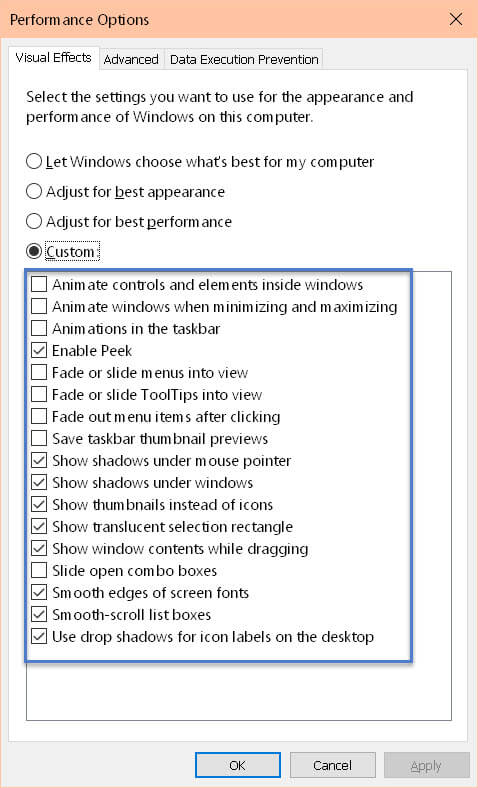
To take things a bit further, how about disabling all those sliding lists, drop-down menus, and other animations. Again, they may look “cool” but they all make your highly tasked CPU’s life a bit more difficult.
- Type the WinKey + X Hotkey combination to bring up the Power Menu
- Choose System
- In the left panel, choose Advanced system settings
- Click the Advanced Tab
- Under Performance, click the Settings Button
- Uncheck all the boxes for Fading, Animations and Sliding. Another option is get rid of all the eye-candy by clicking the Radio Button labeled Adjust for best performance
- Click OK when you are satisfied with your choices
Start-Up Programs
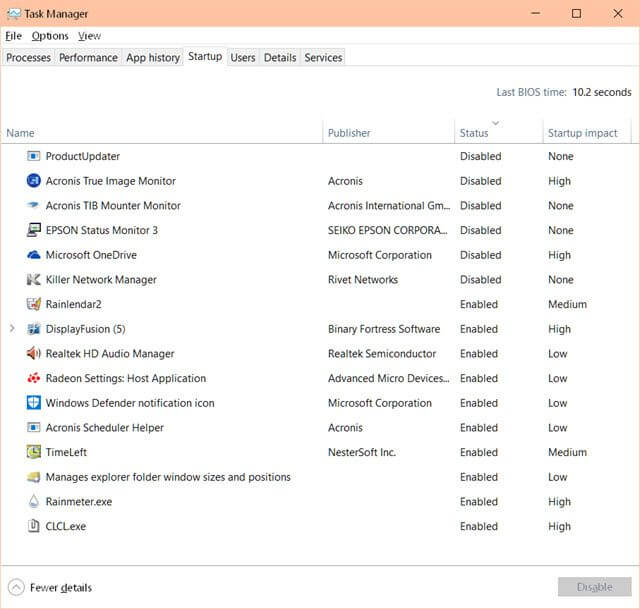
Boot-up times are hugely effected by start-up programs. Go through the list of start-Up programs and disable every single one you don’t need running when you start your computer. This can greatly speed up you Power Button to Usable-Desktop time.
- Type the CTL + SHIFT + ESC Hotkey combination to bring up the Task Manager
- Click the Startup Tab
- Click on each item in the list that you don’t need running at boot time, then click the Disable Button
- Re-boot the computer for these changes to take effect
As an example, I use OneDrive for backup purposes once a week. I don’t need it running in the background 24/7, wasting bandwidth and CPU resources all week long. What a waste. It also has a high boot-time penalty which unnecessarily slows things down, so I keep it disabled until I need it.
Boot Time-Out Settings
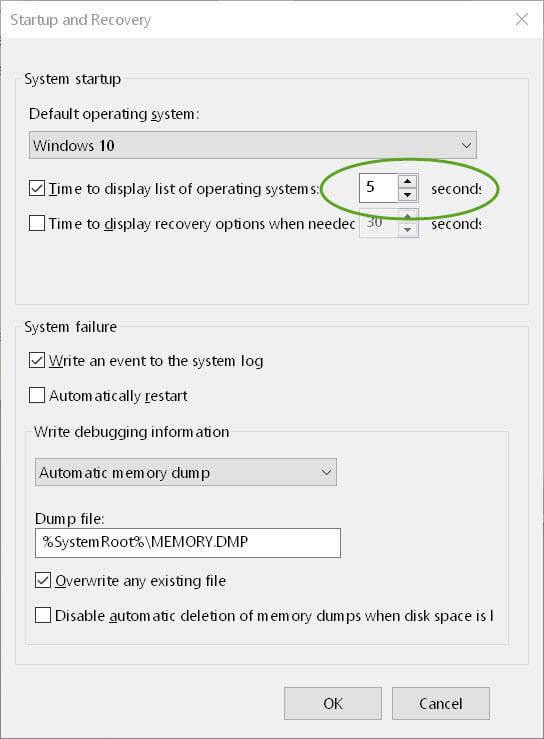
At boot time, Windows 10 waits for a time (30 seconds is the default) before proceeding. This delay is to give you time to choose a different operating system if you have set up a multi-boot system. If you are running only a single default system, then there is no real need to wait 30 seconds for nothing.
- Type the WinKey + X Hotkey combination to bring up the Power Menu
- Choose System
- In the left panel, choose Advanced system settings
- Click the Advanced Tab
- Under Startup and Recovery, click the Settings Button
- Change the Time to display list of operating systems Spinner to the number of seconds you would like
Bonus Tip
 Re-start your PC. Yes, yes, I know. If you’ve ever called Tech Support anywhere on the planet, they always tell you to re-boot your computer. There is actually a pretty good reason for this. It will clear out your used memory, and stop unused processes; it basically gives you a clean slate to work with.
None of the above suggestions taken singly will likely give you much of a speed gain. However, when combined, you should notice a snappier, more responsive system.
Let me know how it goes for you,
Richard
—


Richard,
I think these are good tips and I am going to try some of your suggestions on my weaker Windows 10 computers.
Black Viper (http://www.blackviper.com/) has a nice breakdown of trimming your services that run in the background of windows to help free up resources.
Hi Robert,
As you point out, older weaker systems are what this article aims at.
Black Viper is one of those go-to sites if you want to tweak your Windows Services. I’ve followed his suggestions for years. He puts a lot of time into his posts and I believe he knows what he’s doing. My only doubt is how much difference it truly makes in the modern-day world. There was a time when it did matter. A lot! Computers these days are really fast and shouldn’t, and don’t, have a problem doing a bunch of stuff all at once.
I doubt you’ll ever see a true, real-world speed increase by turning these services off and probably no more than you will by doing a lot of the stuff suggested in this article. It’s artificial. Sometimes, perception is all that matters. If it feels faster, that’s good enough for me regardless of the reasons.
The exception would be on older systems (which you point out) and in that case, it all should apply,
Richard
Hello Richard,
I have an older system, purchased on January 1, 2007, from Dell, and now running Windows 10. Still trying to nurse a few more miles out of it. The CPU is always overloaded, so your tips are most welcome. I just tried all of them. They were absolutely clear and easy to follow. No problems and they seem to help. Should add a few more years to the life of the old CPU.
Many thanks!
Jack
Hello Jack,
Glad it helped and thanks for the kind words,
Richard