![]() By default Word can – and does – impose certain changes to your text. One example is that Word will add borders to the paragraphs in your document based on what you key in. Let’s say, for example, you key in three underlines on a new line and click on Enter. Bingo! you get a solid line that will extend the entire width of your document!
By default Word can – and does – impose certain changes to your text. One example is that Word will add borders to the paragraphs in your document based on what you key in. Let’s say, for example, you key in three underlines on a new line and click on Enter. Bingo! you get a solid line that will extend the entire width of your document!
And these are not the only three characters that result in unforeseen changes although that is the one that I get most complaints and queries about. I wish I had a nickle for every person who wrote to me about a rogue line in their document that they could not get rid of no matter what they did. So forewarned is forearmed.
Below, you will learn how this feature in Word works. Follow along if you like:
- Display the File tab of your Ribbon and click Options to display the Word Options dialog box.
- Click Proofing on the left-hand side.
- Click on AutoCorrect Options to display the dialog box.
- Be certain the AutoFormat As You Type tab is selected.
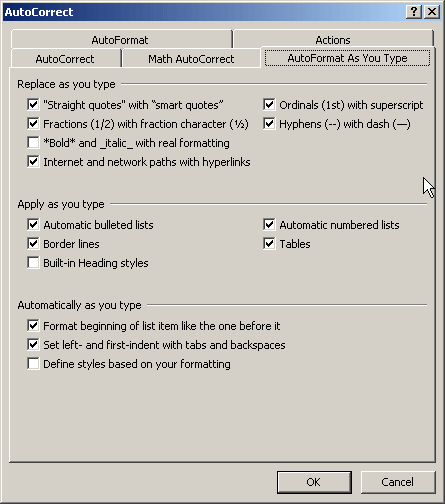
- Take a look at the Border Lines check box. If it is cleared, Word will not automatically create lines in your document. If it is selected, Word will give you lines. So if you do not want lines make sure that it is cleared.
- Close the dialog boxes.
So, now that you have a clearer understanding of how these lines show up in your document, I am sure you would like to know how to get rid of them!
If you accidentally key in those three underlines and see the line appear in your document, the fix is very simple: as with any AutoFormat in Word, you can undo the change by clicking CTRL + Z.
But suppose you want to remove the line at another time? Well there are two ways to accomplish this.
First, remember that it is not really a line, but a paragraph border – two entirely different things.
Secondly, you should display your non-printing characters, which I advise all students to do all the time so that they can see what is actually going on in their documents.
Ok, you are now ready to get rid of your lines:
Position your cursor at the beginning of the paragraph that has the border and click CTRL + Q. This will reset your paragraph’s formatting back to its default, which normally does not include a border.
If this step does not do what you expected, you can always select the entire paragraph and simply delete it.
Now here is another little doozie with this “feature” – they can affect multiple paragraphs.
Follow along:
On a blank line in your document, key in three underscores and hit Enter. This will give you the dreaded line, which as stated above, is actually a paragraph border.
Click you Up arrow one time. This should place your cursor at the beginning of the paragraph that now has the “line.”
Click Enter twice. It now appears as if you have moved the line down two lines, since your cursor is still at the beginning of the paragraph that has the “line:.
Click CTRL + Q. The “line” does not disappear but, instead, moves up a line.
Here is the explanation for this behavior:
Since the “line” is actually a paragraph border, it appears at the bottom of the last paragraph that has that formatting applied. When you clicked Enter two times, you ended up; with three paragraphs, each formatted with a border underneath. Word, however, only displays the border of the last paragraph formatted with that border, even though all three have it because Word sees the border as one that appears under the group of like-formatted paragraphs instead of one that appears under each paragraph.
When you clicked on CTRL + Q, the border was removed from the last of the three paragraphs but remained with the other two, making it appear that it had moved up a line.
To get rid of the border on ALL the paragraphs, you will have to select all the paragraphs and click CTRL + Q. If, however, you do not want to do this because you have other formatting you do not want to lose, follow the steps below:
- Click on CTRL + A to select all paragraphs in your document.
- Display the Home tab of your Ribbon.
- In the Borders group, click the down-arrow next to the Borders tool and then click Borders and Shading to display the dialog box.
- Be certain the Borders tab is selected.
- Click on the None setting.

- Click on OK.
Generally speaking the steps above will remove all borders from all paragraphs and tables in your document. If there are some borders you would like to retain in your document, then, in step one, select only those paragraphs that have borders you would like to remove.
Dave,
Why make a mountain out of a molehill? You can have your cake and eat it too. Keep it on automatic. If you want it, you’ve got it. If you don’t want it, after you’ve put in your lines, dashes, whatever just add a space and then press . The space prevents Word from drawing that automatic line. It’s just that easy.
There is a much simpler way to avoid the automatic line draw. After you have entered your dashes or whatever else you want to enter, press the space bar – once is enough – and then press . The space makes word “think” that this is a complete sequence of characters and no automatic line, etc., will be drawn.
Thanks for your input Gerald. Saving time and keystrokes is always a priority. Now everyone knows why these lines occur and how to quickly get rid of them as well!
I was going absolutely crazy. THANK YOU!!!