I remember the days when I would turn on my computer and go make a pot of coffee. When the coffee was done, I would take a cup back to my desk and maybe it was ready for me to sign in. Then computers got faster and Windows got better. Memory was in the gigabytes instead of megabytes. Hard disk space increased to 500 GB or more. Processor chips became multi-core. Everything was faster, even signing in. Now, that faster computer I have been using for years seems so slow.
One simple way to speed up things is to get rid of that slow mechanical hard disk drive. The price of an Solid State Drive (SSD) has dropped to the point that you can pick up a 500 GB one for under one hundred dollars. Switching is not hard to do and the steps outlined below will make it an easy transition.
The end result will be faster boot times and improved speed — kinda like putting a jet engine on a turtle — you will notice the difference. However, if your computer is a desktop with IDE drives you may not be able to make the switch. The new SSD will be SATA. Even if the old desktop has a SATA drive, you also may need a special mounting bracket to allow the 2.5” drive to fit in a 3.5” slot. I found one on Amazon.
EaseUS Todo Free Backup And Cable
I decided to use the EaseUS Todo Free backup program to clone the internal drive on my laptop. It is a simple process. The speed of the process is dependent on the USB speed and the amount of information on the internal hard drive. If you do not have EaseUS, you can download it from their website.
I used a SATA to USB 3.0 Cable to connect my SSD. I found one on Amazon for less than ten dollars. With this cable I can take any size SATA drive and connect it to my computer just like I do USB flash drives.
After installing EaseUS, Locate its icon on your desktop and run it.
If the capacity of the new SSD is less than the original hard disk, EaseUS will use the new drive as long as the original files will fit. I went from a 500 GB hard disk to a 240 GB SSD. The computer was only using about 90 GB of that 500 GB drive. The restore went fine. Had the new drive been larger than the old one, then the new one would have been partitioned by EaseUS to the original size. For example, had I been going from that 500 GB drive to a 1 TB one, it would have made a 500 GB partition and left 500 GB unallocated.
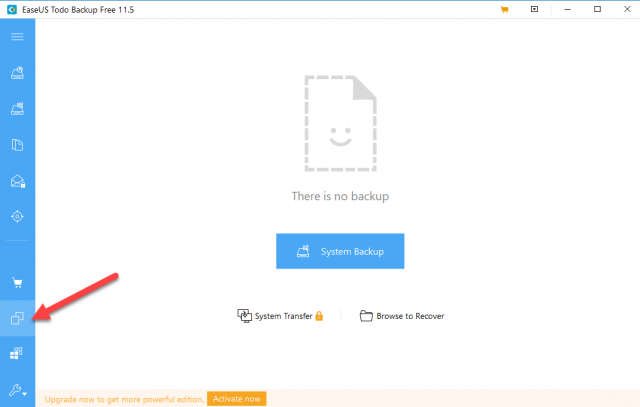
At the EaseUS main screen, click the Clone icon in the left bar.
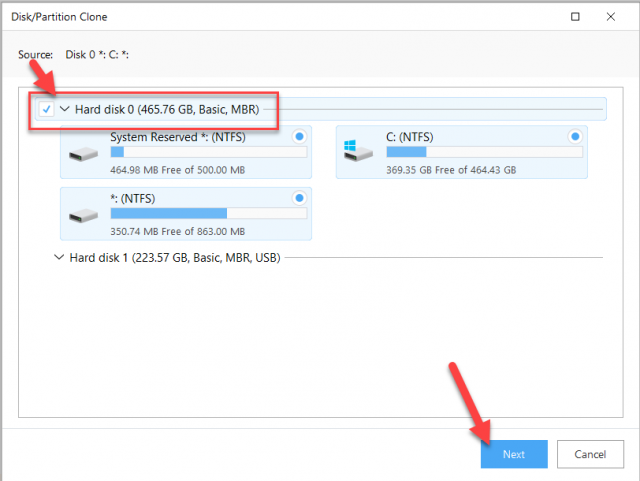
Choose the Source drive by clicking to place a check mark next to the Hard disk 0 (zero) description, then click Next.
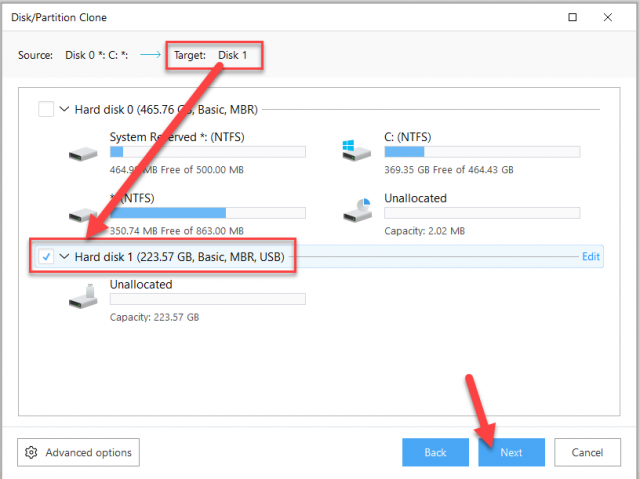
Select the Target Hard disk 1 (one) by placing a check mark in the box, then click Next.
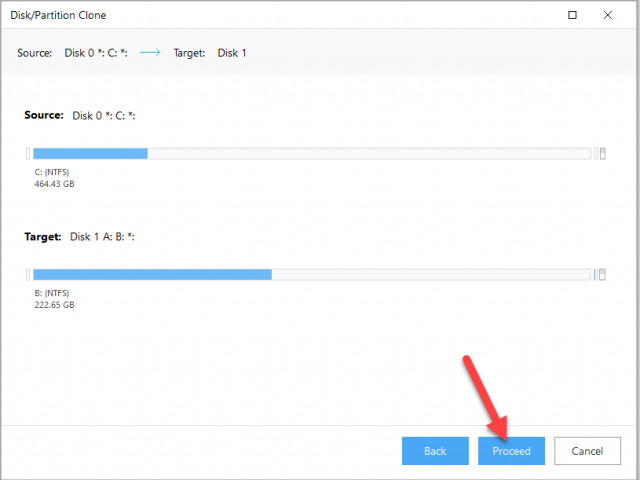
Confirm that you have selected the correct source and target drives, then click Proceed.
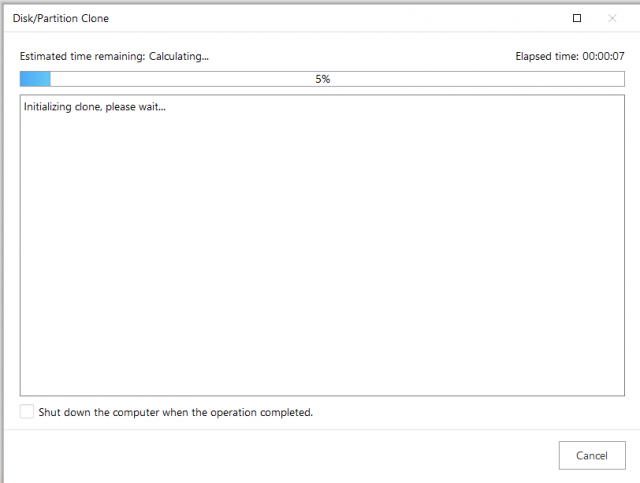
The cloning process begins. An estimate of the time remaining is displayed above a progress bar. My clone process took a little over one hour. Yours will depend on the speed of your disk drives, processor, and most of all how much is on your internal hard drive.
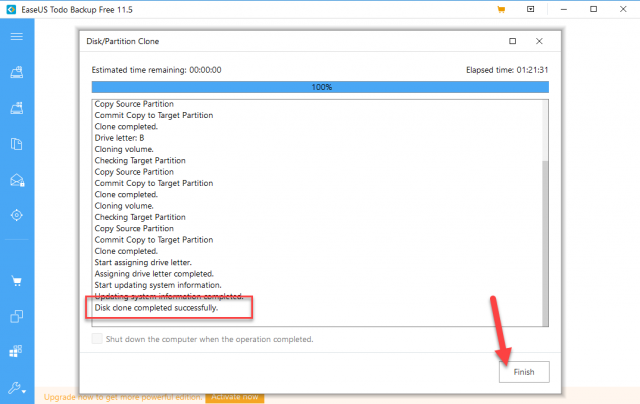
When successfully cloned, click Finish to end the process. Then Exit the EaseUS program and shut down the computer.
At this point, it is time to remove the original drive and replace it with the cloned SSD.
Swapping Drives
Laptops
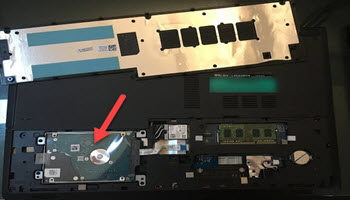
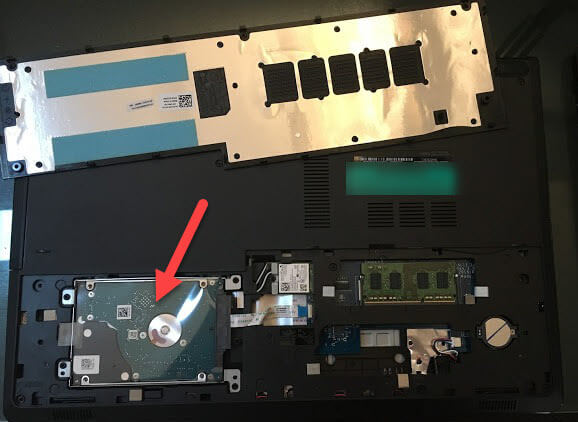
Each laptop computer is different in how the drive comes out. Some, like mine, have a panel on the backside that easily comes off with a couple of screws. Others need the entire back to come off and this might mean removing a dozen or more screws. Safely place the screws where they will not be lost. You will need them to put everything back together.
For detail instructions I suggest searching for, “hard drive removal xxxxx YouTube” with your computer manufacturer and model number instead of xxxxx, probably located on the back side or under the laptop battery. I suggest taking pictures of screw placement and any other items you may have to remove. Pictures are invaluable when reassembling.
Carefully remove the old drive and replace it with the cloned SSD.
Desktops
If yours is a desktop, remove one of the side panels to expose the hard drive. Remove it from the mounting bracket. Install the SSD on a 2.5″ to 5.25″ mounting bracket and install it where the old hard drive was located. Pictures are helpful here also.
Once the SSD is installed, turn the computer on and it will boot from the SSD. Keep the old drive for a backup and after you feel comfortable the cloning went well, using the SATA to USB cable, use the original drive as an external for backups.
Dick
—

Hi Dick, thank you for helping me cloning my program of my LT with your Sata USB cable, today I did install my SSD unit in my LT and it does work just perfect, what a difference ! I hope it will work in a colder state also !LOL
Have a safe trip, Harold. Glad I could help…
I upgraded my Acer desktop with a SSD but it actually slowed it down. Then using the same drive, I put it in an old Acer Aspire 5315 where there was a noticeable speed improvement, of course I’m use to living in the Twilight Zone. 🙂 Otherwise I use Macrium Reflect for backup/cloning.
I can’t imagine why the desktop slowed done… I tried Macrium and it would not clone to a smaller size drive. EasyUS didn’t even ask, it just did it.
I found your article on the SSD interesting. However, I was hoping that it would also deal with how to handle Microsoft when Windows 10 recognizes that your equipment had changed, and then determines that your license is no longer valid, or whatever happens in that situation.
Your original installation was digitally entitled when your installed Windows 10. Changing hardware, unless it is a motherboard, does not matter. 10 recognizes the digital entitlement. Older Operating Systems did not do this and a phone call to Microsft was necessary to explain the upgrade.
Hi Dick, SSD still humming in the snow country as good as every, really works well, thanks a lot! Was a long ride 1500 miles north, Greetings today at 46°F HB
Glad you are safe in the north country… and that the SSD install was a success