Microsoft recently introduced a new method of authentication (known as OAuth) for users who are accessing Outlook.com/Hotmail accounts via third-party applications.
Microsoft is in the process of deprecating all standard methods of authentication, including passwords and app passwords, and OAuth will eventually (by 16th September 2024) become the only accepted method for signing into these accounts via third-party apps.
- For more information please read: Microsoft Enforces New Email Authentication Method
MailWasher & OAuth
MailWasher is an email and spam manager for Windows that’s available either in a free version (limited to a single email account) or Pro version which handles unlimited email accounts and includes other additional features. It’s one of my must-have and most often recommended programs: MailWasher Feature Comparison Chart
In this guide I’ll show you how to set up OAuth in MailWasher:
Setting Up OAuth In MailWasher
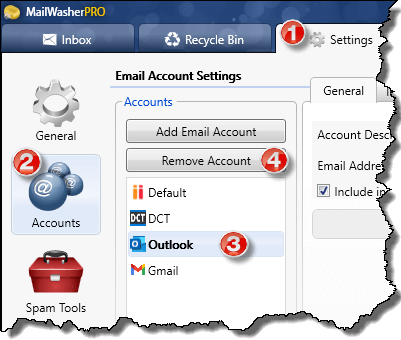
- First off you need to delete the old Outlook.com/Hotmail account
- In MailWasher go to Settings > Accounts, highlight the appropriate account, and then click the Remove Account button:
- Now click the Add Email Account button
- Under the “General” tab, type in an account description – something that identifies the account for you, such as Outlook or Hotmail and then type in the email address
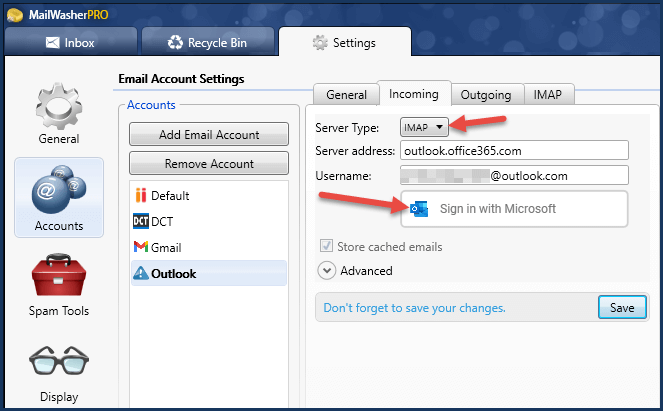
- Open the “Incoming” tab and make sure the Server Type is set to IMAP
- Now click the Sign in with Microsoft button
- Follow the prompts to sign into your account
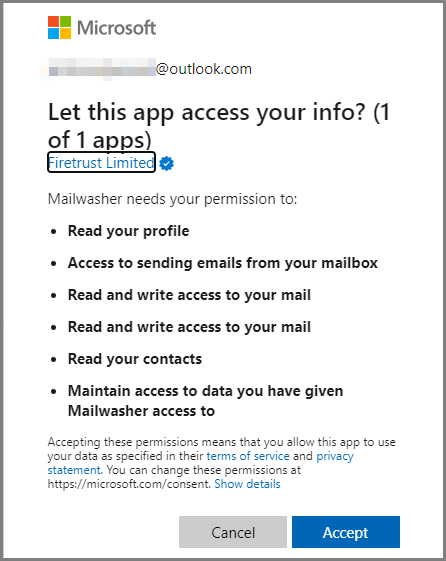
- Once signed in you should receive a “permissions” form. Click Accept
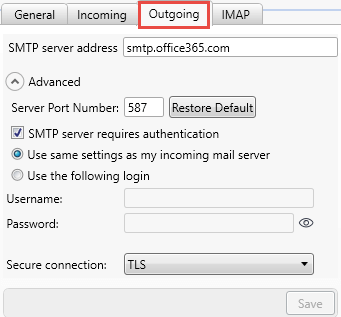
- Now click the Save button to save your settings and it will auto-move to the “Outgoing” tab which should be automatically populated
- Lastly, on to the “IMAP” tab where you can choose which folders MailWasher will check for spam – this will usually be set to only the Inbox by default
- You also might like: How To Add Other Email Accounts To Outllok.com
One final note: Whenever changing MailWasher’s settings, remember to click that Save button when finished, otherwise your changes won’t stick.
—
Thanks for the clear instructions Jim. Corrected my Outgoing Secure Connection from the default of None to TLS, Mindblower!
Magic and a very grateful thank you. Mailwasher Pro has been driving me nuts over the last month or so. The ‘Check Mail’ scan would error out, then an hour later it would work perfectly without changing any settings. Will be interesting to see, over the next week or so, if setting up the authorisation to ‘OAuth’ solves the problem.
You are most welcome Frank. And I’m pretty certain that setting up OAuth will fix those “Check Mail” issues.
Update – Two weeks after implementing your OAuth fix Mailwasher Pro has been working great, and hasn’t missed a beat. Thanks again Jim.
Leave it to MS to make things as complicated as possible. Thank you for the step by step instructions.
I am using Mail Washer Free. When I attempted to follow the instructions in setting up my Outlook account, there is no option to sign in to Microsoft. The About button says I am using the current version of MW. What am I missing?
Hey Dave,
It’s difficult to say what the problem might be, and I’m not sure if OAuth is supported in the free version or not, although I believe it would be.
All I can suggest is that you make sure the “Server Type” is set to IMAP. If the Server Type is set to POP rather than IMAP you won’t see the option to “Sign in with Microsoft”.
Sorry I can’t be of more help.