When we install certain programs they will automatically set themselves as the default application to open all associated files, as part of the installation process. Some typical examples are; a media player for opening video and audio files, a word processor or PDF reader for opening documents and an image viewer for opening digital images.
When we use portable software however, because there is no installation process, the file associations are not set automatically and we must often perform that task ourselves, manually.
Now, it’s not too difficult to do that but, as with most things, it can be daunting if one doesn’t know how. I am going to show you how to set portable software as the default application; for the purpose of this exercise I’ve selected a portable PDF reader in Windows 7, but the principle is the same (or very similar) regardless of function or operating system.
Extracting a portable application
Almost all portable applications with come down in a zipped (or compressed) folder and the first thing we need to do is extract the contents: Simply double click on the zipped folder to start Windows Extraction Wizard and then click on Extract all files:


Select a suitable location for the extracted files; the location of the original zipped folder will be set by default and this is how I generally leave it. The “Show extracted files” option should be enabled by default:

Now you will have two folders in the same location and with the same name – one will be the original downloaded zipped folder and the other will be a normal folder which contains the extracted files.
To set the file association: Locate any relevant file (in this case it would be a PDF document), right click on the file and select Open with.
In the ‘Open with’ window, click on the Browse button and navigate to the location of the folder which contains the extracted files (the look of some of these windows will differ slightly between operating systems but the principle remains the same):

Once located, double click on the folder to open it and then look for the application’s executable and double click on that.
NOTE: The executable is generally the file which is associated with the application’s icon:

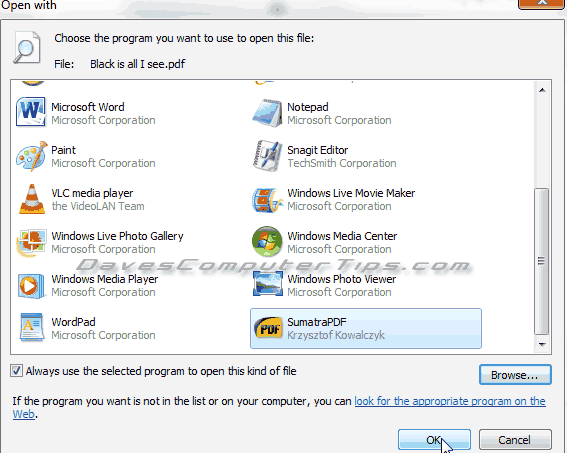
A new ‘Open with’ window should now appear with the selected application added to the list of programs to choose from. The newly added application should be highlighted by default; if it isn’t, highlight it, make sure the option to “Always use the selected program to open this kind of file” is enabled and then click OK.

All done… the file association has now been set and all those particular files should now open via the portable application.
NOTE: This example is for a downloaded portable application that has been saved to the main internal drive. The principle is identical for portable apps saved to external USB drive or flash drive except, of course, the USB device needs to be connected to the host computer.
I love portable programs. I remember back around 2003 when we got into the Portable craze when there weren’t that many available. We spent quite a bit of time trying to make everything we could portable, especially malware removal tools. It turns out though that they work better for technicians rather than the average Joe who might not grasp how time saving they can be. For me, I update them regularly, but many portable programs that have an auto-update feature might actually download the installer version, and when this happens, you end up with conflicting program shortcut issues. Sometimes, either the installed or portable version of the program may not work when both versions are present. For me, I am aware of this, and am cautious when using both on the same computer. So it is very handy to be able to make your favorite portable programs the default. Good Post Dave!