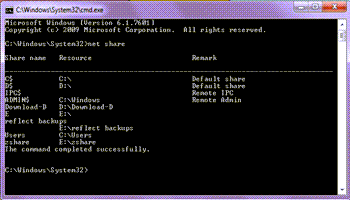
I deleted a shared resource but it still shows up in my Network settings. I had a hard drive that I removed from one of my computers that was labeled Drive E. The drive is gone but the E drive still displays in the network settings.
I wrote before about removing network shares. Read here: How To Remove Network Shares
When I tried to remove the “E share”, it claimed it couldn’t find the resource. That’s why I was trying to remove it. Sometimes you have to remove these through the Registry. To remove these shares using the Registry, do the following. In search type: Registry Editor
Click on it when it shows in the menu. Accept any security prompts.
Standard Registry Editing Warning: The following instructions will ask you to edit your Windows Registry. Be sure to make a backup of your Registry before you make any changes. Making mistakes in the Registry can cause hard-to-diagnose problems, or even keep Windows from functioning properly. If you don’t know how to back up your Registry, please read Windows Quick Tips – Backup/Restore Registry.
Navigate to the following key:
HKEY_LOCAL_MACHINE\SYSTEM\CurrentControlSet\Services\LanmanServer\Shares
You will find a complete list of shared resources. Right-click on the one you want to be removed and click on Delete. No restart is required. If it doesn’t apply right away, then restart your system.
For More Network Troubleshooting Articles, Click Here.
—

