Many times you find yourself working on a confidential or sensitive document and sometimes that document is so confidential and sensitive that it requires a level of protection and security.
Of course, your document can be marked final or you can assign special privileges to it so that your document can only be opened or changed by a certain group, but I thought it prudent to go over just how we can use the security features in Word 2013 to prevent unauthorized access to your confidential and sensitive documents.
First, let’s go over how to access the Document Protection Settings in Word. Follow the steps below to learn how:
- Click on the File tab of your Ribbon.
- When the File screen displays, select Info.

- Click on the Protect Document icon to display the drop-down menu.
From that menu you have five different options that you can avail yourself of to add security to your document, as seen above.
Document Protection Choices:
Mark as Final: While not really a security setting, since it is entirely possible for this designation to be removed by anyone opening your document, this particular option does keep whomever opens your document from making changes to it inadvertently. Selecting this mode of protection will make your file read-only and mark its status as final. It should be noted however, that if the document is opened in an earlier iteration of Word, it will not be read-only.
Encrypt with Password: The easiest method to add a level of security to your document is to encrypt it with a password so that only those who enter the password are able to gain access to it. You should remember though, that even though you can change the password once the document is open, if you lose or forget your password after the document has been closed, there is no way to recover it.
Restrict Editing. This option is much more customizable. Rather than simply password protecting your entire document, you can specify exactly what changes can be made to your document and by whom.
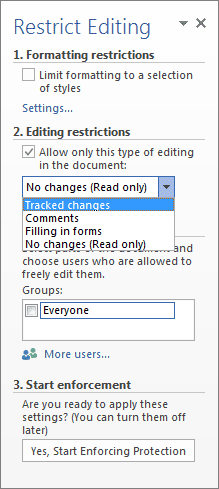
When you select this option, the Restrict Editing sidebar will display on the right-hand side of your screen. The sidebar will give you a variety of options to restrict certain changes to your document and who will be allowed to make those changes. you can also customize which users or groups can freely edit those parts of your document you specify. When you are finished making your choices, click Yes, Start Enforcing Protection.
Restrict Access. This level of protection restricts access to those who who will have permission to edit your document.
Add a Digital Signature. Adding a digital signature to your document will allow the recipient to sign his or her name to the document, verifying it’s contents.
Hopefully, you now are able to protect your documents containing confidential and sensitive data. Knowledge is power!
—
Yes, I thought I would encrypt a word document a few weeks ago. But I didn’t want to write down the password anywhere, in case my daughter saw it. And a week or so later, it wouldn’t accept the password I thought I’d used. I don’t know if that was because I had uninstalled Microsoft Office, reset my PC and then re-installed MS Office – but as I could not access it or print it, I had to delete it and lose all the work I had put into it!
I re-created the document as best I could and this time I saved it to my VeraCrypt encrypted folder instead. Much easier.