 Microsoft has made some pretty dumb decisions over the years and among the dumbest must surely be dropping the feature which allowed users to natively password protect a zipped folder containing sensitive files. Microsoft touts each new operating system as more secure than the last, which is largely true, but then decides to do away with one of the most basic of security features… go figure!
There are plenty of free third party tools which offer to hide/lock files and folders but most come with some sort of limitation or security flaw – for example; some can be quite easily overcome by simply booting into Safe Mode. However, there is still a way to password protect files in recent editions of Windows, provided you have a specific type of free, third party program on hand.
That program is an archive tool, such as 7-Zip, PeaZip, or Bandizip, which I’m guessing many users (if not most) would already have. Almost all of these types of free tools will allow you to create a password protected archive. In this guide I’m going to show you how to password protect files using the portable version of Bandizip but the process should be similar using any of the popular free archive tools. I chose Bandizip as my default archive tool because it’s simple, free, and portable – three of my favorite adjectives when looking at software.
Create a Password Protected Archive with Bandizip
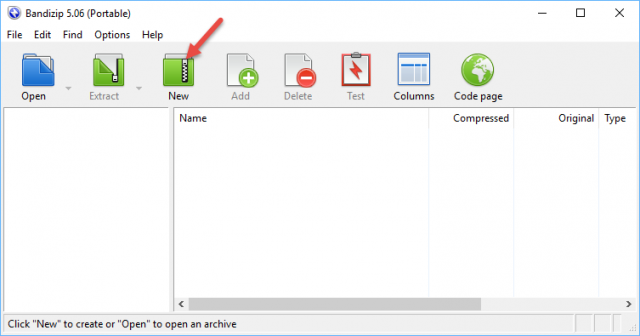
To start the process click New:
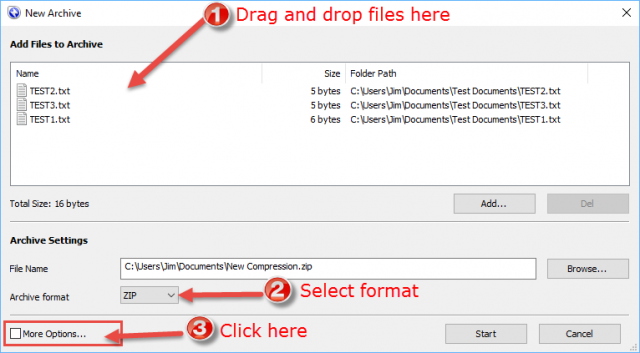
Drag and drop the files you want to protect into the Add Files to Archive box. Or alternatively, click the Add button, browse to and select the files. Next, choose your format – you can use any of the supported compression formats but I think it’s better to stick with the zip format which is pretty much universal. Now click More Options:
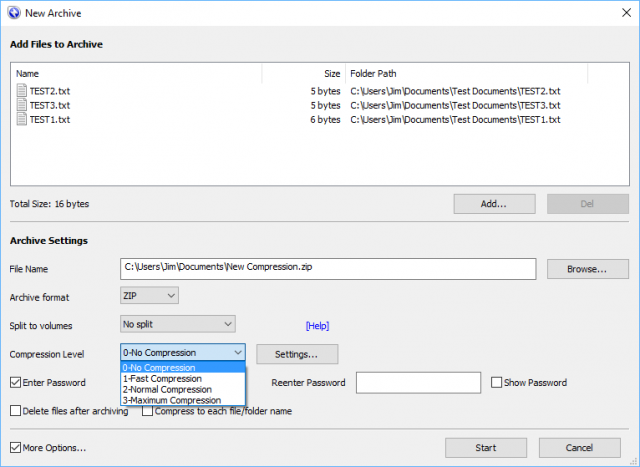
Now you can set your preferred compression level. Bandizip is set to 2-Normal Compression by default but, unless you particularly need to compress the files in order to save space, and considering our main goal here is not compression but to allow password protection, setting compression level to 0-No Compression is quite acceptable:
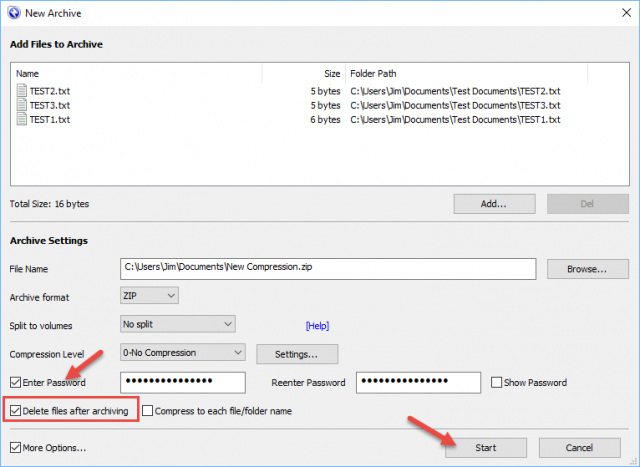
Next, enable the Enter Password option: choose a strong password and type it into both boxes. *Do not forget the password or you will not be able to access the files, best to write it down and keep it somewhere safe.
Once this process has been completed you’ll end up with two copies of the files – one copy in the new zip folder plus the originals. Obviously, once the archive has been created, you’ll need to delete the originals, otherwise it sort of defeats the purpose. You can either enable the option to Delete files after archiving and Bandizip will automatically do that for you or you can manually delete them yourself.
Okay, you’re all ready to go, just click the Start button to create your password protected archive… and voila!
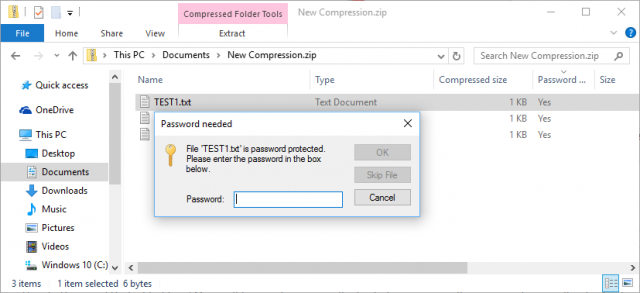
Nobody will be able to open any of the files contained within the zip folder unless the correct password is entered. A quick and easy method to password protect sensitive files.
Very good. Can the protected zip file be moved to a flash drive or to another internal drive?
Sure it can. It’s no different to any other files in that regard.
4 Layer Protection
I keep my sensitive data under 4 layer protection
1st layer—- While saving a file it is Password protected to open.
2nd layer— This password protected file is Zipped and Encrypted using Win Zip.
3rd Layer—. This Zipped and Encrypted file is further encrypted using True crypt.
4th layer— This True crypt container is located in a Partition that is encrypted using Bit locker.
All the 4 Passwords are different and 3rd and 4th Passwords have more than 18 to 20 characters(alphabets ,numerals and special characters)
So to access my most sensitive files I have to open 4 locks
wow that’s a lot of locks….are you hiding the nuclear release keys?
LOL. You took the words right out of my mouth!
And all the passkeys are written down and stored on a notepad by his PC. LOL.
I have a sharp memory. I can remember all the 4 PWs. PW are never stored in the computer but in my Brain