Many of us out there have been part of Amazon for longer than we’d like to admit. I have been using Amazon since 2009 and throughout the years I have moved a few times. When you move, you add a new address to your account or if you are shipping to family or friends then you added their location to your address book. That is right, there is a place where all those addresses reside. If you are like me, you never really delete the old ones because of being lazy or never having the time to do it. This type of stuff is not a high priority for many of us. Recently, a client of mine asked how they could get in there and remove the unwanted ones that they have collected over the years. That made me have to look at my own which made me think I need to do some cleaning of those too. In this article, I want to help you learn how to manage that Amazon address book. Time to jump in and do some fall cleaning.
How To Manage Amazon Address Book (In The Browser)
We will be showing you how to do this on Amazon.com and on the mobile app. Let us start with the website using my Laptop.
Step 1: You will need to head over to Amazon.com on your favorite computer. Sign in to your account if you haven’t already.
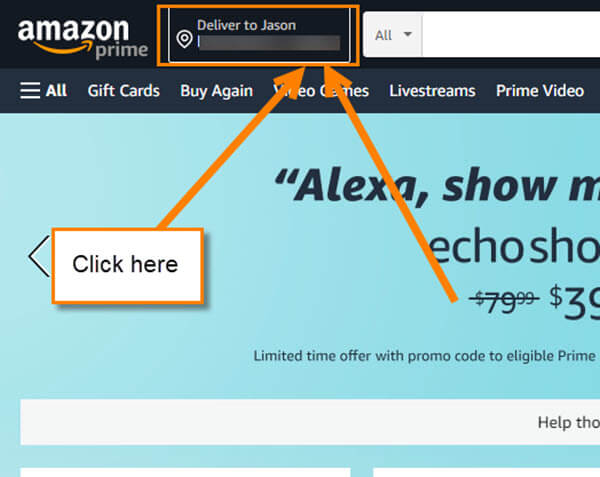
Step 2: Once you are in your account, you can get to the Your Address book two ways. We will first show you by heading up to the top left. Look for Deliver to (Name here) next to the Amazon logo. Click it.
You will see the Choose your Location window. Here you can see some address options but we want to get to the address book. Look in the middle for Manage address book link. Click it.
Step 3: The other option is getting to the Address book by heading up to the right of the website. Hover your mouse over your Hello (Name here) Account and Lists link. The menu will appear and the Account option is at the top. Click it.
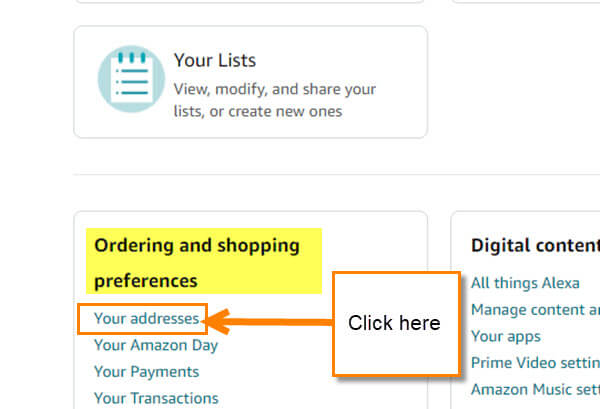
Step 4: On the account screen, look down under the Ordering and shipping preferences section. Here you will find the Your Addresses link. Click it.
Step 5: Here is the magic screen both ways will get you to. On the Your Addresses screen, you can do many things:
- Add a new address
- Remove an address
- Set as Default Address (if you do not see this option then it is your default)
- Edit Address
Find the link you want to use. In this article, we will choose the Remove option for this example.
Under each address, you will see the Remove link. Once you click on Remove it will bring up a Confirm Removal window. It will show the address and a note/warning below that:
Please note: Removing this address will not affect any pending orders being shipped to this address. To ensure uninterrupted fulfillment of future orders, please update any wishlists, subscribe and save settings and periodical subscriptions using this address.
If you are still wanting to delete, then click the YES button at the bottom. Done.
That is how you can manage your Amazon address book on your browser. Now I will show you how to do this on your mobile app.
How To Manage Amazon Address Book Using App
I will be showing how to do this on my Android phone using the Amazon Shopping app.
Step 1: Find the app icon on your mobile device. Tap it.
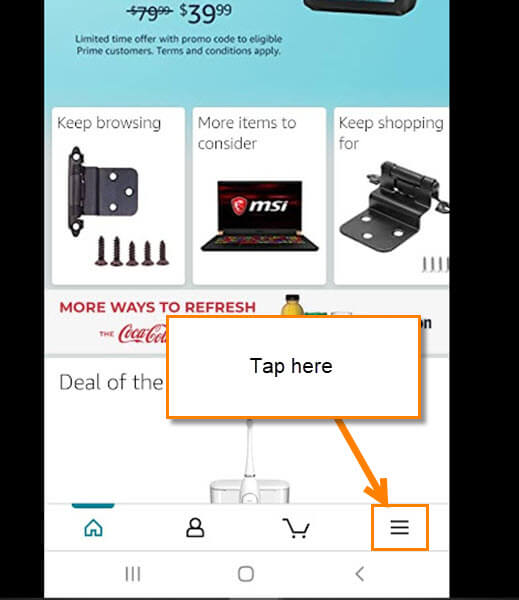
Step 2: On the first screen look to the bottom right and find the three horizontal lines. Tap it.
Step 3: Some tabs will appear at the bottom of the screen. Tap on the Account option.
Step 4: On this screen, look under the Account Settings section to find the Your Addresses option. Tap it.
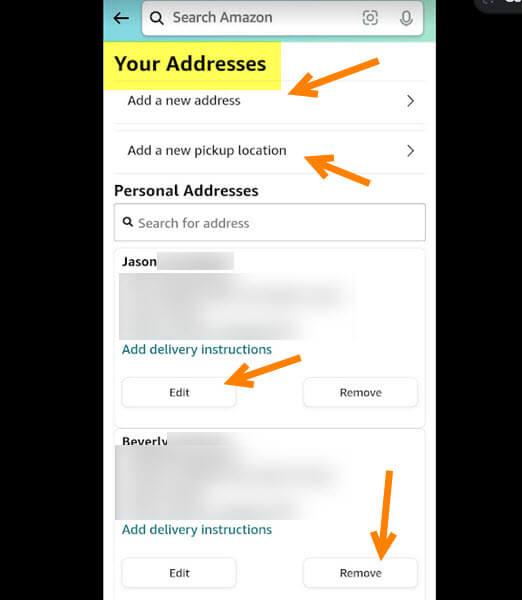
Step 5: Here is where the address book hides on this app. As you can see, they do give you some options:
- Add a New Address
- Add a New pickup location (they ask for your zip to see if there are any pickup locations near you)
- Edit
- Remove
- Add delivery Instructions
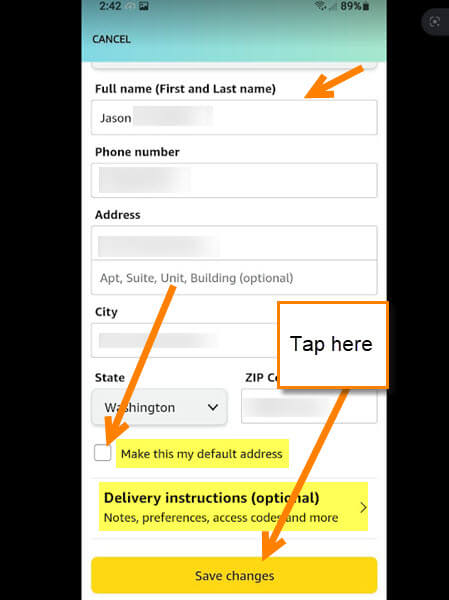
Choose the one you want to work with. As before, they do allow you to remove an address from your account. This is the one I focused on since I have not cleaned this up ever. Tap Remove and you will get the same warning as in your browser. You might have noticed the add as default option is not here. That is because they decided to hide it under the edit option of the address. So, if you wish to set an address as default, click the Edit link under that address.
Step 6: On the edit screen, look below your State and there should be a box you can check next to Make this my default address. Tap that and then tap the save changes button at the bottom. Done.
Now you know how you can manage those addresses you have saved for years on Amazon. Time to tell all your friends and get organized.
—


