Flyby11 is a new tool to help users upgrade from Windows 10 to Windows 11 on unsupported PCs.
Flyby11 provides a method to bypass all requirements – including CPU, TPM, and Secure Boot – and upgrade to the latest Windows 11 version. The tool automatically takes users through the entire process, from downloading the ISO to installation.
How To Upgrade To Windows 11 Using Flyby11
Note: As always, prior to going through these types of processes, make sure you back up everything beforehand.
To get started, go to Github.com and download the flybyscript.zip package. Extract the contents and run the extracted Flyby11.exe file. If you receive a Defender warning notice, click More info > Run anyway
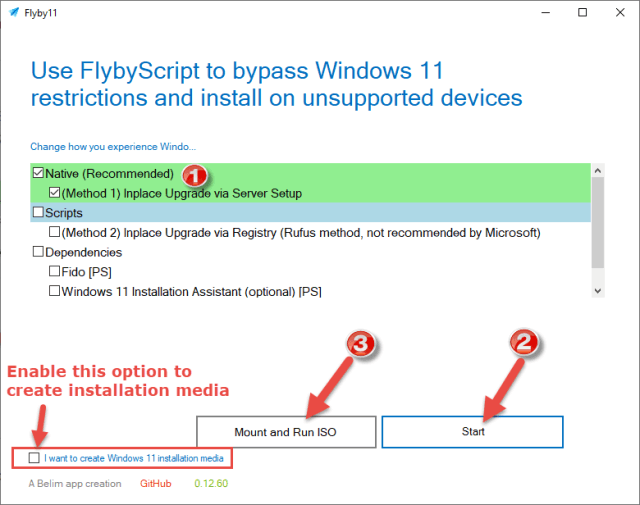
- Enable the first two options, Native (Recommended) and (Method 1) Inplace Upgrade via Server Setup
- Click the Start button
- You will now receive several prompts confirming the details of the ISO. Keep clicking Continue through to the final window and then click Download
- Select a save location (Downloads is the default) and click Save
- When the download has been completed, click the Mount and Run ISO button
- Navigate to the ISO save location and select it
- Click the Install button and follow the instructions to complete installation
There is also an option, located in the bottom left-hand corner of Flyby11’s interface, to create installation media only.
BOTTOM LINE:
In the past, I have consistently predicted that at some future date, Microsoft might deal with these types of installations on unsupported PCs in a manner that renders them no longer viable. Even though that has not happened to date, it does remain a real possibility.
I have not personally tested Flyby11 so, if you try it out, please come back and let us know of your experience via the comments.
—


Thanks Jim. I have had a lot of people ask me how they could install/upgrade to Windows 11 on an older PC. This is the simplest method I have seen so far.
Hey Gary,
Yes, this method is pretty much automated. Most other methods I’ve come across involve a fair bit of technical expertise which, I guess, wouldn’t present a problem for savvy users, but users of any level should be able to get the job done with Flyby11.
Jim, I have an older win 10 laptop which I tried this on, but it came up with a tpm and secure boot issue. Maybe its too old. I also tried the Hasleo win 11 update with the same issue.
Hey John,
Interesting! Flyby11 is supposed to bypass the TPM and secure boot requirements altogether so it’s surprising they would even be mentioned as an issue.
I would be interested to know more. At what stage exactly during the process did the TPM and secure boot issues arise?
Would this work for upgrading windows 8.1?
No, sorry Allan, you’ve missed the boat there. Windows 8.1 has been unsupported for some time and, as such, cannot be upgraded.
Jim,
I was happy that something like this came out. However, my excitement soon died. I tried
to install it twice on win10 updated. The first time I got to the end after restart I got the message could not connect to server. The second attempt after clicking some OKs it said it timed out.
I opened Balarc Advisior and hovered over several microsoft files and it said installed by Virginia. Who the heck is Virginia? Any advice?
Hi Tom. Sorry, have not tried Flyby11 yet, But, are you satisfied using Belarc Advisor? Stopped using it several years ago after receiving bogus information, like security parches are not up to date,, Mindblower!
Hey Tom,
There are any number of reasons why the reinstall might fail and there are several recommended precautions:
1) You must be signed in with an administrator account
2) Disconnect any non-essential USB devices (USB drives in particular)
3) Disable any third-party antivirus
I would also suggest cleaning the system beforehand using an effective junk file cleaner- PrivaZer is recommended.
I forgot that this computer was preowned, so that explains the name Virginia.
I used flyby11 to upgrade my Dell Inspiron 15 and my Dell XPS, laptops, to the W11 24H2 version. Everything went rather smoothly!!! Thanks for the heads-up for flyby11!!!
Daniel. Could you post back after several Windows updates and comment if it still working well, Mindblower!
See no reason why it should not work, been running W11 for, on both laptops, for almost a year now. The only difference, first W11 install, was from within W10, this time I had to do the install from within W11!!!
@MINDBLOWER
OK!!! Flyby11 does not always work, while it did install W11 on my old Dell XPS, the laptop became so unstable, to the point, that I have reverted back to W10. The reason, is because popcnt cpu flag is not present in my intel i5-2450M cpu, and there is no-way to bypass.
While my Dell Inspiron, which has the popcnt flag, is still running well, but it is a few years younger than my XPS.
So I will keep W10 and dual-boot with Linux, until the time the laptop is converted only Linux.
Thanks Daniel. Maybe another company will have better luck this year. Still holding out using Windows 10, Mindblower!
Will this installation type receive automatic updates and features or security updates?
Hey Kris,
Currently, yes. However, bear in mind that Microsoft is forever issuing warnings that these types of installations will eventually not receive any updates. Despite all the warnings, that has not occurred to date, but that does not necessarily mean it won’t happen at some time down the track.
“Will this installation type receive automatic updates and features or security updates?”
Updates, yes, but feature updates, especially, for a machine that does not meet MS specs, can be a problem, especially for the “popcnt” update that was just issued, it sort-of weeded out a lot of older cpu’s.
Microsoft has made it clear that there will be no more feature updates for Windows 10.
https://techcommunity.microsoft.com/blog/windows-itpro-blog/windows-client-roadmap-update-april-2023/3805227
“Still holding out using Windows 10, Mindblower!”
Mindblower
In my opinion, W10 is a lot easier to work with!!! Will be switching this laptop to Linux, in the near future!!!!
“Microsoft has made it clear that there will be no more feature updates for Windows 10.”
That may be true, but I believe now, that the root problem, with the flyby11 script, has been blocked by the MS severs, because every PC I used was getting a “403 error permission denied”. When running “lscpu” from a Linux prompt, it lists the “popcnt”. as a flag, as well as “sse4_1 and the sse4_2” for the i5-2450M cpu, so the problem was elsewhere!!!
Hey Daniel,
It’s been common knowledge for quite some time that Windows 11 will not work with older CPUs that do not support PopCnt/SSE4.
This limitation only applies to CPUs that are older than 14 years, so only very old CPUs are affected.
Hi Jim,
I installed Windows 11 Pro using your instructions. Everything went smoothly.
in the end, I got this message:
A driver cannot load on this device.
Driver: zamguard64.sys
A security setting detects this as a vulnerable driver and blocking it from loading.
You’ll need to adjust your settings to load this driver.
How do I resolve this?
Hey Kris,
zamguard64.sys is associated with Zemana Antimalware. I suggest you uninstall Zemana Antimalware and delete the zamguard64.sys file.
Here is a link to a Microsoft forum thread that discusses this very issue- including a solution:
Microsoft Help – Incompatible driver zamguard64.sys
I used Fllyby11 to upgrade one of my PC’s that is running an Asus P8Z77-V mobo from W10Pro to W11Pro. The i7 3770K had the “popcnt and sse4_2” CPU flags!! Wonder what else MS will throw at us and our old hardware!!!