One of the most important yet often neglected aspects of this process is the preparation. Before you even open Windows Live Movie Maker make sure all the photos you wish to use are contained in the one folder. If the photos are scattered about in different folders; create a new folder and give it a suitable title, then transfer all your required photos to that one folder. Now, sort the photos into the correct order of display and then rename them sequentially: select (highlight) all the photos, right click on the first photo and select Rename. Give the photo a suitable title followed by the number 01 in parenthesis…e.g. for my sample slideshow I renamed the first photo “Beautiful Tasmania (01)”. Then hit “Enter” and you will see that the photos now share a common name and are all numbered sequentially. We are ready to begin:
Windows Live Movie Maker’s GUI has adopted the modern Ribbon style menu which on first viewing appears somewhat confusing, at least to the uninitiated. I can assure you though, once you get used to it, it is very simple and easy to use:
Whether you choose to drag and drop the photos or import them via the browse feature; don’t forget to select (highlight) all the photos in the folder.
Once your photos are displayed in the main pane you can now add a music track. Simply click on the Add music button, navigate to the location of the required MP3 file and select the one you want:
For long slideshows, additional music tracks can be added one after another using the same method.
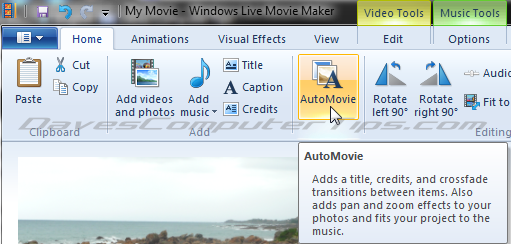
Now click on the Auto Movie button and your slideshow will be ready in no time, complete with random pan and zoom effects:
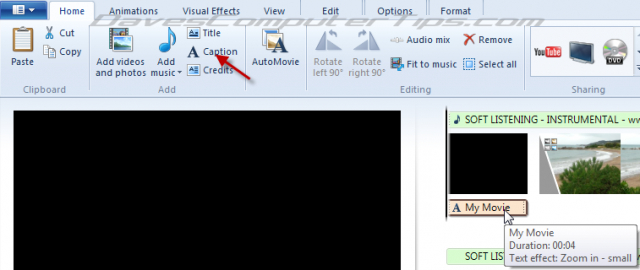
You will see that the Auto Movie feature also adds a ‘Title’ frame to the beginning of your slideshow. The title will display “My Movie” by default but you can change that to suit by clicking on the Caption button and editing the text:
After clicking on the Caption button you will see the text displayed in the Preview screen. Click anywhere inside the little text box, delete the existing title and type in your own. Drag the borders of the text box to suit/fit the new text and/or reposition the box:
There is also an end frame added which simply says “The End”. This can be edited in exactly the same manner but, in most cases anyway, the simple default message is probably going to suffice:
If you’re feeling really adventurous you could now add even more effects to the slideshow per medium of transitions. Click on the Animations button to reveal available transition effects:
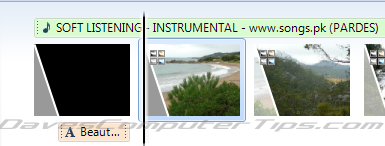
Click on the left hand side of each slide and a black vertical line will appear. Now hover the mouse cursor over a transition to preview, or click on a transition to apply:
All you need do now is save your slideshow by choosing one of the output options under the Sharing button. If you select “Publish on YouTube” (as I did), your slideshow movie will be created to suit and automatically uploaded to YouTube for you.
Here is the finished article:


I am making a slideshow for my parents 50th anniversary in Windows Live Movie Maker. I pretty much have the jist down of making the moving and saving it BUT I need to be able to go back in and edit and make changes to the slideshow several times after I create it. My sister will be bringing more photos and my parents need to make an official OK on the photos we have chosen so some may need to be removed, etc.
I made a ‘practice’ slideshow and when I go back to Open Project and try to edit it tells me it can’t open it and I have tried every way I know. The one I am ‘building’ has about 100 photos that have been dug out and scanned, etc. and I don’t want to lose all of them and the work and time and have to start over with a one-time shot at making this slideshow. I would like it to be no different than a Word document where you open it every day and add and delete things and Save when done.
I obviously haven’t Saved it yet because I don’t want what happened in the practice version. Also I read that you can only save as WMV format….so does that mean anything about not being able to edit it a lot later on?
I am using Windows 7 version so anything you can do to explain to me, if it needs to be different, how to save so I can continue to edit and how do I open after saving to edit and not get the error message. THANK YOU VERY MUCH FOR YOUR HELP.
Brenda – When you have finished creating the slideshow and before you actually ‘Publish’, click on the X to close the program and you will receive a message asking if you want to “save”. If you click on “Yes” it will save the project in “My Documents”. Then, when you re-open it from that location, you should be able to apply any required edits; remove and add photos, re-order photos, etc. I just tried that here and it definitely allows all edits…no problem. All this is before you actually create the output file.
The forum would be a much more suitable platform to continue this discussion Brenda. You can access the forum by clicking on the “Forum” link in the ‘Resources’ menu at the top of this page. We can discuss and chat away on the forum until our heart’s content. 🙂
Cheers…Jim
I have a slideshow project that looks good. I want to add captions to each picture using file name. Or I could add captions to each picture in a sequential order “Picture 1”, “Picture 2” etc. I have more than 700 images in the project so I’d like not to have to do them each manually. Any ideas? Thanks for any suggestions!
Hey Stephen – Sorry mate, but I don’t know of any way to add text to images in the manner you require. The problem is that each text message is generally specific to a particular photo, even sequential numbering. If it were a generic text message, the exact same on each photo, that would be a different story.
Cheers…Jim
Is there a way to automatically re-sort the photos that have been added a project in Windows Live Movie Maker.
Hi Larry – No, there is no way to do that. Please read through the opening paragraph of the article again mate, it describes what needs to be done prior to actually commencing the creation process – specifically to help overcome the lack of any re-sorting feature in WLMM.
Cheers…Jim
I made a slideshow with music….it plays on computer “preview” perfectly.
Also, I burned a dvd and while it plays on that same computer perfectly, it will NOT play correctly (or with music) on dvd player, or another computer. Any ideas? Thanks 🙂
Hi Nicole – What you describe could be caused by any number of things. I’d need to know a lot more details.
However, most likely suspect would be your blank media (DVD). Make sure it is a reputable (ergo reliabe) brand and that it is NOT a rewritable DVD (not DVD RW). The best to use is DVD-R (rather than DVD+R) because it is more universally supported. Try burning the slideshow to a reputable brand DVD-R DVD and see how you go.
Cheers… Jim
Is there a way to set the pictures to be “randomized”? We have our nursing graduation in a few months and it is saving pictures according to when they were saved in the file and we would prefer to have the collection of pictures just shown in a random order. Thank you for any information or assistance you are able to give.
Hi Dee – No, you can’t “randomize” the photos from within Windows Live Movie Maker, there is no setting/feature to do that.
In XP, you can drag and drop the photos around the folder in any order you like prior to importing into WLMM, but not so in Windows 7. It is possible to edit the registry in Window 7 so the ‘auto arrange’ feature can be disabled and you’ll then be able to drag and drop the photos around the folder in any order you like.
If you are interested in the disable auto arrange option, contact me via our “Contact” page and I’ll provide you with a simple method.
Cheers… Jim