This year has forced many of us to learn how to work remotely with our jobs. Even now, we are still being required to keep our distance from one another. A while ago I wrote some articles on Dropbox and Google about creating and sharing folders with others. This is a very important skill to know in this changing world. Even did the how-to video for the Google article. Here are the links to the articles and videos if you want to learn how to do that.
Articles:
How-To Video:
How To Create/Share Google Drive Folders
Here, I wanted to cover how to create and share folders using a Microsoft product called OneDrive. This is also cloud-based storage for your files. With my jobs, I use this one very often since my main job requires me to use the Microsoft online Office 365. This cloud storage can be helpful when trying to share files with people remotely. Time to get those computers out and ready to learn these easy to follow steps.
How To Create/Share OneDrive Folders
I will be using my Windows laptop to show you how to do this.
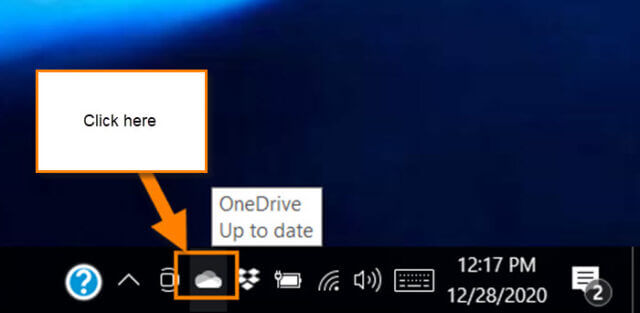
Step 1: If you have the OneDrive desktop app installed on your computer, look in the System Tray. You should see the cloud icon. Click it. (If you do not see this on your computer head on over to onedrive.com, then to Step 3.)
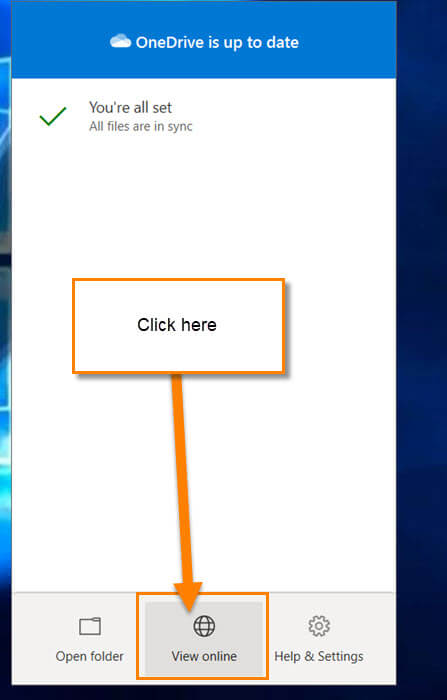
Step 2: A window will open up and from here you need to click on the bottom middle option. This is the View Online link. Click it.
Step 3: Here we are now on the Microsoft onedrive.com website. Yes, you could go straight there in the beginning but I felt you needed to see both ways. Now you will need to sign in to your account. Click on the Sign in option at the top right.
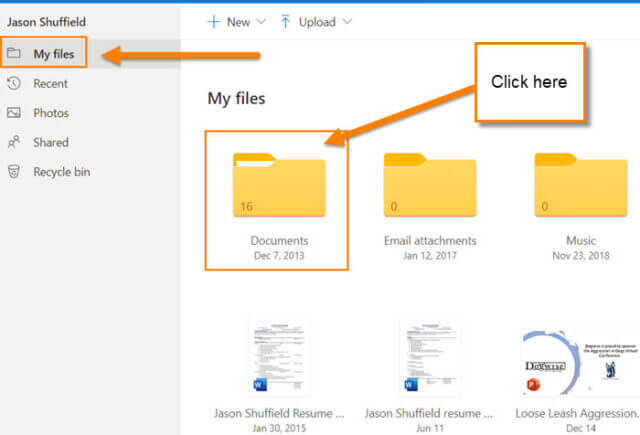
Step 4: Once you are in the cloud, make sure you are in the My Files section. Look to the left menu to see which section you are in. From here, I like to go to my Documents folder. Click it.
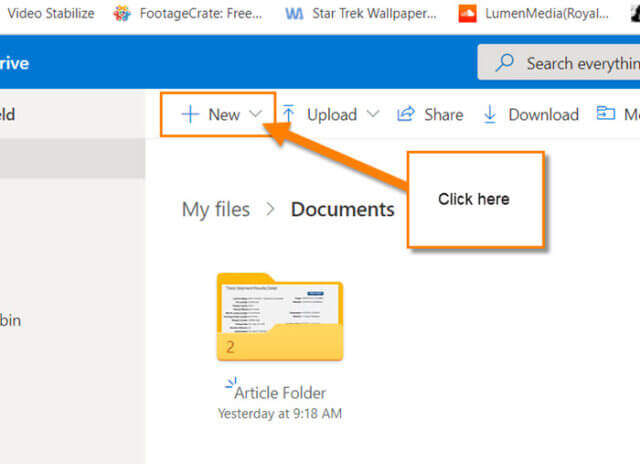
Step 5: Time to do the first part and create that folder you want to share. To do this, click on the + New option at the top.
Step 6: This will open up a drop-down menu. You will want to choose the Folder option on the top of this menu. Click it.
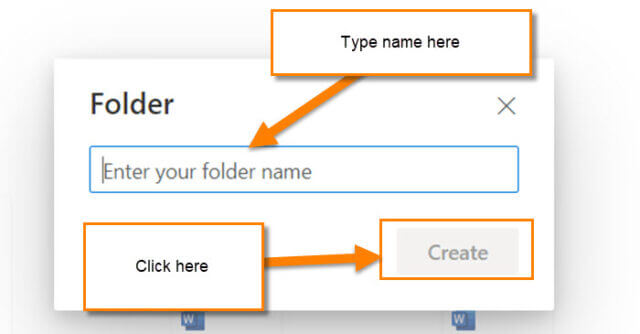
Step 7: A Folder window will appear where you will be able to name it. I’m naming mine Article Folder since that makes sense to me for this article :). After naming it, click the Create button. Done with creating the folder.
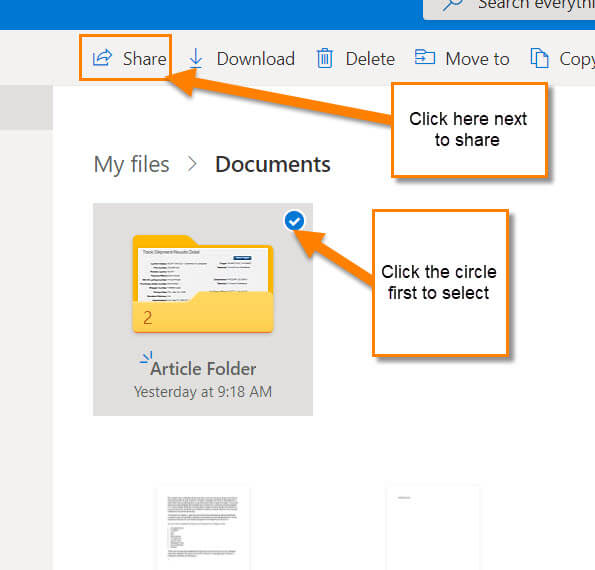
Step 8: Time for us to share this folder with our friends, co-workers, or clients. To do this, hover your mouse over the folder you wish to share. You should see a circle to the top right of that folder. Click it to select the folder. Once you have selected the folder, you need to click on the Share option at the top of the screen next to download.
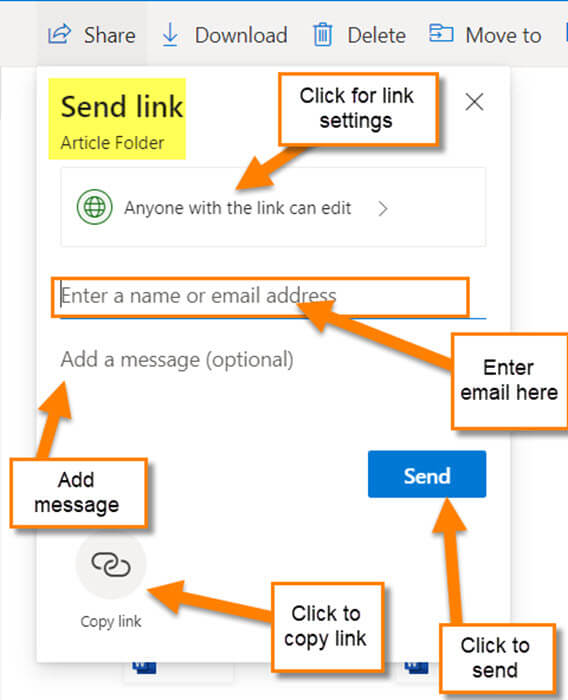
Step 9: Here are the options for sharing this folder link. As you can see you can enter a name or email at the top. Then you can add a message or you can copy the link to share any way you want. By clicking on the Copy link option it will create the sharable link.
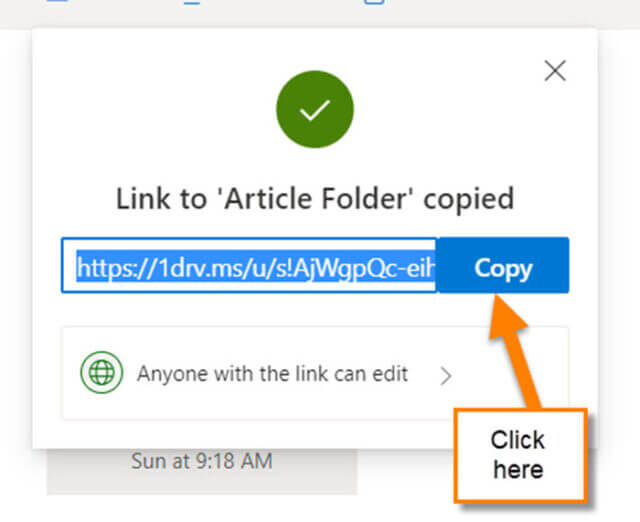
This window will appear and all you have to do is click Copy. Now, before we are done here, look to the option at the top or under the Copy link that says “Anyone with link can edit“. Click it.
Step 10: This is the window that will appear. Link settings for the article folder let you set a few things that might be important to you. Here you have a few choices:
- Allow Editing (you can unselect this to not allow the person to edit the folder)
- Set expiration date (makes it more of a priority to the person to get in there and do what they need to)
- Set Password (this will make sure the folder is more secure)
- Choose Anyone with the link can edit, or choose specific people
That is all you need to do to change the settings. Make sure to click the Apply button at the bottom when done. Then all you need to do is click on the Send button. DONE!
Now you know how to create and share the OneDrive folder with others. Go out and share this knowledge with the world.
—



Somehow I have One Drive on my desktop. I use to be able to print things with ease. However now it sends me to One Drive and I can’t get anything to print anymore. What can I do?
Hi Pat,
I decided to test print a word document and it opened my word software and blinked then sent to printer. What do you have set as your default printer? Also what type of file are you trying to print? When you open the OneDrive Folder on your computer desktop do you right click on the file then pick print from that menu? Sorry for all the questions but trying to figure out why it is not letting you print. Sounds like for some reason it is opening the file online and not even trying to print it. Things to check:
1. Make sure you have the right printer as Default
2. Make sure you have the software on your computer to view file (Word or other)
3. Make sure when you click on the cloud (OneDrive) Click on Open Folder at the bottom of the window. Then right click file and then print
Hopefully this will help us narrow down why it is not working for you.