Recently, I was playing around on TikTok and YouTube at the same time. I do this often since I post on both social platforms. While looking around, I noticed that some people had GIFs of their videos posted on other sites. What this means is that they took parts of their long videos and created a small GIF from them. No,w for you who are not familiar with GIFs, here is your description:
GIF stands for Graphics Interchange Format – in social media, GIFs are small animations and video footage. A GIF is commonly used to represent a feeling or action.
Now that we know what it is, why should we care about this? The reason to care is if you are a content creator on YouTube or any other social media platform where you can upload videos, having a unique GIF can help you grow. Giving funny or fun GIFs that you can quickly make and share can help your channels grow. You can pick any part of a long video and choose something that would be a cool GIF then post it to all your media. Now we know why this would be good. Time for me to show you how you can create a GIF from those YouTube videos you either watched or uploaded. Yes, you heard me right, you can do this with any video, not only your own. Let’s get this lesson started.
How To Create A YouTube GIF
This will be shown using my Windows 10 laptop on the YouTube Website. Also, you will have to sign up for a free account at the end of this process. I used email that I do not use much.
Step 1: Head over to YouTube and find the video from which you wish to create a GIF.
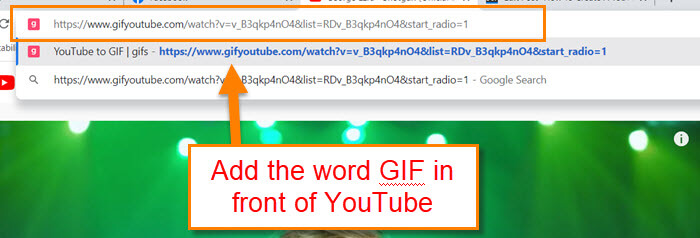
Step 2: Once you have found and opened the video, look at the top address bar. With your cursor in the address bar, type the word gif in front of YouTube and after the www.
Example: www.gifyoutube.com
After doing that hit enter.
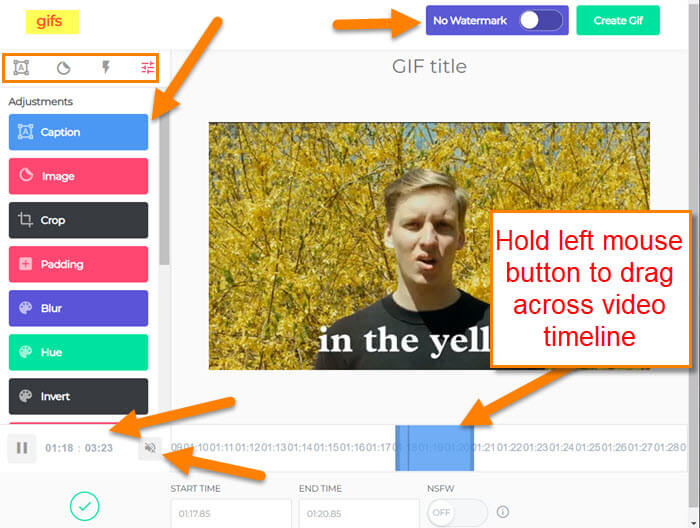
Step 3: You will now be taken to a new webpage called gifs. Here your video will appear with the option to create that fun gif. I’m not going to go through all the features this has but I will cover some to get you started. In the middle of the screen, you will see the video and to the left, there is a menu:
- Caption
- Image/stickers
- Crop
- Padding
- Blur
- and more
At the top-left are quick links to the most popular options. These are the ones I will touch on. Before we move forward you will need to click on the timeline of the video to place the blue gif marker on the part of the video you wish to create your gif from. To do this, hold the left mouse button on the timeline blue marker and drag it to the section you want. After that, you can now start customizing the gif. Let us start with Caption, which is at the top of the menu, or click the quick link on the far left at the top.
Step 4: Here is where you can add a caption. You can change the color, font, wording, and a few other things. Once you are happy with the caption, click Save at the top or at the bottom of the side panel. Time to move on to one of the other options.

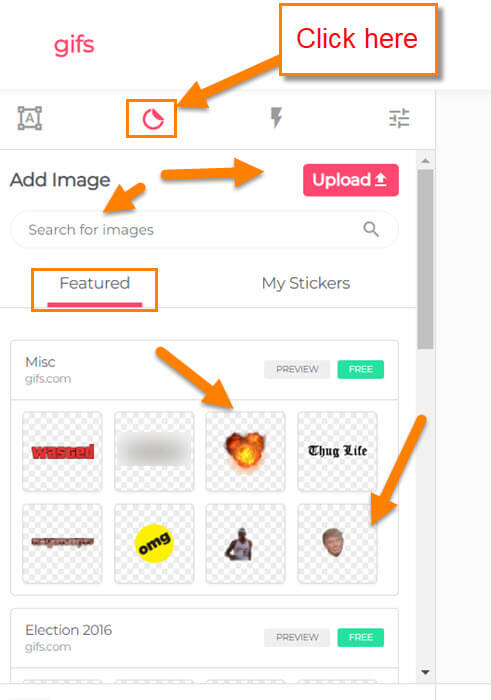
Step 5: Now we will choose the image/sticker option from Quick Links. Here you can add fun stickers to your project.
WARNING: Not all these are free to use. Like all services, there is a paid option so you can get the most out of it.
We will choose the free stickers for our gif. When the Sticker/image is on the video, you can drag it around to place it where you want it.
They give you some options to modify your image. You can mess around with it to get it the way you want. After you are done, click the Save option at the top or bottom. Now, to get back to the menu, click on the last icon on the top left bar. Looks like 3 vertical lines. Click it

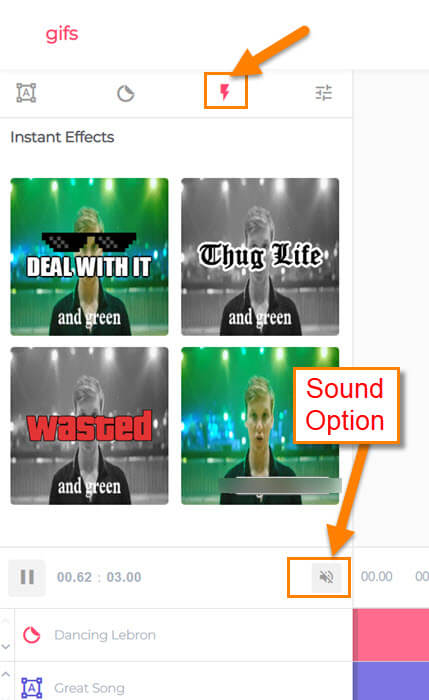
Step 6: The last one I would like to go over is the Instant Effects option you will see at the top (Lighten Icon). After placing the effect on the video you will need to hit the confirmation checkmark that will appear in the middle under the effect. If this does not appear, all you need to do is click on the Save button.
Step 7: You should be back at the menu. If everything looks good, look to the top right of the screen and click the Create GIF button. The next screen will give you some other choices to complete the setup:
- GIF Title
- Tags
- Watermark, NSFW, Sound switches
- Public or private
- Skip
Now, remember that turning the watermark off is a paid feature. The title and tags should all be free. Once you are done here, click the next button at the bottom.

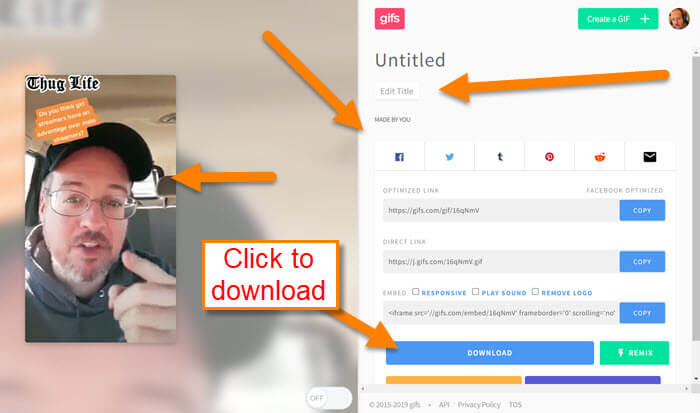
Step 8: Here on the last page is where you can share it or even download it. For this article, I will choose the Download button. They will give you some choices here:
- Small GIF
- Original GIF
- Original MP4
Choose the one you want and all done. You will be asked to log in or sign up. You need to set up a free account to download the GIF. The only thing they ask for is an email address so no other details are given.
There is more to this than I was able to cover but all you need to do is mess around with it. Time to share this new knowledge with everyone.
—