If you haven’t noticed by now, I have been writing lots of articles about my Samsung phone. When you are on a roll, you might as well keep it going. Before we get to this new tip make sure you catch up on all of the previous ones.
Articles
- Take Hands-Free Pictures On Samsung
- How To Turn On One-Handed Mode Samsung
- How To Pin App On Samsung Phone
- How To Make Flashlight Brighter On Samsung
- Set Up Samsung Lighting Styles For Notifications
- Add Rotating Pictures To Lock Screen Samsung
Videos
- How To Pin App On Samsung Phone
- How To Turn On One-Handed Mode Samsung
- Set Up Samsung Lighting Styles For Notifications
- How To Make Flashlight Brighter On Samsung
- Take Hands-Free Pictures On Samsung
- Add Rotating Pictures To Lock Screen Samsung
This time I was messing around with my phone and discovered something fun. ‘What could be so much fun using your phone,’ you might be asking? Glad you asked. I found a way to create a GIF with your camera app. With your Samsung phone, you can create your own personal GIFs and share them with anyone (Samsung calls this option a Photo Burst). If you don’t know what a GIF is, then here is the definition.
GIF stands for Graphics Interchange Format – in social media, GIFs are small animations and video footage. A GIF is commonly used to represent a feeling or action.
Now that you know what it is, it is time to show you how to create it. Pull out those Samsung devices and let’s get this lesson started.
How To Create A GIF On Samsung
I will show you this on my Samsung Galaxy A20. This was also tested on my wife’s Samsung A20 and an A10e.
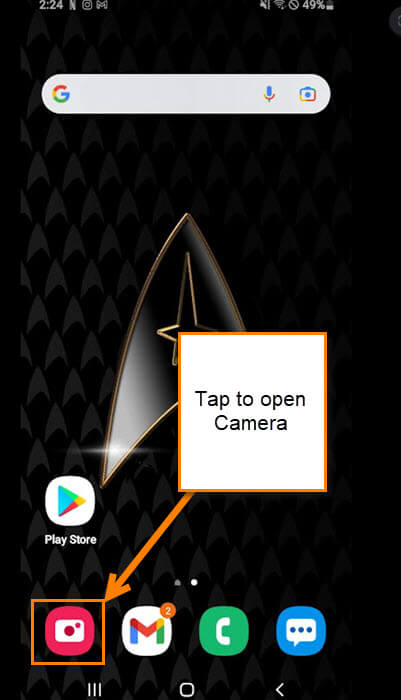
Step 1: Turn on your device and tap on your camera app.
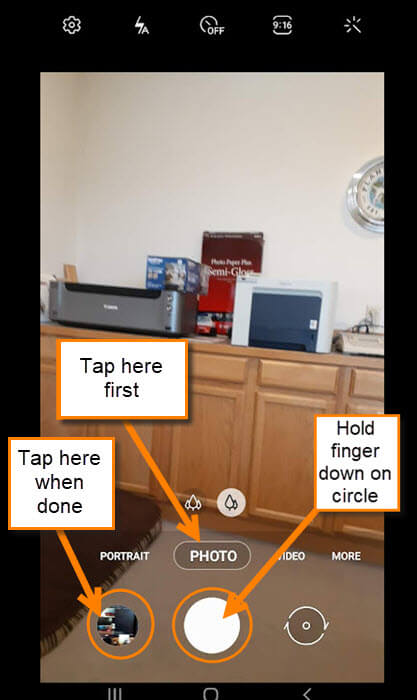
Step 2: Once in the camera app, aim the camera at what you wish to turn into a GIF. Make sure you are on the Photo taking section. That would be the middle option. Now hold your finger down on the circle in the bottom middle. This is a lot like a stop motion picture. Move the camera all you like and when done, tap the Gallery link to the left of the camera button.
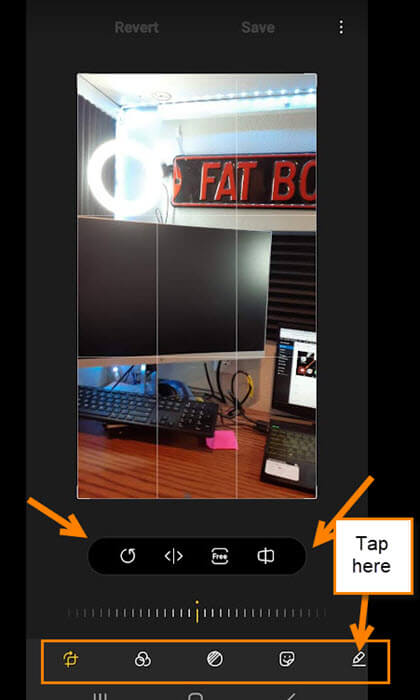
Step 3: Here is where you can see what you have created so far. On the left, you have a count of all the images you have taken. Slide the picture to move down the line. If you want to remove a picture, select it from the line and tap the trash can. For this article, we will show you some of the editing options. Make sure to tap on the image you wish to edit first. Tap the pencil icon on the menu below.
Step 4: On this next screen, you are offered many options. This is from left to right in this list:
- Crop the photos
- Change the lighting filter
- Brighten or darken images
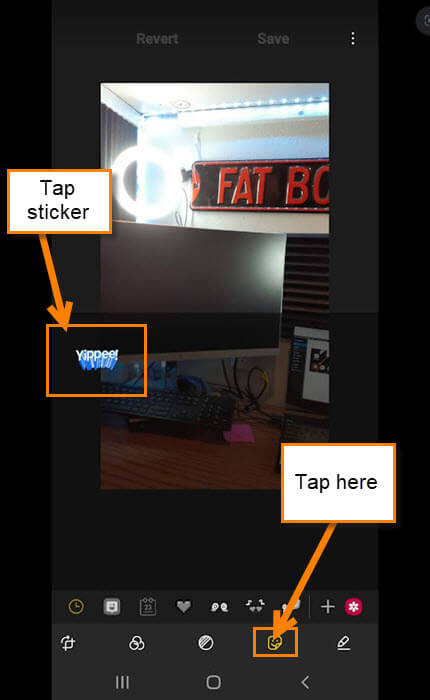
- Add a Sticker
- Draw on photos
Let us tap on the draw option to the far right(Pencil).
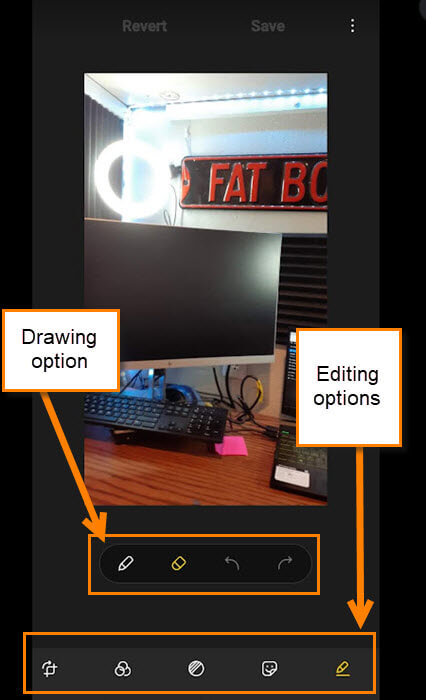
Step 5: They give you some Drawing options right below the photo (Draw or Erase). Of course, right below that, you have the other editing options to choose from. You will need to mess around in here to get the feel of what you want to do and can do. Tap Save at the top when you are happy with your drawing. After that let us try the adding Sticker button.
Step 6: To add a sticker tap the Sticker icon in the bottom menu. You might need to tap the pencil again to have this option show. Once you do that you will be given options to choose from. Right below the photo, you have the Sticker menu now. Tap on one to see the options they offer. Once you find the sticker you like, Tap it. The chosen option should appear above the menu when selected.
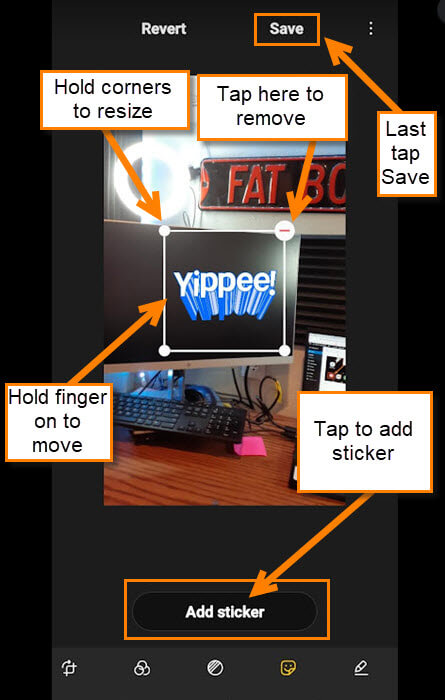
Step 7: Time to adjust the sticker:
- Hold corners to resize
- Hit the minus sign to remove it
- Hold finger on the Sticker and drag to move
- Add Sticker button
If you are happy with the results, Tap the Add Sticker button. Now it’s time to save our photo with the new look. Tap Save at the top. You will need to add the same sticker to each photo if you want it to appear all the way through.
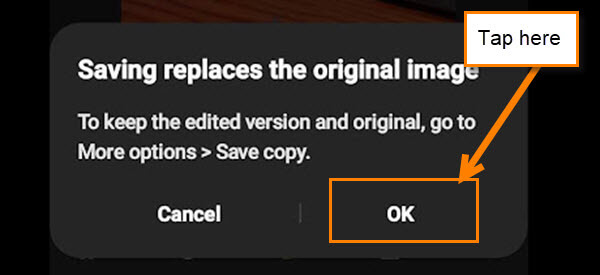
When saving, you might see this message if you saved this as a GIF before. All you need to do is Tap OK.
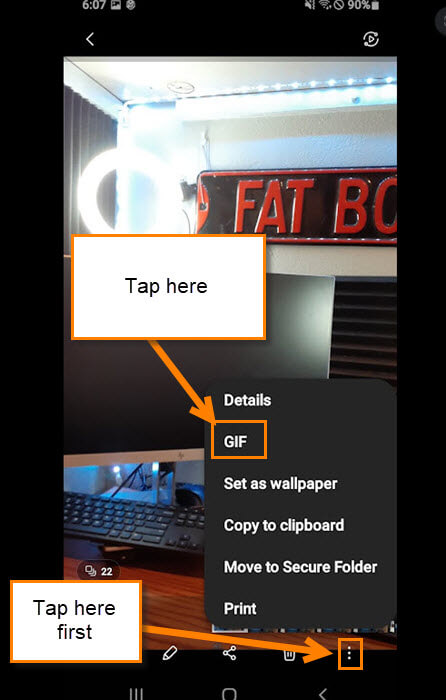
Step 8: Let’s say you are all done with your edits. If so, look to the bottom right and tap the 3 dots. A menu will appear and all you need to do is find GIF in the menu. Tap it.
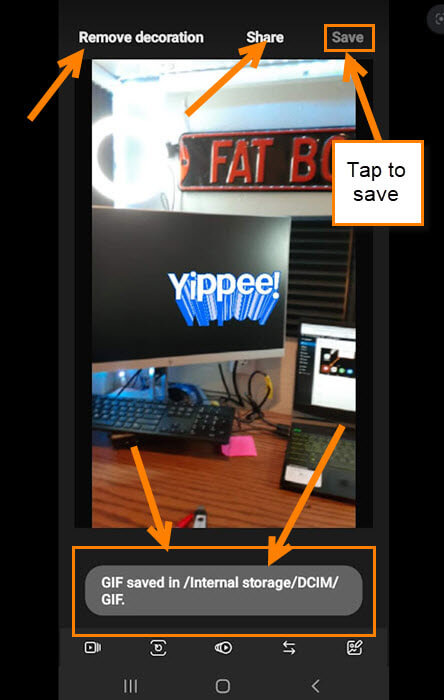
Step 9: The device will process this and show you a preview of your new GIF. At the top, you have Save and Share. For this article, we are choosing Save. After tapping save, you will see a confirmation of where it is being saved below. You have now created your GIF. To find this, look under your picture folder on your device. Done!
I would suggest messing around with this and the editing side of it. There is so much to cover on the editing side that I only had time to touch on the two I did. Now get out there and show your newfound knowledge.
—


Hello, Jason,
I’ve been a long time subscriber to Dave’s Computer Tips, and appreciate your helpful articles.
With the Russian threat of cyber attacks, could you please advise how to best preserve my huge cache of photos? Most are saved to Google cloud, but if that goes down, I’m guessing everything is lost? Should I put the photos on thumb drives?
It would be great if you smart fellows could help us learn how to prepare for internet loss. For “just in case” ….
Thank you.
Hi Rebecca,
Ultimately, you are the one responsible for backing up your data. Backing up your photos to a Cloud service is a good idea, but it is not bullet-proof. Google, for example, stores all that data on SSDs and hard drives, just like you do, and hardware, no matter who owns it, is subject to fallibility. They even say in their ToS that there are no guarantees.
My suggestion would be to make regular backups of your system and data. I make a backup every day (it is automated). The frequency is determined by how often your data changes over time.
Less frequently, perhaps, you could make a backup to an external device, like a hard drive or SSD, or thumb drive. I make one once a week. I never leave external drives connected other than for backups. Malware can corrupt those, too.
Lastly, a third medium might be the Cloud. Having an off-site backup is protection against “Acts of God” such as fire, floods, etc.
Any quality backup solution will allow you to automate most of these tasks so you can basically set it and forget it with only the occasional check to see that all is working as it should.
Consider the 3-2-1 backup strategy: You should have three backups, on at least two different mediums, with at least one copy off-site.
As our titular “Dave” is fond of saying, “You can never have too many backups.”
Hope this helps,
Richard
PS My apologies to Jason for jumping in here but I felt the question deserved an outside response.
Thank you so much for your prompt response and easy-to-understand advice. Plan to be prepared!