Most modern PCs will boot from both MBR and GPT partitioned system drives running under a combination Legacy/UEFI system. However, with the advent of Windows 11 and its harsh requirements, GPT will become mandatory and some users might want or need to convert a system drive from MBR to GPT. Besides, the GPT partition style provides quite a few benefits over MBR.
Fortunately, Windows 10 includes a tool that will not only convert a system drive from MBR to GPT without data loss but will also create a new EFI System partition. It’s appropriately named MBR2GPT.
First, an explanation of the some of the terminology and processes:
- MBR (Master Boot Record) is the older partitioning style utilized for system drives running under Legacy BIOS
- GPT (GUID Partition Table) is the modern partitioning style utilized for system drives running under UEFI
- All system drives require a boot partition that contains the boot loader, the software necessary for booting the operating system
- In MBR system drives the boot partition, named “System Reserved“, is around 350 MB and is usually formatted in NTFS
- In GPT system drives the boot partition, named “EFI System Partition” is 100 MB and must be formatted in Fat32
- Converting a system drive from MBR to GPT not only requires a change in the partitioning style but also requires the creation of a new EFI System boot partition formatted in FAT32
How To Use MBR2GPT
Note: before you start, the first and most important step is to back up everything on the drive you are converting.
In order for MBR2GPT to work successfully, your system drive must meet the following requirements:
- There are no more than three primary partitions in the MBR partition table
- The disk does not have any extended/logical partition
- The disk is not encrypted
- You are running a version of Windows 10 that is 1703 or later (does not work with Windows 7/8/8.1 or earlier Windows 10 versions)
The preferable and safest method is to perform the conversion from within the Windows Recovery Environment. You’ll need to boot into Advanced Startup mode — probably the easiest way to do that is to hold down the Shift key and click Restart.
- In Advanced Startup mode, choose Troubleshoot > Advanced Options > Command Prompt
- Select your administrator account and sign in with your credentials (if applicable)
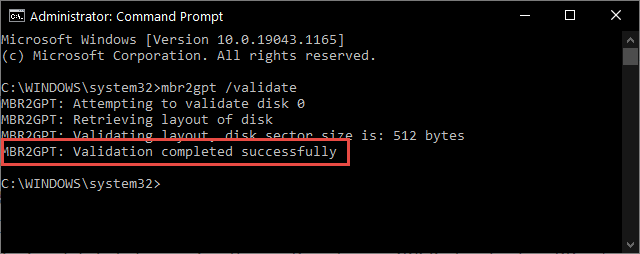
- Type the following command to ensure the drive meets the requirements and press Enter: mbr2gpt /validate
- If the command returns an error, you cannot go any further and you’ll need to research and fix the error
- If you see the message “Validation completed successfully” (as per the above screenshot) you are good to go
- Type in the following command to convert the drive from MBR to GPT and press Enter: mbr2gpt /convert
- Several actions will take place, including validation of the drive and creation of an EFI system partition. The UEFI boot files and GPT components will be added to the partition. Then the MBR2GPT tool will update the Boot Configuration Data (BCD) accordingly
- Exit Advanced Startup mode and boot the machine as per normal
Using MBR2GPT From Within Windows
The steps are essentially the same when running the MBR2GPT tool from within the operating system but you need to add /allowFullOS to the end of each command:
- mbr2gpt /validate /allowFullOS
- mbr2gpt /convert /allowFullOS
NOTE: Running the tool from within Windows will not replace the existing System Reserved partition with the EFI System partition so you’ll end up with both boot partitions on the drive. The drive will still boot okay and the now redundant System Reserved partition is not taking up much space on the drive. That said, if it bothers you, you can use a third-party partition manager to delete the redundant System Reserved partition and merge the unallocated space.
I cannot emphasize enough: Before you start, the first and most important step is to back up everything on the drive you are converting, including creating a system image backup.
I have gone through this process three times with one success and two failures (both on the same drive). If it hadn’t been for system images backups, I would have been in real trouble.
—


Mow that is an article I wish I had 3 years ago, but still worthwhile as many computers are still unwisely using MBR. I would caution the folks to check if their BIOS is capable of operating in UEFI, to begin with as many of the computers we are looking at are from the period before or just at the transition to the new specification. Something that I ran into at the same time I made this conversion was that I also changed over to a NVMe drive from the traditional spin-up drive. This had some hiccups that I had to educate W/D about on the software they provided for cloning, that didn’t have the needed tools at that time.
System Reserved is still required on a MBR2GPT conversion, removing it in any way renders the machine unbootable.
No, that’s not quite accurate. A “boot partition” is what’s still required. In the case of an MBR2GPT conversion from within Windows, users will end up with two boot partitions, the original System Reserved partition plus an additional EFI System Partition. The original System Reserved partition is no longer required and, in fact, will no longer work anyway. If removed, the system will still boot from the newly created EFI System Partition.