
Both Windows 10 and Windows 11 include a “Reliability Monitor” feature that will present a system stability rating from 1 to 10, and also help diagnose problematic apps/processes. However, the Reliability Monitor is tucked away and not easy to locate… unless you know how.
How To Access Reliability Monitor
- In Windows 10: open a Run command (Windows + R keys), type in perfmon /rel and hit Enter
- In Windows 11: The above Run command will work fine, or alternatively, open the Start menu and type Reliability, then click View reliability history in the results
Here is a screenshot of my Reliability Monitor in Windows 10 (click the image to enlarge):
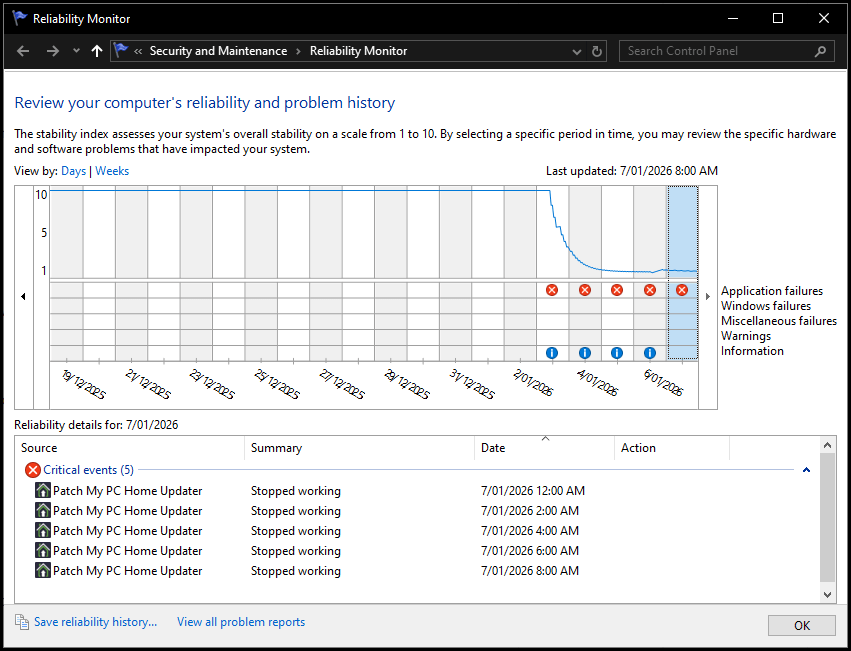
As you can see from the image, the blue line across the top shows that my system rated a solid 10 out of 10 until it ran into an issue with PatchMyPC. Full disclosure, the issue with PatchMyPC was of my own doing, as each time, I hadn’t initially noticed an application listed for updating that I didn’t want updated. I know, I’m a slow learner sometimes.
Use Reliability Monitor For Troubleshooting
- When you click on an entry marked with an X inside a red circle, pertinent details will then be listed in the bottom half of the window
- Click on any day to view details of events for that particular day, including updates, installations, and any issues encountered
- If your system started playing up (say) a week ago, scroll back to that date and check details for any new software installs, driver updates, or system changes
- Windows updates can cause instability issues. Reliability Monitor shows precisely when updates were installed, helping pinpoint a potential culprit
- Combine Reliability Monitor with Event Viewer for deeper diagnostics
BOTTOM LINE:
Reliability Monitor is an excellent yet often overlooked tool for checking system stability and helping diagnose stability issues.
—
Thanks Jim
Now we just need a “Reliability Monitor” for Microsoft Windows 11 Updates !
Cheers
Reg
Thanks for pointing out another feature I never knew existed. I’d like to send you a picture of the results I got, but since it appears that is out of the question, permit me to say the blue line across the top is similar to a 3 year old with a blue pen.
First error I see back on the 22nd of December 2025 shows “Critical events” and it says “Intel(R)Innovation Platform Fram… stopped working.” Beneath that, it has all to do with successful Windows updates.
If you had got a reading starting out like that, would you say that was good, bad or ugly?
Hey Nicke,
Critical events are not good but, as long as the same critical event is not repeating on a regular basis, nothing to be overly concerned about. Especially if your system is otherwise performing fine.
Thanks, Jim. This is why I like your newsletter.
Jim, you saved my sanity. For weeks, or even months, my window file explorer was so bloody slow – that hated green bar kept crawling, teaching me patience! I looked up every remedy on the web but none of them mentioned the right one. Today, I used your Reliability Monitor advice and found out that the Search function has been on the blink. Ran the troubleshooter, and I am off to the races! Thank you.
You are most welcome Harry. I’m happy to hear it helped.
Question about the hated green bar that painfully crawls from left to right when I open a folder in Windows 10.
Maybe, I can find the answer from the meeting of minds here, though I have been scouring the web for months, to no avail. I did run the Search troubleshooter and rebuilt the index, unsuccessfully, and tried many of the recommended remedies on the Web, turning out to be futile. How can I fix this absolutely infuriating evil PERMANENTLY?
Hey Harry,
We would need more information about your setup:
What is the make and model of your CPU (processor)?
What RAM is installed- 4GB, 8GB, 16GB?
Have you tried running Task Manager while that infernal green progress line is crawling across? Task Manager will show you what processes are consuming resources- CPU, RAM, and disk.
We can provide more help over on the Forum. The Forum is a far better medium for helping with these types of issues. You can post screenshots on the forum, so we can see exactly what’s going on.
Cos, Jim. I will do that.
Awesome Info…ty
Darn, I meant “Thanks”