

The Windows Recovery Environment provides several options that play an integral role in helping to repair a misbehaving operating system. Windows sets up the Recovery Environment on a separate hidden partition (visible only via Disk Management) to help safeguard against accidental user modifications that could prove catastrophic. However, accidents can, and do, happen.
Check That Your RE Is Enabled
To check the status of your Recovery Environment, open an elevated Command Prompt (Admin) and type in, or copy and paste, the following command: reagentc /info

If the status returns as “Enabled”, you’re all good. If it returns as “Disabled” run the following command: reagentc /enable
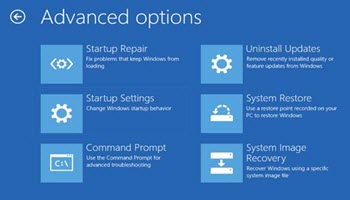
How To Boot Into The Recovery Environment
There are a number of ways to boot into the Recovery Environment (aka Advanced Startup). An earlier article explains four methods in detail, please read: 4 Ways To Access Advanced Startup Options
Or, you can do as I have done and create a desktop shortcut to automatically boot into the Recovery Environment. To learn how, please read: 4 Ways To Access Advanced Startup Options (scroll down to the sub-heading “Bonus: Create Desktop Shortcut“.
Missing Or Corrupt Recovery Environment
A missing or corrupt Recovery Environment is not good but, fortunately, is quite an easy fix. The best method to rectify a missing or corrupt Recovery Environment is to perform an in-place upgrade.
A few prerequisites prior to commencing the in-place upgrade:
- Make sure you are signed in to an administrator account
- Disconnect all external peripherals except for mouse, keyboard, and LAN cable
- Disable antivirus and any 3rd-party security tools that include real-time protection
Now, download and run the Media Creation Tool:
Accept the license terms, then choose the option to “Upgrade this PC now”. Click Next and follow the prompts (make sure the option to “Keep personal files and apps” is enabled).
This type of in-place upgrade will not only fix a missing or corrupt Recovery Environment but can also be used to fix many serious Windows issues.
BOTTOM LINE:
An active and pristine Recovery Environment provides many useful tools. However, I cannot stress enough that the ultimate recovery tool is a backup strategy involving regularly creating and storing system image backups.
—


Interesting article Jim. Never knew of the RE. Checked and it is Enabled. Should this be something to verify and could it get Disabled, Mindblower!
Hey MB,
Once enabled the RE should remain that way.
I did an Install Repair and totally forgot to disable Norton 360. But it presented no grief, so apparently, I got away with it this time around. I only thought of it after having read your Article.
Hey Nicke,
Disabling the AV prior to performing a repair installation is purely precautionary. An active AV can interfere with the install but not necessarily. It’s pretty much a just-in-case situation.
Thanks for the info Jim. My RE was already set correctly. Your last statement leaves me with a question, How often should one do the System Image Backup? Mine is set for daily and that seems to me probably much more often than necessary. I have a USB 6 gb backup drive that I’m using.
Hey Larry,
If you’re using a 6 GB USB drive to store your image backups I’m guessing you’re creating either incremental or differential backups? With that system, you still need a base full image saved as well. Where are you saving that full image backup?