Last week I wrote an article on Venmo about how to change your profile image. If you want to check it out, here it is:
How To Update Venmo Profile Image
This time, I thought I would show you the steps to change the Venmo Privacy Settings. In case you are not familiar with this app, here is a short description:
Venmo is an American mobile payment service founded in 2009 and owned by PayPal since 2013. Venmo is aimed at users who wish to split their bills. Account holders can transfer funds to others via a mobile phone app; both the sender and receiver must live in the United States. {Wikipedia}
Why would I need to do this? That is a great question. When you send money using the app, it can show up on the public feed. Here is what the public feed is according to Venmo:
Public: The transaction will be shared on the public feed and anyone on the internet may be able to see it. Friends only: The transaction will only be shared with your Venmo friends and with the other participant’s Venmo friends. (Venmo help center)
If you have your privacy set to Public, then everyone on your feed sees what you paid out or received. I like to keep that stuff private and I think you might, too. If you would like to learn, then let us start our lesson.
How To Change Venmo Privacy Settings
This will be shown using my Motorola Edge Android phone using the Venmo app.
Step 1: On your mobile device find the Venmo app. Tap it.
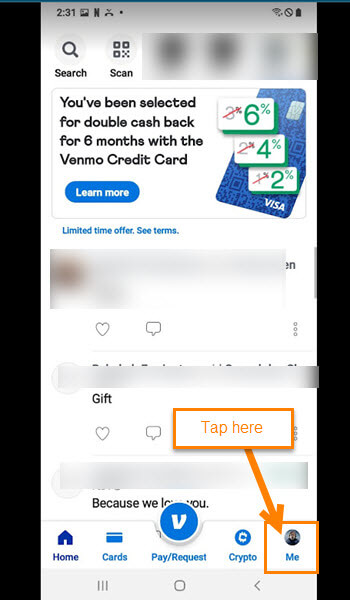
Step 2: After the app opens, look to the bottom right. You will see your Profile Image. Tap it.
Step 3: On your Profile screen look to the top right to see the Settings (gear) icon. Tap it.
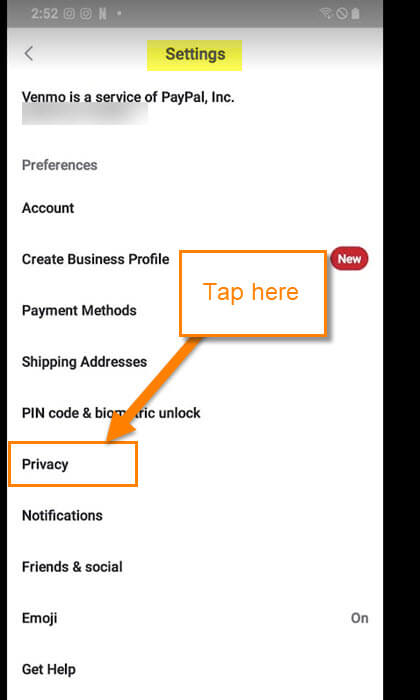
Step 4: Here on the Settings screen you are looking for the option, Privacy. Tap it.
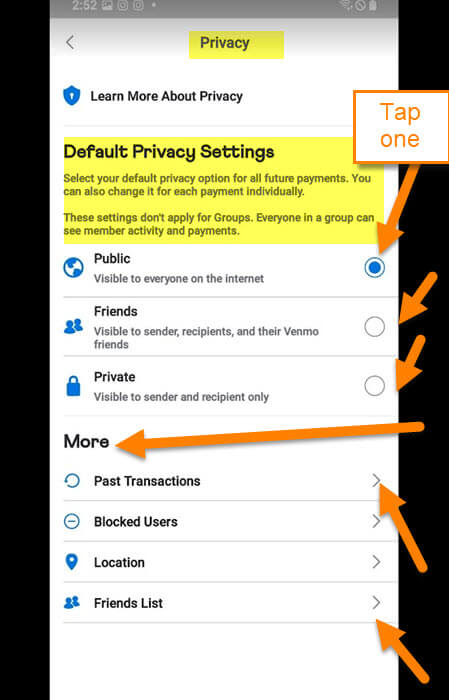
Step 5: The Default Privacy screen is where the magic happens.
Select your default privacy option for all future payments. You can also change it for each payment individually. These settings don’t apply for Groups. Everyone in a group can see member activity and payments.
Here are the options they offer you here:
- Public (Visible to everyone on the internet)
- Friends (Visible to sender, recipients, and their Venmo friends)
- Private (Visible to sender and recipient only)
Tap the circle to the right of the option that you feel works best for you. There are a few more options that you can adjust below.
Under More:
- Past Transactions
- Blocked Users
- Location
- Friend List
In this article, I will go over Past Transactions and Friends List. Tap on Past Transactions.
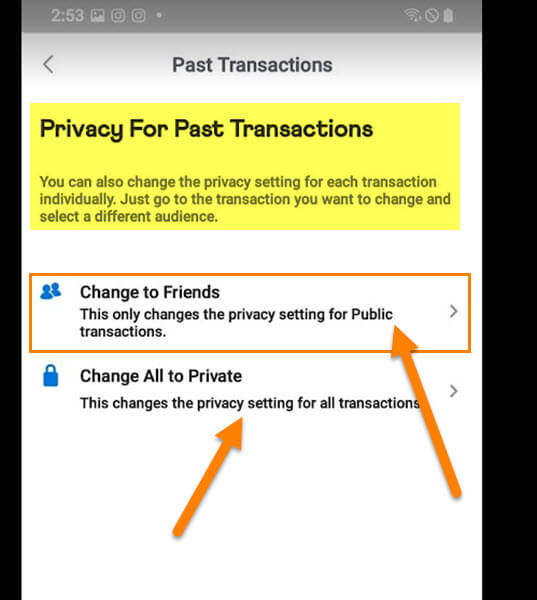
Step 6: This is what this screen will do for you:
Privacy For Past Transactions: You can also change the privacy setting for each transaction individually. Just go to the transaction you want to change and select a different audience.
- Change To Friends (This only changes the privacy setting for Public transactions)
- Change All to Private (This changes the privacy setting for all transactions)
Make sure to look over these settings to make the right choices. Now let us head back and tap on the Friends List option.
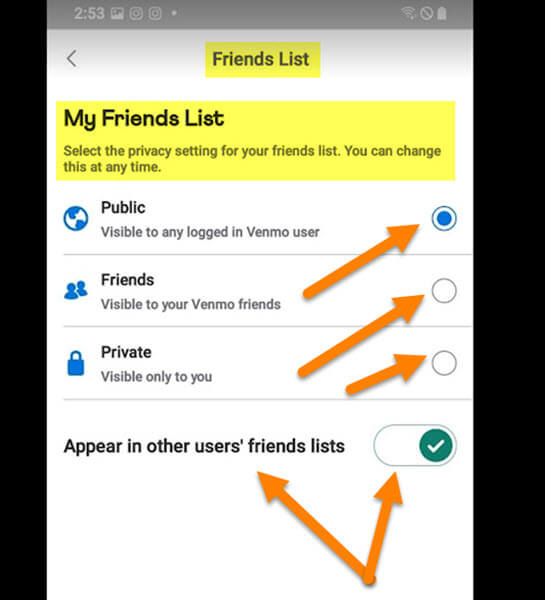
Step 7: On the Friends List screen you are given some choices that you may recognize.
Select the privacy setting for your friends list. You can change this at any time.
- Public (Visible to any logged-in Venmo user)
- Friends (Visible to your Venmo friends)
- Private (Visible only to you)
- Appear in other users’ friends lists (Tap switch to turn off and on)
Choose the one that you feel is right for you by tapping the circle to the right of the option. Done!
You now know how to set that privacy on your Venmo account. Make sure to share your new knowledge with friends and family.
—


