Adding Stickers To Your Desktop
Windows will be rolling out Desktop stickers for a future build of Windows. Right now, they are available in Beta and Dev Windows Insiders, but I imagine it won’t be long for them to roll out with an upcoming update for all users.
Enable Desktop Sticker
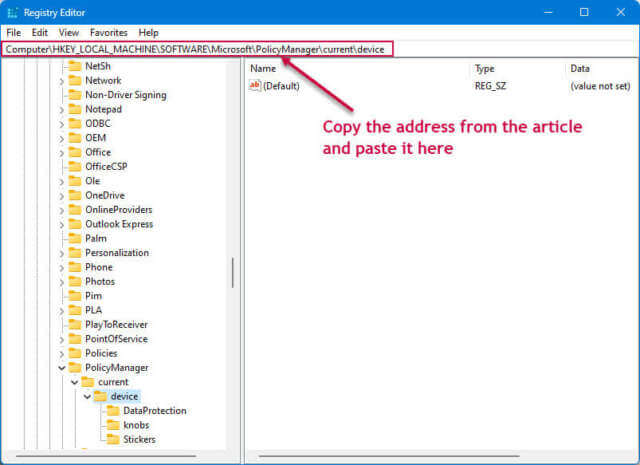
To enable stickers, click on the search icon and type in Regedit. The Regedit Applet will appear. Click on “Run as Administrator”, then “Yes”… …when the UAC screen appears to open the Registry editor. Once in the Registry…
Computer\HKEY_LOCAL_MACHINE\SOFTWARE\Microsoft\PolicyManager\current\device
- Click on the Device Folder to expand the contents
- Right-click on device > New > Add
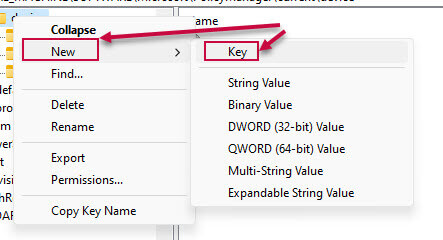
- This will add a new Key Folder within the Device Folder
- Right-click on the new folder and rename it “Stickers” without the quotes
- Now click anywhere in the right window; right-click and select (DWORD (32-bit) Value
- This will add a new value labeled New Value #1

- Right-click on the new value and choose Modify (Ed note: You will have to change the Value Name to EnableStickers as shown in the above image.)
- This will open an edit window. Change the Value data from 0 to 1, then click on OK
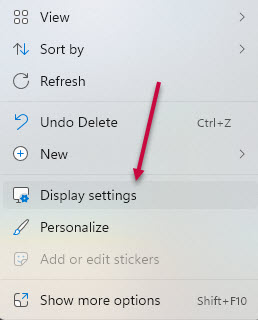
- Right-click on the desktop and choose Display Settings
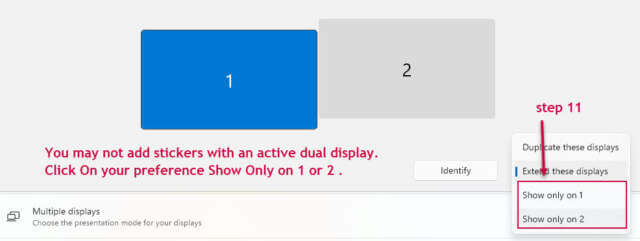
- Click on the Extend these displays button and choose “Show Only On” and select the monitor where you wish to have Stickers
- If you fail to do this, when you right-click on the desktop the context menu will have (Add or Edit Stickers) but it will be grayed out. For it to work, you may only have one monitor active
- Once you have the stickers on your desktop, and the add sticker button visible, you may move and resize them but only on the monitor they were installed on. They cannot be moved between monitors
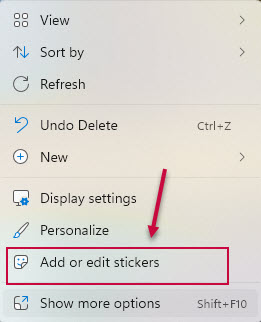
- If you have multiple monitors, you will have to repeat the process for each monitor. Different monitors may have the same or different stickers. Clicking on Add or Edit Stickers will display the Stickers Window where you can select any of several stickers

- Once stickers have been placed on your desktop, they become part of it. They cannot be moved, deleted, or resized unless you repeat the steps above. In other words, you must have the “Add Sticker” Button visible to make any changes

Summary
Stickers may not be your thing but if you are a fan of displaying stickers, Microsoft gives you a pretty good selection. Yes, you may change the desktop background and the stickers will remain. If you have a beta channel edition of Windows, you can activate stickers right now. It is an easy addition to the Registry.
—

Are stickers meant for kids or would an adult have a real use for them?
Also, is this article applicable for a Win10 user?
I Dan, there are really a lot of stickers, some might be what an adult wanted to be pasted on their desktop. I have seen worse just in desktop choices of customers I service. Hopefully they will expand them to Major Sports Teams then I would gladly put my Cowboys star on the screen. However, from most of the stickers, I see they are definitely aiming for kids. At this time there is no goal to put them on Win 10 but because the code is so similar when it is released it might work on 10.
Jim: Understood, thanks for your reply. I think I’ll take a pass on ‘stickers’ since I’m trying to declutter my life.
🙂
Can someone find the resources ( images) that are used for the stickers and post a link to them or the files that contain them. I can’t install windows 11 due to I’m stuck with x86 and it requires x64. Thanks in advance