
A few weeks ago I wrote an article on how to change your YouTube profile picture. From that article, I received a question from my fellow DCT writer on how you can create/add a banner to your channel. This is a great question since it is one of the most confusing parts of setting up your channel. The reason for this is that the size of it varies depending on which device someone is looking at the video page on. In this article, I’m hoping I can clear up how to add the banner and make sure you created the banner to the right size for better viewing. Since we are talking about YouTube, make sure you check out my other articles on this subject here:
- How To Enable Restricted Mode On YouTube
- How To Change YouTube Profile Picture
- How To Promote A YouTube Video With Google Ads
- How To Add A Blur To YouTube Videos
Now that we know what this will be covering, it is time for us to have this lesson begin.
How To Add Banner To YouTube Channel
This will be shown on my laptop on the YouTube website. We will be starting with the banner size.
These first steps are all about what size the banner settings should be. There is a sweet spot where all devices will see that part of the image. Here are the recommended sizes for YouTube Banners:
Your banner image must meet the following criteria:
- Minimum dimension for upload: 2048 x 1152 px with an aspect ratio of 16:9.
- At the minimum dimension, the safe area for text and logos: 1235 x 338 px. Larger images may get cropped on certain views or devices.
- File size: 6 MB or smaller.
How to resize images
You can use your computer’s image editor or an online image resizer to resize the images. For example, you can use Preview on an Apple computer or Microsoft Photos on Windows.
The sweet spot which I mentioned above according to YouTube is 1235 x 338 px. As long as your Banner is set at 2048 x 1152 px and then create a smaller banner at 1235 x 338 px. Then you can layer it on the larger banner and center it. This article will not go into great detail about creating the image but I will give you some good pointers.
Step 1: Use the editing software that you like, or I have one that is actually free. I use this software all the time for work and DCT banners. It is located at PIXLR and once there, choose the PIXLR E option on the front page.
![]()

Step 2: After choosing the option, you will see this screen. Click on Create New in the middle under the Open Image button.

Step 3: From here, look to the right, and first name the new image. Then type in the size 2048 for width and 1152 for height. You can choose a background color but I want to leave it transparent. Now click on the create button at the bottom right.

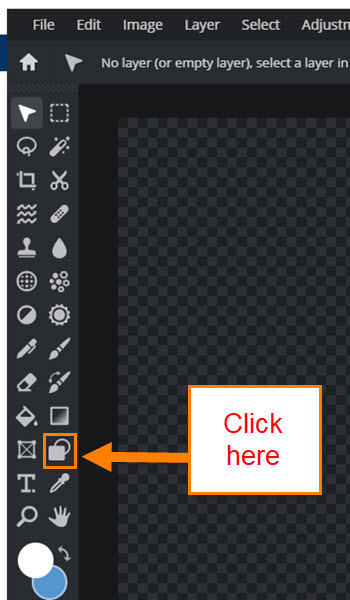
Step 4: On this screen is where we can start designing. Here is how you can create that sweet spot for your image. Look to the left menu and above the eyedropper image click on shapes. This is near the bottom of the menu.
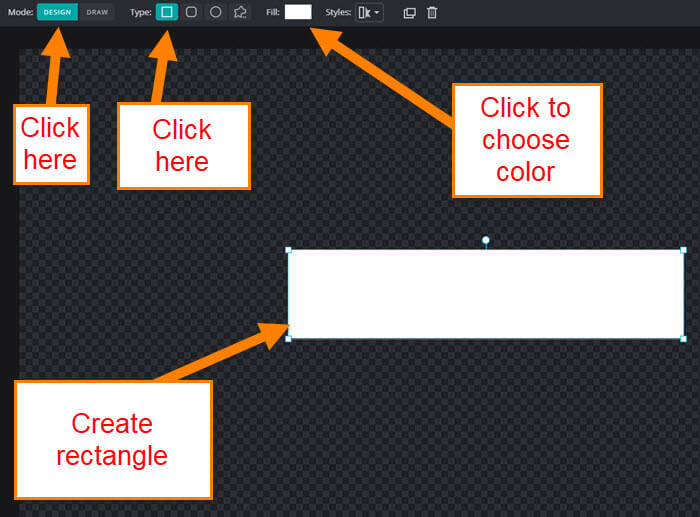
Step 5: Now look to the top menu bar and you will have some shape options. If you do not see this, then make sure you are in the Design and not the Draw section. You will see these on the tap bar to the far left. Once that is done, choose the rectangle to the right of Type. A little further over click on the Fill color to choose the color of the box. After choosing your color, you should see a plus image when hovering over the screen. Hold the left mouse button down and make your rectangle. Once you let go, the rectangle will appear. Do not worry about the size; we will fix that next.
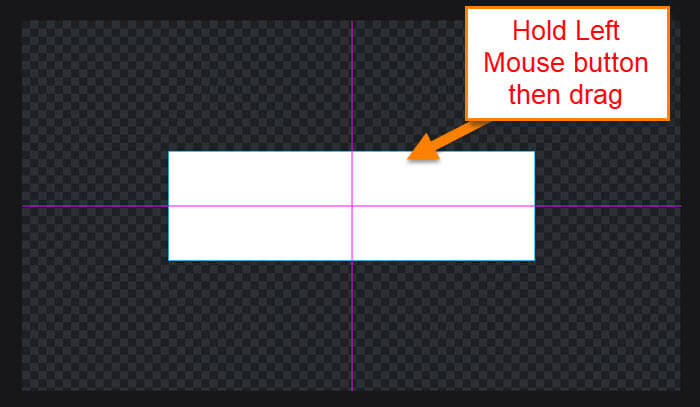
Step 6: Go to the top left and click on the selecting arrow. Now click once on your box and look to the top menu bar. There will be the Aspect bar which we will need to select the FREE option next to it. Time to change the Size of this rectangle. For the width type 1235 and for the height, 338. The box is now the size for the sweet spot. Zoom out by using the scroller on your mouse; this way, you can see the whole area. Now drag the box to the center of the banner. Hold the left mouse button down on the image and drag it. Once you are at the center, you should see the crosshairs show up. Let go of the button.

Step 7: Now your banner is ready for your design. Whatever is on the white box area will be shown on all devices. You can put things on the outside area if you wish. Get to designing. Time to move on to how to add your creation to your Channel.

How To Add Banner To YouTube Channel
This will be shown using YouTube’s website on my Windows PC. We will use my Gamer Channel (Gold Club Gamers) as an example since I need to update my banner anyway.
Step 1: Head over to your YouTube account and log in. Make sure you are logging in on the YouTube account your channel is attached to.

Step 2: After you are in, look to the top right and click on your profile image. Now we want to make sure we are on the channel we want to change or add the Banner to. If you are not, click on Switch account on this menu. Here you will see all the channels you manage. Choose the one you want to work on.


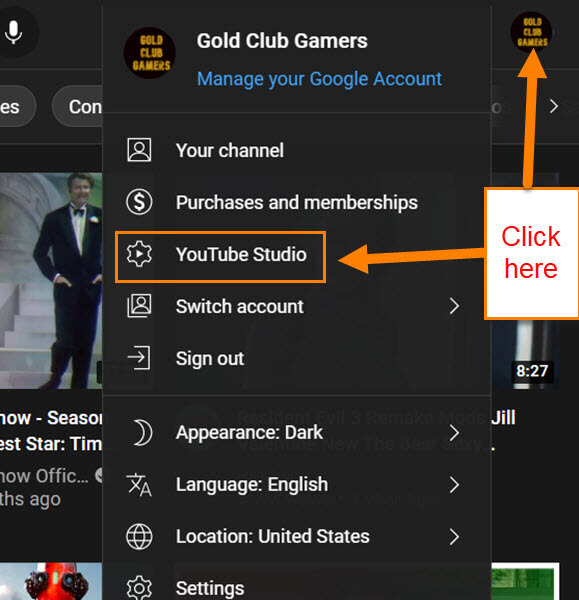
Step 3: Now head back up to the top right and click on your profile image again. Click on YouTube Studio on the menu.
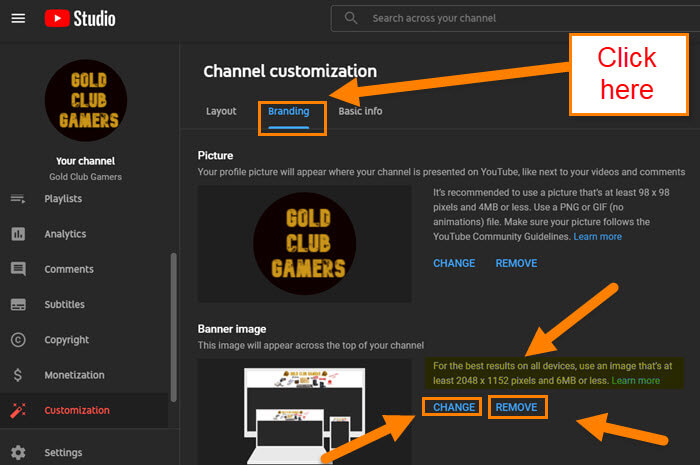
Step 4: On the Channel dashboard, look to the left menu. Scroll down to Customization. Click it.

Step 5: On the Channel customization screen you will need to click on Branding. That is the second tab at the top. The middle option is where we can change, remove, or add a banner. Since I have already added a banner, mine says Change and Remove only. Before clicking on the Change or Add option, you will notice they tell you what size to use for best results.
For the best results on all devices, use an image that’s at least 2048 x 1152 pixels and 6MB or less.
We talked about this above and this should be what you already have set up. Let us click Change for this article.
Step 6: Your File Explorer will open and now you need to find the banner you created. Once found, select it and click the Open button.

Step 7: Here you will see the preview screen. The sweet spot is in the center which we mentioned above. Move your mouse over each section of wording to see how it will look on each device. If you are happy with your creation, click the Done button at the bottom right.
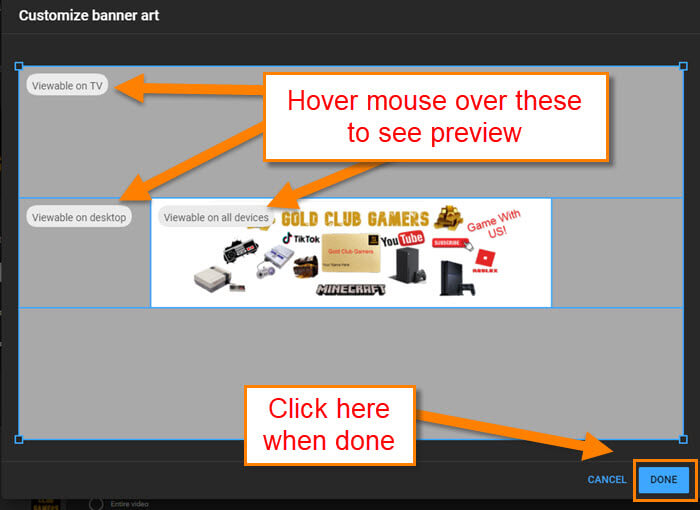
Step 8: The last thing to do is click the Publish button at the top right of the screen. Done! You can view this on your channel on any device to see the outcome.

Time for you to create those amazing banners for your channel. Make sure to share your new knowledge with your friends and family.
—