This guide relates to Windows 7 and Windows 8/8.1, access is slightly different but the procedures from there on are identical.
 System Restore was first introduced in Windows ME as a solution for otherwise unresolvable system malfunctions or other issues per medium of restoring a snapshot (sort of) from a previously known good condition. However, in those early years it was not terribly reliable, even in XP it was still pretty much a hit and miss proposition. Microsoft has subsequently improved the feature with each new version of Windows until System Restore has now become a very reliable method of recovery.
System Restore points are automatically created with each new Windows Update, and prior to some software installations, where supported. In earlier versions, system restore points were also automatically created each 24 hours (provided none had been created in the interim), but in the most recent versions of Windows this time frame has now been increased to one week.
I have always maintained that it’s a good idea to manually create restore points prior to any significant system changes, such as installing new software, or running cleaning/tweaking/optimization type software. It’s a bit like when the police are heading into a risky situation, what do they do? Call for backup. Perhaps not such a good analogy, but you know what I mean.
Accessing System Restore
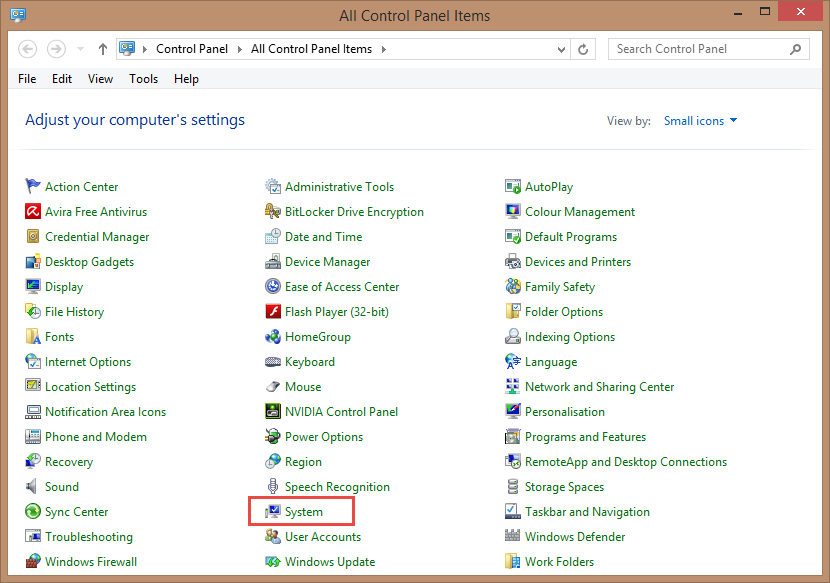
In both Windows 7 and Windows 8/8.1, System Restore can be accessed via Control Panel —-> System or right click Computer/This PC and then click Properties.
Additionally, in Windows 8/8.1 – bring up the “WinX” menu by either right clicking in the bottom left hand corner of the screen or simultaneously pressing the Windows + X keys, and then click on System.
From here, within the “System” window, procedures are identical for both Windows 7 and Windows 8/8.1. Simply click on the System Protection link in the left hand column to access relevant System Restore settings:
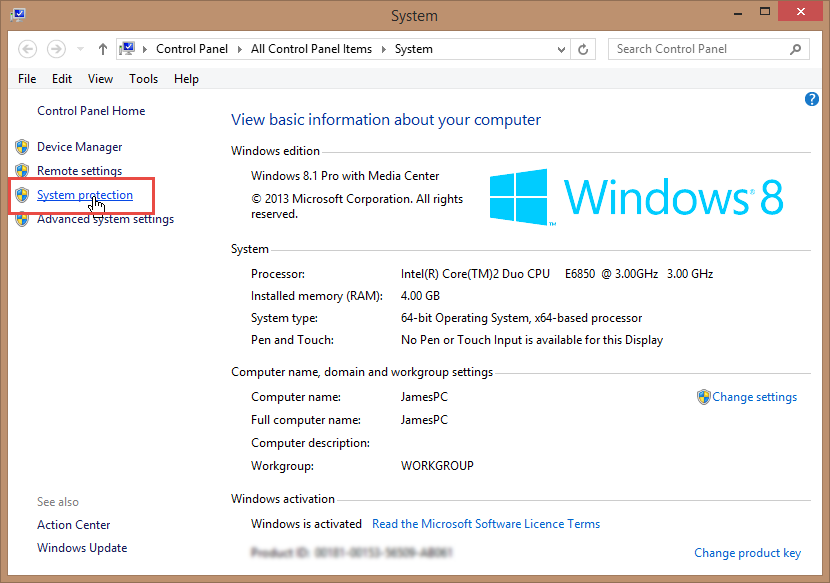
This then takes us to the “System Properties” window:

As you can see from the above screenshot, this “System Properties” window includes buttons which lead to restoring the system, manually creating new restore points, and configuring system restore (including turning System Restore on and off for each connected drive).
This is my main machine which includes both Windows 7 and Windows 8.1 installed on separate internal hard drives in a dual boot scenario. I am currently working within Windows 8.1 so that is why System Restore is turned ‘on’ for that operating system and ‘off’ for Windows 7. Were I to boot into Windows 7, the converse would apply. The third drive listed is a connected external USB drive which I use for data backup.
Restoring the System
Clicking on the System Restore button provides access to a list of all saved restore points from which you can then choose to restore the system to an earlier time:
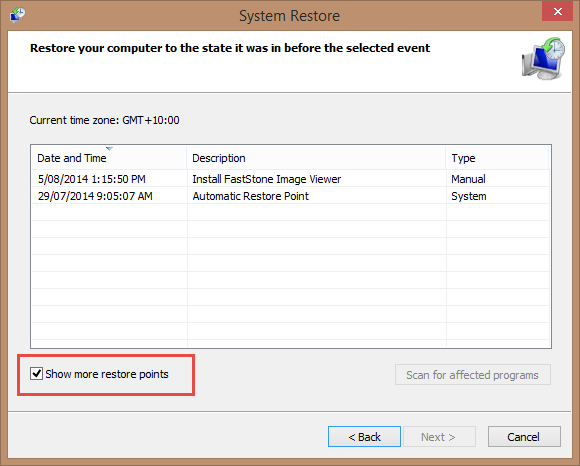
- Make sure to always select a restore point which predates the issue.
- To display all available restore points you will need to enable the “Show more restore points” option.
- The reason there are only two restore points displayed at this time is because I recently recovered this operating system from a previous image backup.
All you need to do from here is click on your selected restore point to highlight it, click Next and follow the prompts.
Creating a Restore Point
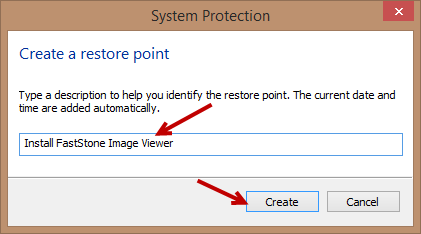
To manually create a system restore point, simply click the Create button, type a suitable name into the box provided and then click the Create button again:
 Configuring System Restore
Clicking on the Configure button will take you to a new window where you can turn system protection on or off, delete all restore points, and designate the amount of disk space occupied by System Restore, bearing in mind that the less space you allocate, the fewer restore points will be stored – when the maximum allotted amount of disk space has been reached, Windows automatically starts deleting older restore points each time a new one is created.
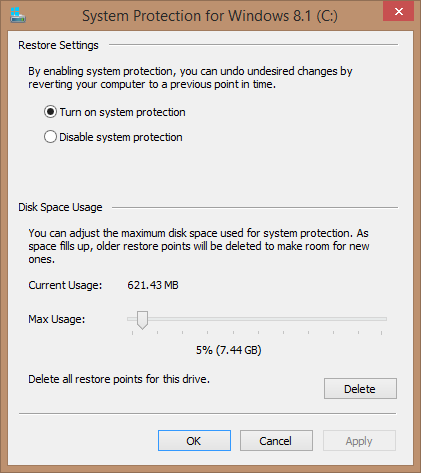
By default, Windows allocates between 3% and 5% of total drive capacity to store system restore points. In my case, utilizing 5%, the Window 8.1 drive is 148GB total capacity equating to 7.4GB set aside for System Restore. However, those users who are running out of free disk space can reduce the amount allocated for system restore simply by moving the slider to the left. Conversely, those who have plenty of available free disk space can force Windows to save more restore points by moving the slider to the right.
Remember, the more space allocated = the more system restore points that will be saved. For those users who do not tend to create image backups, I’m always an advocate for “the more the merrier”, especially where available free disk space is not an issue.
When Should You Use System Restore?
Even though System Restore has now evolved into a reliable recovery method, I still advise using the feature sparingly, preferably as a last resort rather than first response. There are a lot of common issues which can be quite easily resolved with a little research, and you’ll generally learn something along the way. However, when all else fails, it’s reassuring to know that System Restore can come to the rescue.
Hi Jim,
An excellent, easy to understand explanation and guide.
I have used SR a couple of times to dig myself out of a hole, on the occasions when reaching the, “Oh bugger!” point in time with a computer problem.
I am sure that a novice could work through System Restore without any hassles using your guide.
Kind Regards,
Jonno.
Cheers Jonno, appreciate the kind words.
Hello, Jim,
Please describe the details with screen shots , how to create a system image of the W8 partition and the method of restoring it in the next DCT . It will be a great help to some of my friends who are struggling to do so.
regards
Raju
Sure thing Raju. Do you mean the native WIndows 8 imaging tool?
Jim … Thanks, for your excellent explanation! I know how to use Restore, but, for me it is always good, to review and to pick up a few new tricks. I have been reading your articles, for almost 2 years now, through PC Pitstop and finally, late last year, I subscribed to Dave’s Computer Tips. I love the newsletter and usually, read every article, when I get it.
Right now, I am using Windows 7 Professional 64Bit. It took me a long, long time to switch from Windows XP Professional, to Windows 7. I was so comfortable with Windows XP and simply, knew the “ins and outs” of the OS. I am finally, becoming comfortable with Windows 7, after a year and a half of usage. I have had the 64Bit version, since, September 2013 and do find that I have some issues, with playing games on the OS. I do like the 64Bit version and of course, always prefer the NTFS. What a stablizalor NTFS has been for computers, in my personal opinion. Since, I have been opting to use the NTFS, my computers have been so solid and stable, it’s mind boggling, at times.
Again, thank you Jim … For doing a great job, with all of your articles!
Glad you enjoy the newsletters, always nice to hear,
Thank you for the kind words, appreciated.
Cheers… Jim
Hi Jim, I have been using Windows 7, 64 bit for about 18 months. I also have never been able to retain SR points on my computer. I’ve researched this issue, tried MANY, MANY things and it seems that it is more common than not with Windows 7 where SR points just disappear for no reason. Any thoughts on the subject? Thanks, Chris
Hi Chris – Yes, it’s quite a common issue. Conventional wisdom says there are several possible causes: http://blogs.technet.com/b/asiasupp/archive/2010/09/08/system-restore-points-are-missing-after-windows-7-reboot.aspx
These fixes work for some but not for all.
Incidentally, the exact same issue occurs in my dual boot system with Windows 7 and Windows 8. When I boot from Windows 8 to Windows 7 and then back again, all the Windows 8 restore points are gone… and vice versa.
It doesn’t bother me unduly because I regularly create system images.
Cheers… Jim