![]() I would like to share a few handy and useful tricks for using the Find & Replace feature in Word with you. Feel free to follow along on your own computer, using your own documents. I usually encourage that interaction because once you have actually done something it becomes a bit easier to remember.
I would like to share a few handy and useful tricks for using the Find & Replace feature in Word with you. Feel free to follow along on your own computer, using your own documents. I usually encourage that interaction because once you have actually done something it becomes a bit easier to remember.
Have you ever received a document to work on that another colleague has worked on or received an e-mail with a document attached that has a glaring error? And not only is there a glaring error (such as putting a comma outside of a quotation mark), but the same error is all through your document many, many times!
Yes, I thought you may have. But, let’s cover the basics first because some folks, though hard to believe, do not know how to access the Find and Replace feature!
You can locate the Find and Replace tool at the upper right-hand side of your Ribbon in Word. Of course, I love to same time and keystrokes and so I use the key combination shortcut to open it – CTRL + H to open the dialog box.

Now that the dialog box is open you can see that it is pretty intuitive – first, click on the Find tab and then you just key in the text you would like to find in the Find what field at the top and key in the text you would like to replace it with in the Replace with field in the bottom.
Once you have finished that little operation, you will click the Replace button to review and replace the first instance of the text you specified or, if you are the intrepid Word user, click Replace All, which will go through your document and replace all instances that match the word or phrase that you specified above.
If you noticed, above I said that Word would replace any word or phrase that you specified. Yes, that’s right, phrase! Not only can you find and replace a word, but actual phrases also! Say for instance, you have a document with name Nordstoms Department Store throughout. Of course, that is incorrect – there is no “s” in that name. So you search for Nordstroms Department Store and replace it with Nordstrom Department Store.
You can also use Search and replace to fix capitalization errors. Suppose I decided that I wanted my name to appear as c.a. Bratt? It is very simple to change it to lower case initials.
I wish I had a nickel for every time I have received a phone call asking me how to eliminate extra page breaks and hard returns in a document! You can, of course, scroll through your document and manually delete those pages and returns, but nobody is perfect and this method greatly widens the margin for errors and omissions. Personally, I want to do this task as quickly and painlessly as possible so yes, I will use the Find and Replace tool and let it do all the work for me!
Ok, let’s start with the page breaks shall we? If the document has lots of strange pagination it is possible that page breaks are the culprit.
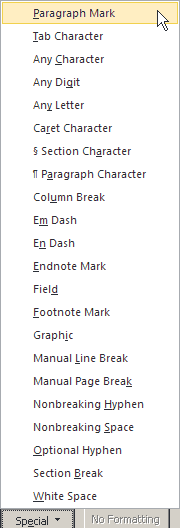
Once you have opened the Find and Replace dialog, using CTRL + H, click the More button and under Special, select Manual Page Breaks. Word will insert ^m in the Find what field.
Simply leave the Replace with field empty and click on Replace all and Word will go to work and tell you the number of replacements it has made, if any. You have now taken control of the page breaks in your document.
Perhaps you have some paragraphs that look a bit wonky to you. It could be that, for whatever reason, there are hard line breaks causing the problem. If you have the Show/Hide feature enabled (and I hope you always do), you could easily see this. Sadly most folks to not use that wonderful little feature and so you will now have Word take care of this problem for you.
Again, open the Find and Replace dialog box using CTRL + H and under More | Special, select paragraph marks.
Word will then insert ^p in the Find what field.
Leave the Replace with field empty.
Word will remove all line breaks in your document for you!
But wait! Mostly likely you do not want to remove all paragraph marks from you document do you? That would leave you with a document consisting of rather large paragraph wouldn’t it?
So, if you only have four or five paragraphs that were pasted into your document, and they have too many breaks, can can very easily h ave the Find and Replace tool remove the breaks out of those specific paragraphs. Simply select those paragraphs and follow the steps above!
Here’s another call I get frequently – how do I get rid of two spaces between sentences in my document and replace it with one space only? I have no intention of telling you how to space your sentences, although most folks use only one space between them now because we now have proportional fonts.
In any event, if you are looking to replace those two spaces between your sentences, you do so quickly and easily by using the Find and Replace tool and telling it to replace two spaces with only one.
Now if you have been following along with me, you will have noticed that in the dialog box, under the More button, there are a Sounds Like and Find all word forms selections.
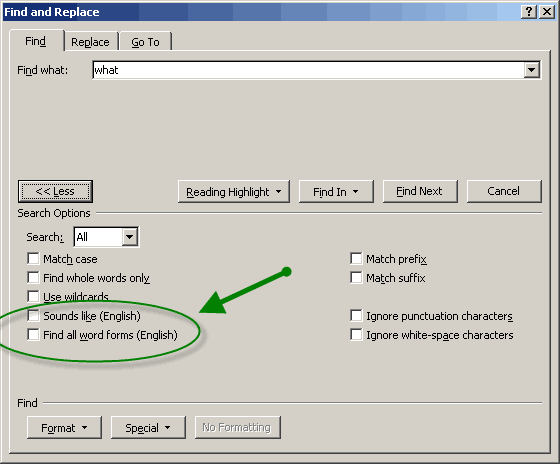
As you can see, both of these options only work in English. On paper it looks good and it should find words that sound like the word you enter into the Find field, but it is a long, long way from perfect.
Word forms though, is really useful and I encourage you to use it.
There are, as mentioned at the beginning, more features in this robust tool and I have not covered them all but I bet I showed you some that you didn’t already know about!
Thank you. The find and replace tricks have helped me. I have made a small donation to show my appreciation. Thanks again.
I am so glad to hear that my article has helped you. Thank you for letting us know!