Does Size Matter? – The Final Word
It wasn’t too long ago that HotMail imposed a 10MB limit on eMail attachments. That doesn’t leave much wiggle room when it comes to photos. Images are second only to videos and audio files when it comes to sheer size. An image can easily reach the 500KB mark in no time.
This becomes especially important if you happen to be a web master and page load speed is all-important.
What if you happen to like uploading a ton of images to Facebook? Then size does matter, after all.
Regardless of where your mind may be lurking at the moment, for the purposes of this discussion, smaller is better.
FILEminimizer – Installation and Usage
Installation of FILEminimizer is a snap. There is no junk software to watch out for; simply install it to your folder of choice and run it. Then let the magic happen…
Note: Until I registered the program I was presented with a nag screen reminding me to do so. It’s really no big deal and a small price to pay for a great, free utility. It will work without registration if you don’t mind the nagging.
That being said, let me show you a couple of images:
Try, for the moment, to ignore those gorgeous eyes and focus on the images themselves. Here’s the challenge—try to see the differences between them where quality is concerned. My amateur eye can discern none. There is one huge difference that is not immediately apparent, however. It’s the size of the images I’m talking about.
Note: The above images are not the original full images. They are screen grabs. Jim Hillier, my friend and DCT editor, would have my hide if I had uploaded nearly a megabyte in two images for demonstration purposes. I’m sure he’d be calling me ‘chum’ near some South Pacific island.
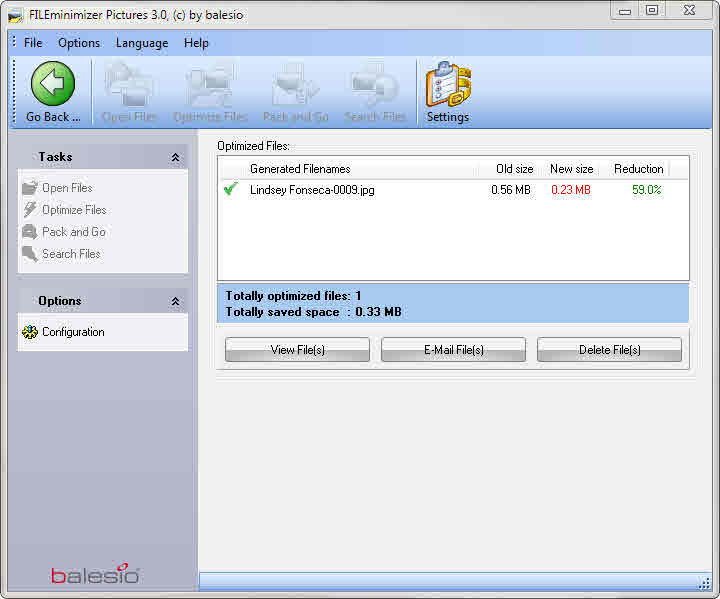
The Before image was originally 560KB, and after compression with FILEminimizer, it was 230KB; this is a whopping 59% reduction in size! I’ve used many compression programs in the past and not a single one came close to this without a noticeable loss of quality.
I might be putting the cart before the horse here, but this is the FILEminimizer results window for the above compression run:
Sharp-eyed readers will have noticed the actress’s name is Lindsey Fonseca, and I have at least nine pictures of her eyes.
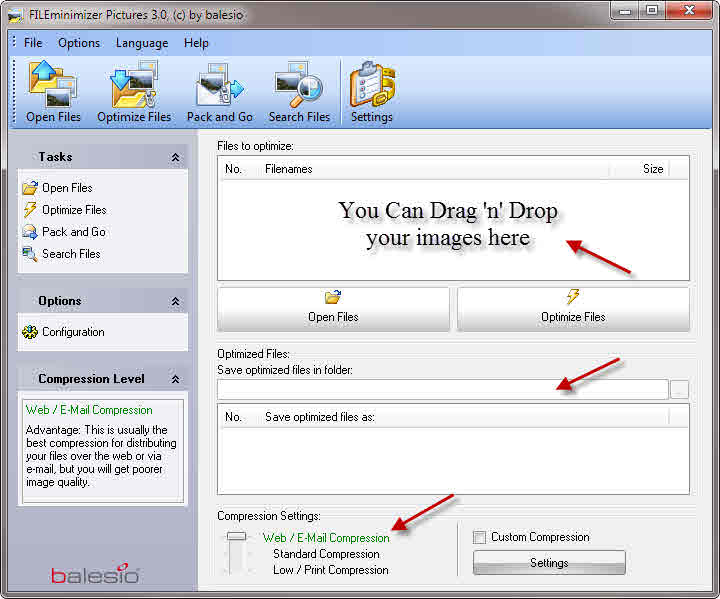
So, you say you want to know how to make this happen? I’ll show you the basics…
FILEminimizer – Main Screen
Download and fire up FILEminimizer.
- One of the features in FILEminimizer that I really like is that you can Drag and Drop a bunch of images directly into the program. I typically like to compress a number of images at one time so this is a boon for me.
- You can set FILEminimizer to create the newly compressed images to any destination folder you like. This leaves the original images untouched. If you don’t like the results for whatever reason, you still have your originals.
- You can choose from three levels of compression with an easy-to-use slider or you can configure the compression to any level you choose.
Settings
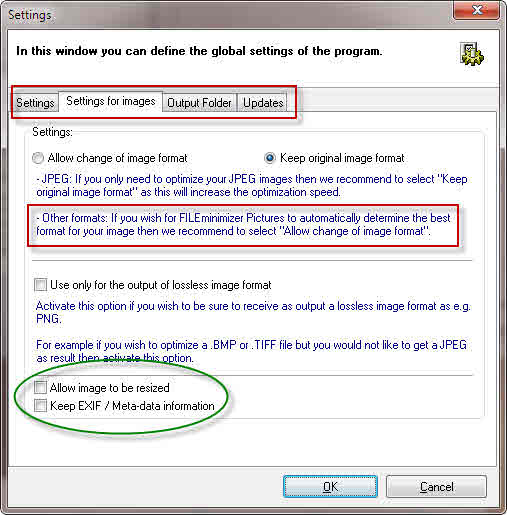
There are several options to choose from when configuring FILEminimizer. There is one particular settings window that I thought you should pay attention to:
If you click on the Settings Button on the Main FILEminimizer Screen, then choose the Settings for Images Tab in the window that opens, you will be brought to a screen that looks like the above image.
I have highlighted a couple things I deem particularly important to consider.
- The radio buttons (don’t ask me why they call them that) in the upper third of the window let you choose between changing the format or keeping the original format. If you choose the former, FILEminimizer will decide which format to use which is determined by the best compression results. The latter will keep the original format. This can be important if you have a web site pointing to a particular image file then change its extension. The site will no longer be able to find the file and all you’ll see is a blank empty box instead of the image.
- The second thing I wanted to point out is at the bottom portion of the window. FILEminimizer will change the size of the image if you want it to do so. I don’t know how aggressive the resizing algorithm is since I haven’t tried it, but I can imagine that a 1 x 1 image would be smaller than 1024 x 768 image. Ya think? I’m pretty sure there must be self-imposed limitations employed, however.
What the heck is EXIF? And Meta Data?!
EXIF is an acronym for Exchangeable Image File
Here’s the source from Wikipedia:
EXIF is a standard that specifies the formats for images, sound, and ancillary tags used by digital cameras (including smartphones), scanners and other systems handling image and sound files recorded by digital cameras. The specification uses the following existing file formats with the addition of specific metadata tags: JPEG Discrete cosine transform (DCT) for compressed image files, TIFF Rev. 6.0 (RGB or YCbCr) for uncompressed image files, and RIFF WAV for audio files (Linear PCM or ITU-T G.711 μ-Law PCM for uncompressed audio data, and IMA-ADPCM for compressed audio data). It is not supported in JPEG 2000, PNG, or GIF.
MetaData is basically data about data. That may seem silly at first glance but it can be useful. Here’s another convoluted description from Wikipedia particular to photographs:
MetaData may be written into a digital photo file that will identify who owns it, copyright & contact information, what camera created the file, along with exposure information and descriptive information such as keywords about the photo, making the file searchable on the computer and/or the Internet. Some metadata are written by the camera and some is input by the photographer and/or software after downloading to a computer. However, not all digital cameras enable you to edit metadata; this functionality has been available on most Nikon DSLRs since the Nikon D3 and on most new Canon cameras since the Canon EOS 7D.
The bottom line here is that if you don’t need this extra information attached to the image, let FILEminimizer remove it. That will help further reduce the file size and that is the whole point of this exercise, n’est-ce pas?
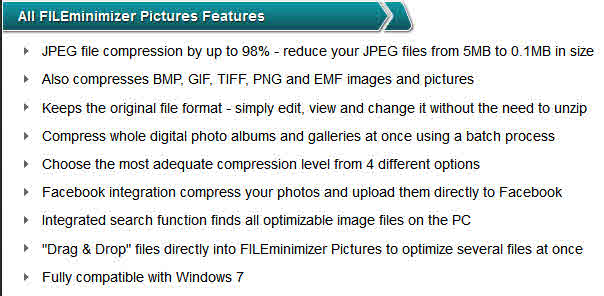
Here’s a feature list provided at the Balesio Web Site:
- I have used FILEminimizer for only a short time but have yet to see a 98% reduction. A sales pitch perhaps, but I have seen 60% reduction and that in itself is remarkable
- I haven’t used the Facebook upload feature
- I don’t run a home network and haven’t tried the search feature, either
Conclusions
FILEminimizer is a wonderful utility that will help anyone who needs to transfer quantities of images over the Internet. Whether it be via eMail, for Facebook, or onto a web site, this little gem is the ticket. It would also be useful for people whose image collections have gone a tad crazy and take up enormous amounts of disk space. Yes, I’m looking in the mirror as we speak :-/
I recommend you give this a try and see for yourself. You can find FILEminimizer Pictures at the developer’s Web Site: Balesio
Let me know how it works for you and above all else, have fun!
Richard
Addendum:
Since I wrote this article I have realized some new things:
- There is a 500 image limit in the free version
- Registration – Even if you register the product, you will be harassed by nag screens from time to time



Thank you very much for your article.
We really appreciate that you recommend our Software.
Thank you again, that is very kind of you.
Best regards,
balesio AG
Dear Balesio AG,
Thank you for your kind comments and acknowledgement of this post.
Perhaps a Giveaway contest might be in order? Think about it 😉 No pressure… really…
🙂 🙂 🙂
Richard
When you say there is a 500 image limit, does that mean the program should be uninstalled after 500 images have been modified?
Thanks,
Dan
Hi Dan,
The 500 limit is per run. This means 500 is the most you can process at one time.
If you had 750 images to process, You would have to first do 500, then the remaining 250.
Hope this helps,
Richard
Coincidentally, I noticed this offer (for TODAY [8/29/2013] ONLY!):
http://www.bitsdujour.com/software/fileminimizer-pdf-70
Hi dan,
Thanks for the heads up!
Please note that this giveaway is for the PDF minimizer and not the one discussed in this article.
Richard