Basic Computing 5 – Creating Desktop Shortcuts
I have one particular client who, if he doesn’t have a shortcut on his desktop to a particular program or folder, is completely lost. I have shown him multiple times how to create these shortcuts, he’s even written down my step-by-step instructions. Even so, every time one of his desktop shortcuts mysteriously ”disappears”, I have to go to his home and create a new one for him. In Windows 10, creating desktop shortcuts to installed programs, folders, and files is a relatively simple process. Here’s how:
Create Shortcuts To Installed Programs
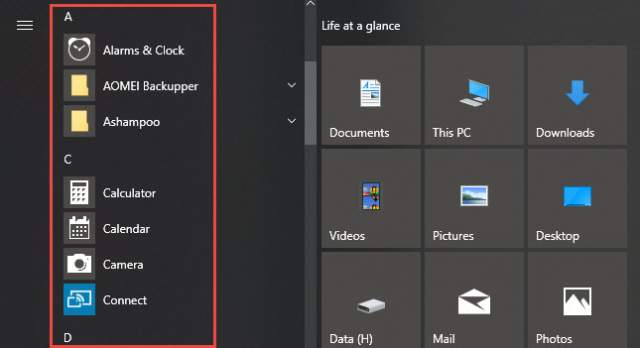
In Windows 10, all installed programs and Apps are conveniently listed in alphabetical order down the left-hand panel of the Start menu:
- To open the Start menu – either left-click the Start button or press the ‘Windows’ key on the keyboard
- Locate the listing for the program you want to create a desktop shortcut for
- Drag that entry from the Start menu to the desktop and you’ll see the word “Link” appear when you’re hovering over the desktop
- Release the mouse button to create a link to the program, aka, a desktop shortcut
If the program is within a Folder containing multiple programs — such as in the case of Microsoft Office, for example– you’ll first need to click on that Folder to expand the contents and then drag and drop the specific program onto the desktop:
Create Desktop Shortcut To Items In Quick Access
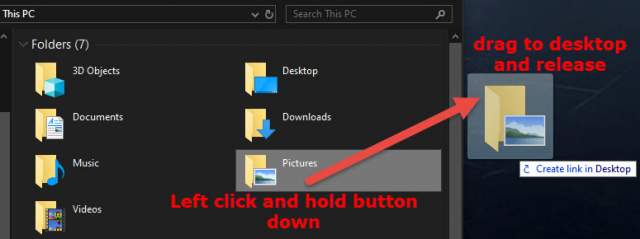
Creating a shortcut on the desktop to a specific folder listed under Quick Access –Pictures, Documents, Music, Videos, etc.– is exactly the same process as above. Navigate to the folder (let’s say Pictures), then drag and drop that folder onto the desktop.
- Items displayed under Quick Access are actually links to folders. So all you are doing here is copying the link from Quick Access to the Desktop, which then eliminates the need to open File Explorer in order to access those links.
Create Shortcuts To Folders Or Files
- Requires the additional use of the Alt key
Navigate to the folder or file but this time, hold down the Alt key on your keyboard and then drag and drop the folder or file onto your desktop in the same manner as above. Holding down Alt is necessary– if you don’t hold down the Alt key, Windows will display the message Move to Desktop, and the entire folder or file will be moved/copied to your desktop rather than simply creating a link.
If you want to rename your new desktop shortcut, right-click the shortcut, select Rename, and change the name to whatever you fancy.
- For a complete rundown on drag and drop, please read my earlier article: How To Drag And Drop Files
—


