A problem was encountered when upgrading my Outlook 2013 to Outlook 2021. (See my “Do You Use Microsoft Outlook With Gmail? Maybe Not After May 30” article.) The “Save Sent Item to” item disappeared from the Quick Access Toolbar. After extensive Internet research, I decided it was no longer available. However, I found an undocumented easy way to put it back in the Quick Access Toolbar of Outlook 2021.
What Is The Quick Access Toolbar?
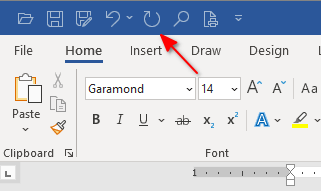
The Quick Access Toolbar is located in the top-left corner of each Outlook window and allows quick access to often-used commands (see image below).
What Does The “Save Sent Item to” Command Do?
You probably know that when you send an email, your sent email typically ends up in the “Sent” folder because that is the program default. How often do you then go to the Sent folder and drag that email to the folder where you want it to be? A good reason to move your sent email to another folder is that the sent folder is eventually emptied automatically. So any sent email that you want to be saved for a long time should be moved to a folder that you created. Besides, you are more organized when you use folders in Outlook.
The “Save Sent Item to” command allows you to select the folder where your sent email will end up BEFORE you send it. That saves time in dragging the sent email around after you send it. Besides, what if you get distracted after sending your email and forget to move the file from the sent folder to another folder? That sent email will eventually be deleted.
How Do I Add The “Save Sent Item to” Command To The Quick Access Toolbar?
Over the history of Outlook, there are two different ways to add the “Save Sent Item to” command to the Quick Access Toolbar. What I am calling “Method 1” is for old versions of Outlook and “Method 2” for new versions. I am purposely being vague about “old” and “new”, but I can narrow it down some. I know that Outlook 2013 and earlier use Method 1 and that Outlook 2021 and future versions (I assume) use Method 2. I just don’t know if it was Outlook 2016, Outlook 2019, or Outlook 2021 when it switched to Method 2. So if you are using Outlook 2016 or Outlook 2019, try Method 1, but if it doesn’t work use Method 2.
Method 1
1. When you are in a send mail window, click on the little symbol at the right end of the Quick Access Toolbar shown at #1 below, and then click on “More Commands…” as shown at #2 below.
2. Yours will say “Popular Commands” in the “Choose commands from” box shown below at #1. Use the little down arrow to choose “All Commands” as shown. The commands will now be listed in alphabetical order below that box. Mine does NOT show the “Save Sent Item to” command because I have a “new” version of Outlook, but yours will be in the location noted as #2 below if you are using an “old” version of Outlook.
3. Click on your “Save Sent Item to” command and then click the “Add >>” button which is shown above as #3 to place it in the list of the commands to the right of the “Add >>” button.
4. If you are happy with the position of the “Save Sent Item to” command which will be the right-most command in the Quick Access Toolbar, simply click the “OK” button shown above and you are done. If you want your new command to be further to the left in the Quick Access Toolbar, click on the command in the box to the right of the “Add >>” button and then click on the up-arrow button to the right. When you have it where you want it, click the “OK” button, and you are done.
Method 2
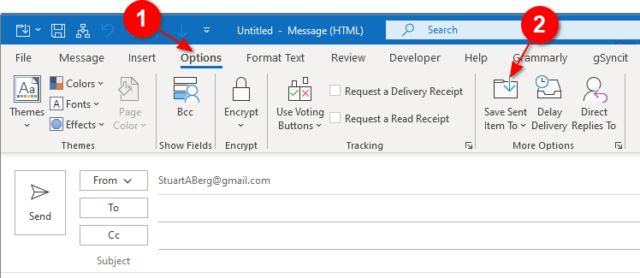
When you are in a Send Mail window, click on the “Options” tab as shown at #1 below. Notice that the “Save Sent Item To” command is already there at #2 below. You can use it from there.
However, because the send mail window opens at the “Message” tab, I find it more convenient to use it from the Quick Access Toolbar while I’m in the “Message” tab. So RIGHT-click on the “Save Sent Item To” command as is shown above and you will see the image below where you can click on “Add to Quick Access Toolbar”, and you are done.
How To Use the “Save Sent Item to” Command
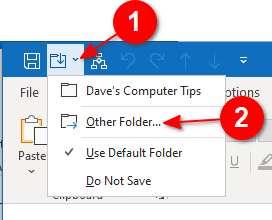
1. When you are about to send any email, click on the little down arrow shown at #1 in the image below. Where I only have “Dave’s Computer Tips” showing, you will have nothing the first time you run this command. However, as you use it the command will save the most recent dozen or so folder names previously used so you can reuse them by clicking on the one you want. When not in the list of previously used folders, choose the folder name for the email you want to send by clicking on “Other Folder…” shown at #2 below.
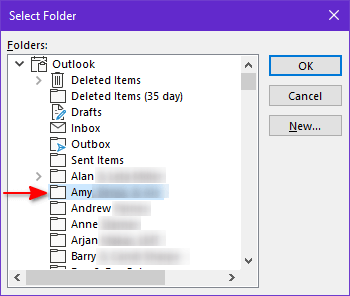
2. Now you will see something like the image below. (I’ve blurred out last names for privacy reasons.) You can look through the entire list of your folders to find the one you want and click on it. I’ve clicked on Amy’s name which causes it to have a light blue background color. If I now click the “OK” button, whenever the email is sent, a copy will be saved in the “Amy” folder, NOT in the Sent folder. Should you want to create a new folder, click on the “New…” button to create one.
Some Other Things To Know
1. I haven’t tested this across all the apps, but it appears that RIGHT-clicking on any command in the ribbon of any of the programs in the “new” Microsoft Office (i.e. Outlook, Word, Excel, etc.) will offer you the “Add to Quick Access Toolbar” as the first item listed if that command is not already in the Quick Access Toolbar.
2. There is a setting in (I believe) all versions of Outlook that saves the reply to an email that is in one of your folders to that folder at the time it’s sent. In my Outlook 2021 that setting is at File > Options > Mail and is in the “Save messages” section. You can see it in the image below. The image below also shows “Save copies of messages in the Sent Items folder” which as mentioned previously is the default.
Should you have any questions or concerns, please use the Comments section below.
—


Nice tip. Thank you!
Hi Elliott,
Thank you for taking the time to let me know that you liked it. I hope others will find it useful as well.
Stu