
Since the beginning of time, about the time I was born, Windows has had a desktop icon system in place. You click on an icon and it miraculously opens a program, document, or just about anything else you want. Of course, you are already familiar with these types of icons. But wait– you can set up other, more specialized icons, and this week’s Quick Tips article is going to show you how to set up a few unique ones.
How To Create A Shortcut (Icon)
It’s easy to create a desktop shortcut. Follow these simple steps to do so:
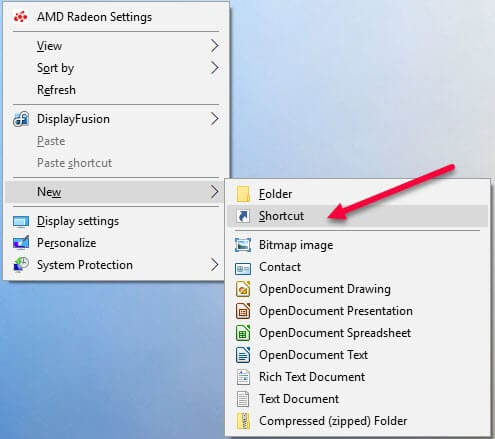
- Right-click on an empty space on your desktop
- In the context menu that appears, hover over New
- In the sub-menu that opens, click Shortcut
Note: In the above image you can see that there are many varied items that can be created this way. For example, you can create a new Folder in which to place similar types of of files, programs, and/or data. It helps reduce desktop clutter. I don’t like clutter.
Clicking on the Shortcut item will open a new window:

At this point, you need to tell Windows what program or file this shortcut is going to point to. If you know the path, you can type it in. If not, then you can use the Browse button to find the desired item.
I promised at the beginning of this post that I would show you some handy shortcuts that aren’t normally known to the casual user.
Windows Update
To get to Windows Update you would normally have to suffer through several clicks of the mouse and navigate your way through the Settings App. How about a single click on your new shortcut?
To create a shortcut to Windows Update, enter this path into the Edit Box shown in the above image:
ms-settings:windowsupdate
Note: I recommend that you copy and paste the above in order to avoid typographical errors.
Once you have entered the above text, click the Next button. A new window will open asking you for a name for this shortcut. You may choose any name that suits your fancy, but it might help to keep it descriptive. In this case, maybe “Windows Update” makes sense? Whatever your decision, click the Finish button to complete the task.
You will now have a new Shortcut on your desktop pointing to Windows Update. No more drilling through the confusing Settings App to reach your destination. Sweet!
Control Panel
To create a Control Panel shortcut, things are a bit different:
- Click the Start button
- Type control panel
- Right-click Control Panel in the list
- In the Context menu that opens, choose Open file location
- File Manager will open with the Control Panel link highlighted
- Right-click and Drag that link to your desktop
- In the window that opens, choose Create shortcuts here
You will now have an icon on your desktop pointing to Control Panel.
God Mode
Don’t let this scare you. God Mode is a special type of folder that will hold more shortcuts than you ever thought existed. Here’s how to create it:
- Right-click on an empty space on your desktop
- In the Context menu, hover over New
- In the sub-menu that opens click Folder
- Here’s the magic– enter this text as the name of the folder: GodMode.{ED7BA470-8E54-465E-825C-99712043E01C}
- Click OK
Note: As before, I recommend copying and pasting this to avoid typos.
Note 2: On my system, for whatever reason, the icon does not have any text below it as normal icons do. If you try to rename it, then it won’t work any more and you’ll have to recreate it. Not all Windows computers will react in this same way.
Clicking on this new icon will open up 204 shortcuts to everything from Administrative tools to the Windows Firewall. Pretty impressive, don’t you think? Have a look:
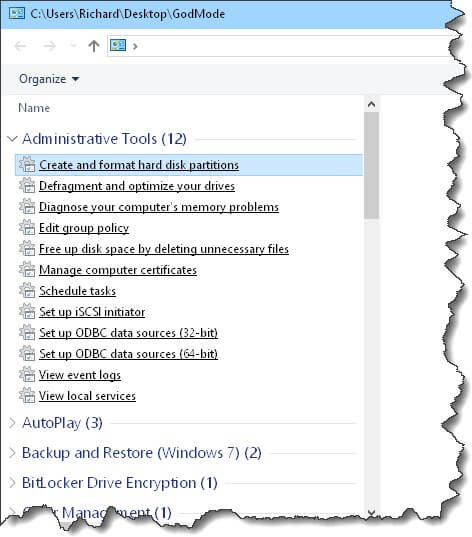
Be careful! It’s easy to spend hours in there. Seriously, make backups before tinkering. You’ll thank me later.
Bonus Tip
Windows will automatically choose an icon for you when creating normal shortcuts. By “normal” I mean those like the Windows Update shortcut we created earlier. This will not work with the Control Panel or God Mode shortcuts, for example.
If you would like to change the default icon to something else, then do this:
- Right-click on your new icon
- In the Context menu, choose Properties
- In the window that opens, click the Shortcut tab
- Now, click the Change Icon button
That should open a window similar to this one:
![]()
Scroll through the icons until you find one you like, click it, then click the OK button. In the Properties window, click OK and you’re done.
Note: Any program file (exe) or library file (dll) will have its own set of icons to choose from. Windows chooses the shell32.dll file by default, but you can use any file you like. Click the Browse button to begin your search. There are many thousands of icons already on your system.
Note 2: Given that this is Windows, the new icon you chose might not “stick”. To remedy this, you might have to do a screen refresh with the F5 key. Sometimes a system re-boot is necessary. And sometimes, it doesn’t work at all. Bless you, Microsoft.
As always, if you have any helpful suggestions, comments or questions, please share them with us,
Richard
—
Just a warning, the God Mode icon can sometimes crash a system. Use at your own risk.
The ms-settings: approach is a new one to me. After a quick search I found this page with over a hundred more shortcuts
https://docs.microsoft.com/en-us/windows/uwp/launch-resume/launch-settings-app
Hi Ron,
Wow! You sure found the mother lode.
Great tip and a wonderful addition to this article!
Thanks,
Richard