 The Windows Recycle Bin has been around for a long time and I must say, it is a great idea. It helps protect us from ourselves in so many ways. It allows us to delete stuff willy-nilly and retrieve it once we realize that we had. Oops! What some of you may not know is that there are ways to control the size of the Recycle Bin, decide whether we want a warning, or to disable it completely. This week’s Quick Tips article will try to show you how to take control of your Windows Circular File.
Recycle Bin Options
By default, Windows allocates a percentage of your disk drive towards your Recycle Bin. This can be up to 15% of your drive, depending on its size. Think about that for a moment. 15% of a 250GB drive is 37GB. That’s a whopping amount of space to dedicate to files you’ve chosen to delete. What if you start thinking about today’s multi-terabye drives? The numbers become mind-numbing. Let’s tame this beast, shall we?
- Right-click the Recycle Bin icon on your desktop
- Choose Properties in the context menu that pops open
That should bring you to a simple screen that looks something like this:
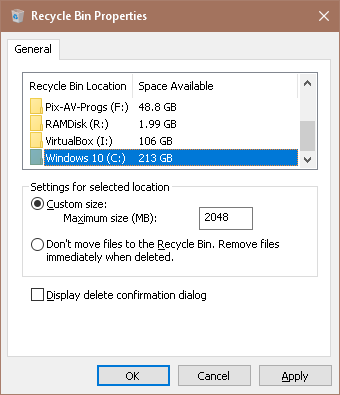
In this window, you can choose the drive. I happen to have lots of partitions and drives so we’ll focus on the system drive (usually ‘C’). You can choose a custom size, let Windows decide, or choose to not have any files sent to the Recycle Bin. You can also choose to have a confirmation dialog pop up whenever you delete a file. You know, those irritating things that ask you if you’re sure you want to do what you just said you wanted it to do?
Note: Adjust your settings, then click the Apply button, then move on to the next partition or drive. When you are satisfied with all your choices, then click the OK button to close the window.
Custom Bin
I like the Custom setting. You can set this to anything you like, but to keep it useful, you will have to sacrifice a certain amount of disk space. It all depends on how you use your computer. If you keep a lot of data on your system drive, then it might be a good idea to keep a larger Recycle Bin. If you don’t, then it makes sense to have a smaller size. As you can see in the above image, mine is set to to 2GB. (2048 is 2GB). That is more than enough for me since I keep no data on the system drive.
Note: To calculate the number of Bytes, simply multiply the number by 1024. For example, 3 * 1024= 3072. The number you enter is perceived in Megabytes by Windows. 3,072 Megabytes is equal to 3 Gigabytes. You don’t have to enter numbers that are powers of two, but it keeps things nice and clean from a drive’s point of view.
Ballsy Bin
You can also choose not to have any deletions go to the Recycle Bin. Now, I’ve been around computers for a very long time and, of course, I never make mistakes <cough>. It doesn’t matter that you are an experienced computer professional, and who, like me, never unintentionally deletes a file. It is not a good idea to disable the Recycle Bin entirely. I will leave that up to your ego to decide.
Note: As with all rules there are exceptions. For example, I have a partition devoted solely to movies. Honestly, I never delete files from that partition– I can’t bear the thought. Besides, there are backups of those movies all over the place. There is no good reason to have an active Recycle Bin on that drive that I can think of. Why waste space that could otherwise be used by yet another, very necessary movie?
Fraidy-Cat Bin
On the other end of the spectrum there is the option to confirm any and all deletions. If you check that box, then any time you delete something a window will pop up asking if you really want to do what you just said you wanted to do. I, for one, find confirmation dialogs most annoying. In this case, it truly doesn’t make a lot of sense considering the whole point of the Recycle Bin is being able to recover from things like doing what you didn’t want to do in the first place. The choice is yours.
Note: If you use the ‘Ballsy Bin’ approach, then the confirmation pop-up might prove useful. One never knows, does one…
Final Thoughts
The Recycle Bin is one of those simple ideas that has proven to be invaluable over time. (It has saved my bacon on more than one occasion.) It is easy to focus on all the bad things intrinsic to Windows, but the Recycle Bin is definitely one of the good things we might easily take for granted. Somebody thought of it! Tag <Hero> (whomever you may be).
As always, if you have any helpful suggestions, comments or questions, please share them with us,
Richard
—
Thanks Richard,
My opinion is that the Recycle Bin is a helpful tool which sits unobtrusively in the top left corner of my screen.
I check the contents on a regular basis before ’emptying’ to make sure that ‘items’ therein are no longer required, and if I am doubtful over an item I place it on the desktop for re-assessment.
Hi Jon,
That sounds like a safe way to manage things,
Richard
For some idiotic reason,Microsoft has deleted the option “Empty Recycle Bin” as a single direct option in Windows 10 Pro (I don’t own Home, so I don’t know if that is also true for Home). Is there a way to add that to the options at the top of the Recycle Bin “Task Bar”?
GerryR, I have Windows 10 Pro , I right click on the Recycle Bin icon and Empty Recycle Bin is first on the menu list.
Expand the Menu, press to hold down the Shift key then right click on the Recycle Bin icon.
Hope this helps….:-)
joninOz,
Thanks!