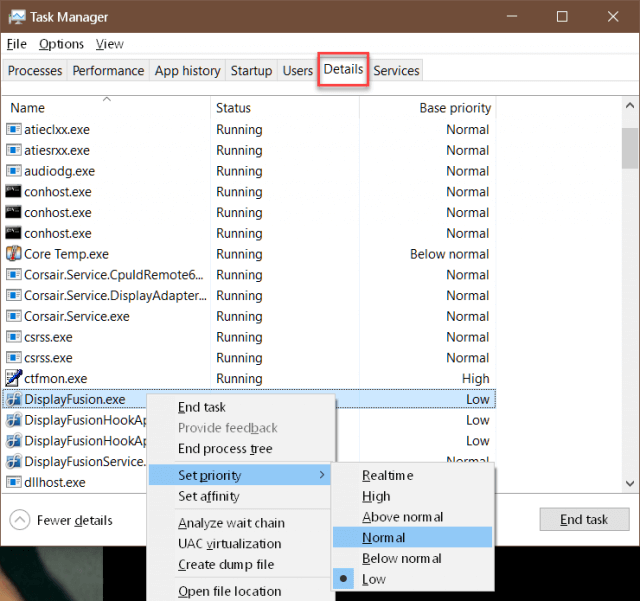
 Windows manages all the processes running on your computer. It controls how much memory is allocated to each process and it also controls how much time is devoted to each process in turn. Sometimes, you might want to change the priority of a process if you’d like it to get more attention (or less) than Windows deems necessary.
For example, I use a third-party multi-monitor management program called DisplayFusion. I use it for several of its abundant features but one thing it does that I like is that it lets me have different background images on each of my monitors. I have it set to change this display every 10 minutes. Recently, when this change takes place, it causes videos that I am watching to stutter, and sometimes it causes other programs to “hitch” for a second. I’m sure this is due to a recent graphics driver update. In any case, it is irritating, so I changed the DisplayFusion priority settings to “Low” and that fixed things for the most part. (I’m waiting for the next graphics driver update to see if things get back to normal.)
This week’s Quick Tips article will show you how to manage the Priority settings on your own. It’s always about more control over your system, isn’t it…
Getting To The Setting
- Use the CTRL + SHIFT + ESC keys to open Task Manager
- In Task Manager, click the Details tab
- Right-click any header to choose the columns you want to see; in this case, you want to check Base Priority
- Right-click the process of which you want to change the Priority
- In the Context menu that opens, choose Set priority
- Click the priority setting at which you want the process to run
You will have six options:
- Realtime (never choose this as it may lock up your computer)
- High
- Above normal
- Normal
- Below normal
- Low
That should bring you to a window similar to this one:
I strongly suggest that you never choose Realtime. It will totally hog your system resources and might even keep your computer from running properly and it might even make your PC unusable. Start with baby-steps and first try Above normal or Below normal to see if that setting does the job for you. Once you make your selection, a confirmation window will pop open where you can choose to either confirm or cancel your choice.
Note #1: I haven’t been able to find information about whether you have to reboot your computer for these settings to take effect, but I don’t believe you do– the change seems to be immediate.
Note #2: While putting this article together I noticed a process called “Corsair.Service.DisplayAdapter.exe”. It is sitting there in the above image. This is part of a new keyboard driver that I installed a short while back and I can’t for the life of me understand why a keyboard has anything to do with a display adapter. It might be the source of my graphics problems. There is also a suspicious-looking serive with the word “remote” in it. I don’t like anything that uses that word. This will have to be looked into more deeply– hmmm… I will disable both of these from running at boot time and see what, if anything, breaks.
As always, if you have any helpful suggestions, comments or questions, please share them with us,
Richard
—


I Tried it but doesn’t work in Windows 10.
Hi Jack,
This was tested on a Pro edition. Which edition are you using?
My version: Windows 10 Home
Version: 1903/19H1 64-bit
That might be the reason…