
 Start Menu Tiles
The full screen Start Menu with Tiles began its life in the now infamous Windows 8. Most people hated it but I think that is mainly because it was such a huge change from the original Start Menu we had been using for decades. People resist change and the bigger the change, the more resistance is felt.
To be honest, the first time I saw the Windows 8 Start Screen I didn’t know what to do next. That is not a good thing for any Operating System.
Microsoft is sticking to its guns, though, and the Tiles still live among us. Admittedly, Windows 10 has backed off a bit by allowing its Users to disable the full-screen version we were forced to use previously. And a welcome addition to compliment the Tiles is a scrollable Menu that most people expect to see.
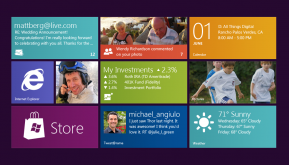
Windows 10 lets you personalize nearly every aspect of its interface and the Start Menu is no exception. You can have wide tiles, small tiles, live tiles and static tiles, and groups of tiles. The customization choices are numerous, and today, we’ll be touching on some of those options.
Personalizing Tiles
Tiles – To Pin, or Not To Pin
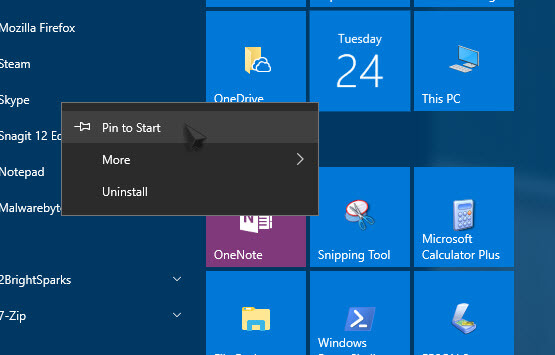
- You can ‘pin’ anything listed in the scrollable menu on the left into the Start Menu as a Tile. Simply right-click it and choose Pin to Start. You will immediately see a new Tile show up in the Start Menu and you can drag it into any position you want.
- You can ‘unpin’ any Tile by Right-clicking it and choosing Unpin from Start
- You can ‘pin’ any Tile to the Taskbar as well. Right-click a Tile, hover your mouse over More, and choose Pin to taskbar
- You can ‘unpin’ a Taskbar item by Right-clicking it and choosing Unpin from taskbar
How Many Tiles?
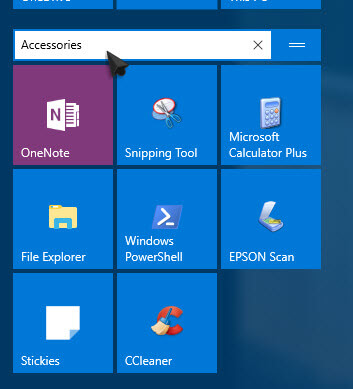
Normally, the Start Menu gives room for 12 small tiles across. You can up this number to 16 by toggling a setting.
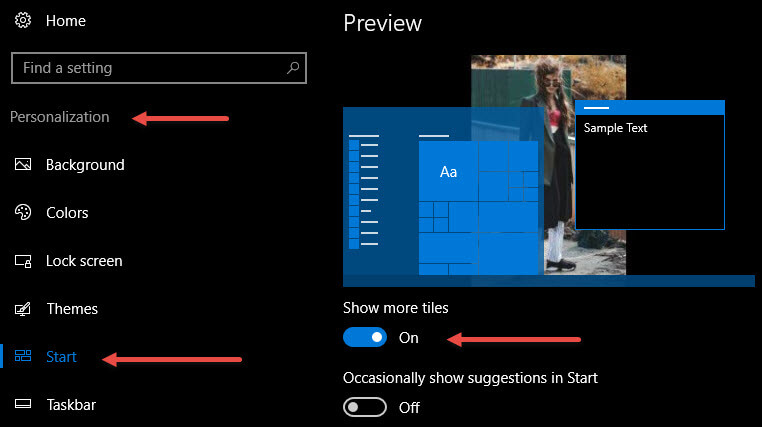
Use the Windows Key + I hotkey to open the Settings window. From there, choose Personalization, then Start. You will see a Toggle on the right labeled, Show more tiles. By switching this back and forth you will see the changes above.
Pay no attention to the girl in the above image. It is one of the background images I have and kept it simply because I thought her outfit was so remarkable. I would absolutely expect to see her on early episodes of Saturday Night Live. Those were the days, my friend… ♫
Tile Sizes
You can change the size of the Tiles by right-clicking one, hovering over the Resize option, and choosing a size from the Menu that flies out.
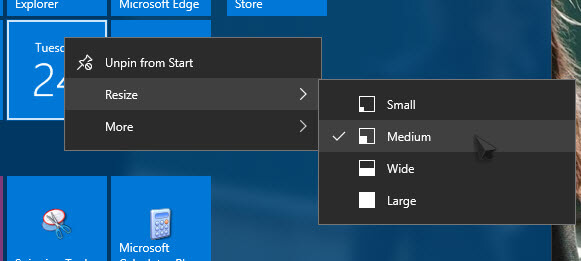
The number of available sizes will vary depending on the Tile you have chosen.
Live Tiles
 The image to the left not only shows the Weather Tile “Live” but also shows how lucky I am to live in such a balmy clime. Yes, folks, those temperatures are in Fahrenheit. One degree above freezing is today’s expected high and I’m going to enjoy it while I can. I worked for it, I earned it, and nobody is going to deprive me of it!
Time for beach balls and parasols, everyone!
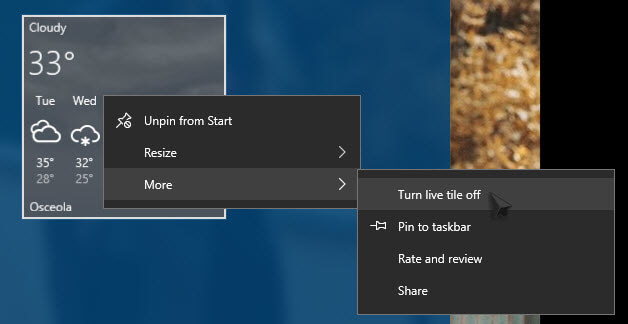
Right-click a Tile, hover your mouse over More, then toggle Turn live tile on/off.
Not all tiles offer a “live” version so you will have to experiment.
Tile Groups
Rename a Group
Above each group of Tiles in the Start Menu, there is a Group Name. This can easily be changed to suit your tastes. Simply click on any Group Name and you will be able to edit the name.
Create a Group
You can create a new Group by dragging a Tile to any spot in the Start Menu that is not part of an existing Group. Windows will create a new Group there, and you can name it in the same way as before.
Remove a Group
You can remove an existing Group by emptying it of all its Tiles. Windows will do that for you, too. Apparently, Windows abhors empty Groups as Nature does a vacuum.
The Bottom Line
By combining all the aforementioned options, you can mix and match to your heart’s content. If you run out of ideas, you can use your favorite search engine and you will find Start Menu images by the thousands. That should get your creative juices flowing.
The Start Menu can be not only functional but aesthetically pleasing, too. A nice combination…
Richard
—
Thanks for the tips. The “show more” setting is nice, but another “how to” article suggested turning on “full screen” setting. I found I liked it so I kept it. I liked it because although it is full screen it disappears quickly. I was only able to use Win 8 after I discovered how to quickly and easily switch to the traditional desktop view!
BUT, the main reason I read this article is not there. The number one piece of customization I do is edit the icon/tile text. Many of the titles are too long, ie “Microsoft Word 2010”, I can tell it is MS from the icon so I shorten the text to 2010 Word (so that all of the icons sort into the same place.
I keep finding and forgetting how to change the text in Win 10.
Hi Ron,
There are probably several ways to do this, but here is one:
1. In the scrollable menu on the left find the link you want to rename
2. Right-click, hover over More… and choose Open file location
3. Once you have found the shortcut, Right-click and choose Rename
Tip: Another way to sort shortcuts is to preface them with 1-, 2-, 3-, etc…
This was a very helpful comment so thank you for sharing.
Hope this helps,
Richard