


Fast User Switching

There are two reasonably easy ways to turn this feature off, and if you have no need for Fast User Switching, or you simply don’t want it enabled, then this week’s Quick Tips article is for you. Read on…
Disabling Fast User Switching With Group Policy Editor
- Use the WinKey + R hotkey to open the Run Box
- Type gpedit.msc and click OK; the Group Policy Editor will open
- In the left panel, follow this path: Computer Configuration > Administrative Templates > System > Logon
That should bring you here:
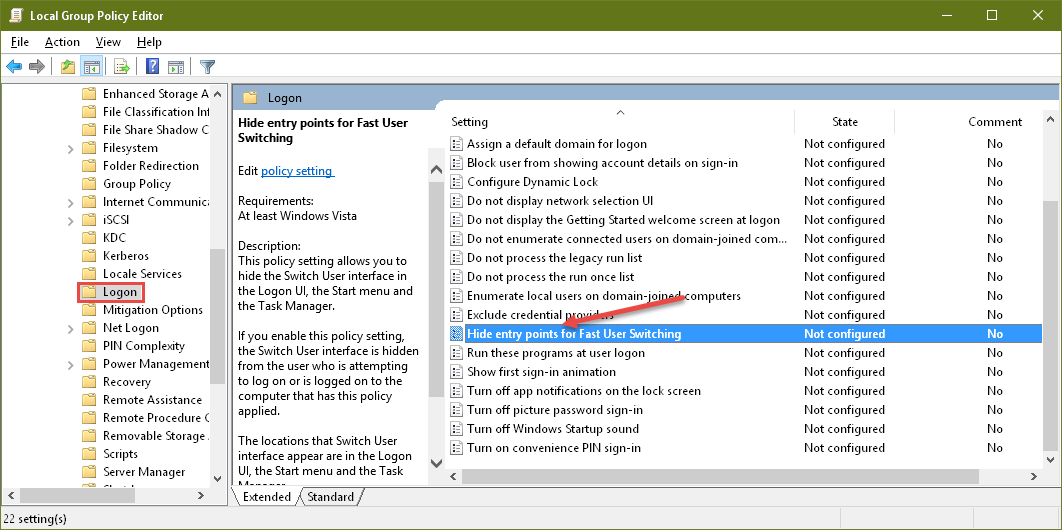
- In the right panel, find and double-click the entry: Hide entry points for Fast User Switching
- In the window that opens, tick the Radio button labeled Enabled and click OK
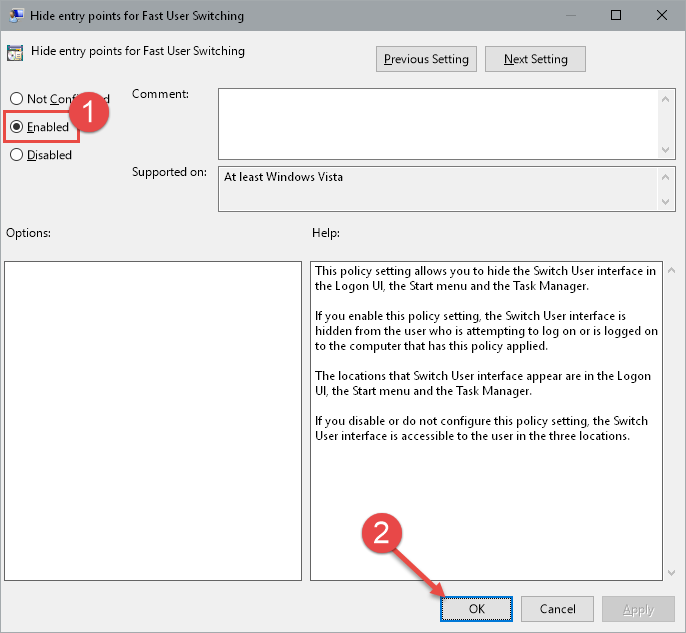
You will have to reboot your computer for these changes to take effect. To reverse these settings, change the setting from Enabled to Not Configured.
Disabling Fast User Switching With The Registry Editor
If you own the Home version of Windows, you will need to make changes in the Registry, as the Group Policy Editor will not be available to you. Be careful here…
[message type=”warning”]
Standard Warning
The next few steps involve using the Windows Registry Editor. The standard warning is, before any changes are made to the Registry, Back It Up! If you don’t know how to do that, here is a Windows 10 Quick Tips post that will show you how.
[/message]
[message type=”info”]
Open The Windows Registry Editor
- To open the Windows Registry Editor, use the Windows Key + R Hotkey combination to open a Run Box
- In the Run Box, type regedit and hit Enter or click the OK Button
[/message]

- Drill down this path in the left panel: HKEY_LOCAL_MACHINE\SOFTWARE\Microsoft\Windows\CurrentVersion\Policies\System
- In the right panel, Right-click an empty spot
- Choose New, then DWORD (32-bit) Value
- Name it HideFastUserSwitching
- Double-click the new DWORD and change its value to 1, then click OK
- Close the Registry Editor
You will have to reboot your computer for the new settings to take effect. To reverse this setting, change the value from 1 (one) to 0 (zero).
Bonus Tip
If you are running the new Creators Update, you can copy and paste the above Registry path into the Editor’s Address Bar to quickly take you to the correct sub-key. This will save you the mundane task of searching through the daunting list.
Final Words
Once these settings are in place a User will have to log out before another User can log in. Multiple Users cannot be logged in simultaneously and the option will no longer be available on the Start Menu. Well, that was the whole point of the exercise, wasn’t it?
Even though this article is directed at Windows 10 Users, the instructions should work with versions going back to the ancient Vista system, as well. Maybe. Obviously, the interface will be different, but the results should be the same. I don’t have these older systems at my disposal to put that statement to the test, so take this with a large grain of salt. I only support Windows 10 these days. Particularly, where changes to the Registry are concerned, I tend to the side of caution.
As always, if you have any helpful comments and/or suggestions, please share them with us,
Richard
—

