
Screenshots And The Print Screen Key (PrtScn)
Taking screen shots is part of my life. They are needed on a daily basis for an educational/technical Website like Dave’s Computer Tips (DCT). It is much easier to show you how to do something than it is to merely tell you about it. The old “a picture is worth a thousand words” adage certainly holds true.
Due to the nature of my business, a dedicated Screen Capture program is a necessity for me, but you may not need all those bells and whistles. Out of the box, Windows 10 provides some basic ways to capture screen shots and I’m here to tell you about two of them and they are both pretty lame. I’ll show you a better way a bit later.
Whole Screen Shot
In Windows, if you press the PrtScn key, Windows will make a copy of your entire screen and store it in memory. To access this screen grab and ultimately save it, you will need to open up the Windows Paint program and paste your screen shot into that. From that point forward you may manipulate it, then save it.
Note: If you have multiple monitors, the screen shot will be of all of them and you will have to use the Paint program to crop what you don’t need. As I said, it’s pretty lame.
Just A Window Shot
If you want to capture only an active window, then use the AltKey + PrtScn key combination. It’s the same as before; you will have to run Paint and paste your screen shot into it before it is of any real use to you. Still lame…
A Better Way – WinKey + PrtScn
Windows 10 introduced a better way. By pressing the WinKey + PrtScn key, Windows will save your capture as an image on your hard drive. The default location for this save is This PC–>Pictures–>Screenshots. This method lets you bypass the Paint program altogether and is just fine if all you need is a down-and-dirty screen shot.
Unfortunately, the WinKey + Alt + PrtScn combination does nothing at all, so you’re stuck with whole screen shots using this approach.
The above methods are quick and easy choices for taking simple screen shots. ‘Simple’ is the key word here.
The Snipping Tool
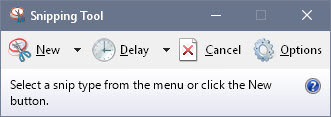 Windows 10 provides a basic screen capture utility called Snipping Tool. The Snipping Tool will allow you to capture a defined portion of the screen and save it to disk. It also provides a few elementary tools for highlighting, drawing lines, and an eraser. You can also save your screen shots in three formats: jpg, png, and gif. It can also be saved as a single HTML file (mht).
To find this tool all you have to do is click on the Start Button and begin typing snipping tool. You can then pin it to your Start Menu or the Task bar for future one-click accessibility.
This simple utility may be everything you need for casual screen grabs to send via eMail to a friend or colleague. If you’re looking for something more sophisticated, you may have to open your wallet in order to get a quality program. When I open my wallet, George Washington blinks his eyes and squints.
Bonus
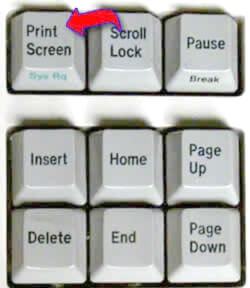
Some of you may be wondering about the Scroll Lock and Pause/Break keys. They are both left-overs from the IBM PC days of yore. You will now be able to sleep tonight having read the following:
Scroll Lock
The Scroll Lock key was meant to lock all scrolling techniques, and is a remnant from the original IBM PC keyboard. In the original design, Scroll Lock was intended to modify the behavior of the arrow keys. When the Scroll Lock mode was on, the arrow keys would scroll the contents of a text window instead of moving the cursor. In this usage, Scroll Lock is a toggling lock key like Num Lock or Caps Lock, which have a state that persists after the key is released. ~ Source Wikipedia
Pause/Break
These keys are remnants from the days of the old Disk Operating System (DOS). Interestingly, they still work in a Windows Command Box, also known as a DOS Box by us older folks.
Pause
The Pause key is intended to pause text outputs so you can have a chance to read what is flying by on the screen. In some cases, it can also be used to pause a computer’s BIOS during POST in order to read the screen before continuing. This used to work on older computers.
- BIOS: Basic Input/Output System
- POST: Power-On Self-Test
Break
The Break key is activated by pressing the CTRL key and the Pause key simultaneously. The purpose of the Break key is to stop a Batch file (.bat) from completing. It works in the same way CTRL + C works. If you press CTRL + C in a Command Box, you will see a “C^” show up next to the prompt.
If a Batch file is running and the Command Box is open, activating either the Break Key or using the CTRL + C combination will stop the script from proceeding.
Now you know. Sleep tight,
Richard
—
I use http://getgreenshot.org/
Hi Steve Si,
Looks interesting. I like that it is open source; that’s always a plus.
Thanks for your input,
Richard
I hardly ever use the Prt Scr key, and when I did, I nver pasted into MS Paint. I would usually paste to MS Word. There’s also a screenshot feature actually built in to Word, and that was the first way I learned to do screenshots.
The Snipping Tool is now my preferred way of capturing screenshots since it was first introduced in Windows 7.
Hi Tony,
Thanks for pointing out an alternative approach. Unfortunately, many of us do not have Word and MS Paint is a quick and dirty option.
I like the Snipping Tool as well,
Richard
Interesting. I can’t imagine a computer without Microsoft Word. I’ve always had it and the rest of the suite that goes with this, as my first entry into the land of computers was business. My home personal computer life developed after that, and Office came pre-installed, or otherwise I installed it on any machine I own.
Nevertheless, thanks for renewing my interest in the Print Screen key.
People who, like Richard and myself, use screenshots on a daily basis, can’t get much help from this options you described. I chose to use PaintShop Pro for my screenshots and I am very satisfied since it delivers a simple way of taking them and a high quality screenshots. I recommend checking this and trying it out, you don’t have to use it often to have it, but you could use it to make your life a little bit easier http://www.paintshoppro.com/en/pages/screenshots/
Hi Donna,
PaintShop is a great editing tool, but it does come at a price.
I prefer free over pricey any day, but sometimes you just have to bite the bullet if you want real quality.
Thanks for the tip,
Richard