How To Change Your Screen Resolution
Each monitor you have connected to your computer has a default resolution. Unlike the old Cathode Ray Tube (CRT) monitors, today’s monitors have a defined number of picture elements (pixels) set in a width by height matrix. 1920 x 1080 is by far the most commonly used resolution today. You will see monitor specifications saying 1080p and nothing else. This presumes a standard aspect ratio of 16:9, which is 1920 x 1080. The “p” refers to the way the image is rendered on your screen and in this case, means “progressive”. The old CRTs could also scan using an interleaving method but that does not apply to modern flat panels. In that case, the trailing letter would be an “i” instead.
I won’t bother you with all the geeky details. If you are interested in more information on the subject, that is what search engines are for. Instead, this Quick Tips article will show you how to check and possibly change your monitor’s resolution.
Why Change The Resolution?
If, for some odd reason, your resolution is set to something other than your monitor’s native resolution, then what displays can be very blurry. This is especially true when it comes to text. A nice clear image is what you should be shooting for.
For AMD users, see the end of this post for a bonus tip.
Getting To The Setting
- Use the Windows Key + I to open Settings
- Choose System
- In the left panel, click on Display
That should bring you here:
Note: You can click on any of the images in this post to enlarge them for easier reading.
Up top, you can see three monitors represented with identifying numbers. If you have only a single monitor, then, of course, you will only see one monitor. Their relative resolutions are indicated by the different sizes. For example, in the above image, the monitor labeled “1” is my main monitor and is set to 1440. The number “2” monitor is set to 1080 (that is actually a TV that is also used as another monitor).
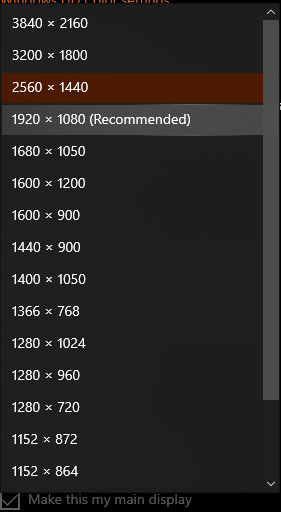
At the bottom of the image, you can see the current resolution that is being used for the highlighted monitor (1440). To change the resolution for a given monitor, simply click on the monitor at the top, and open the drop-down list. It should look something like this:
Recommended Resolution
Windows recommends a particular resolution. In this case, it is 1080. That is because this particular monitor has a native resolution of 1080. In almost every case, you will want to make sure your resolution is set to your monitor’s native resolution. This will provide you with the best image your monitor is capable of delivering.
You are probably squirming in your seat right now because I have mine set to the non-native 1440 and that contradicts everything I’ve been telling you. Here’s why…
Bonus Tip
First, I must begin by saying that I have been using nothing but AMD graphics cards for years. It is not so much that I am a devoted AMD fanboy, but because AMD seems to deliver more bang for the buck than its competitors. The only reason I mention this is because I want you to know that I am totally ignorant when it comes to Nvidia products and their software. They might offer a similar setting to what we are about to discuss, but only Nvidia users will know the answer to that question.
Virtual Super Resolution
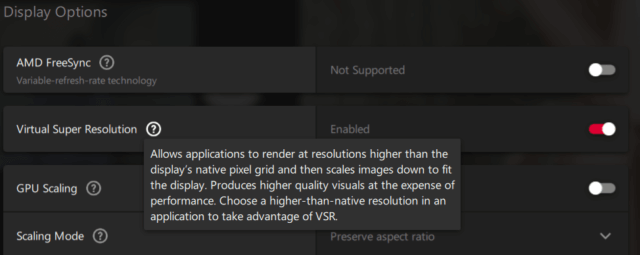
The AMD Radeon software allows one to enable what is called Virtual Super Resolution (VSR). The following image explains what it offers:
What is nice about this feature is that one can get more screen real estate without sacrificing the quality of the image. The downside is that it does increase demand for the graphics card and can therefore be detrimental to performance. I wouldn’t recommend using this if you are a big fan of AAA first-person shooters. Since that’s not my favorite pastime, VSR is well-suited for my normal activities.
And now you know why I told you one thing but did another. “Do as I say and not as I do.”
As always, if you have any helpful suggestions, comments or questions, please share them with us,
Richard
RELATED ARTICLE:


