Word will create address labels for you from data that has been stored in a different source (i.e., Access database or Excel workbook).
Essentially, Word takes the information from those sources and places it into the format that you designate in Word. Because it has been put into Word format, it it now possible that one or more lines could be too long to fit in the designated space in the label in your document.
When your address text wraps to more than one line, Word will treat it as any other paragraph and will left-align each line in the paragraph. But suppose you do not want your wrapped text left aligned? There is not an easy fix for this in Word, but you can work around the issue in a few ways.
The first method to deal with this issue is manually. If you can create a new document when you merge your labels, you can look through the addresses, find the ones that have lines that are too long, click Enter where you want the line to break and adjust the alignment of the offending long line. This method, of course, is tedious and cumbersome. The biggest advantage of this method as I see it, is that you format your text in any way you like (i.e., center, indent, flush right or left, etc.).
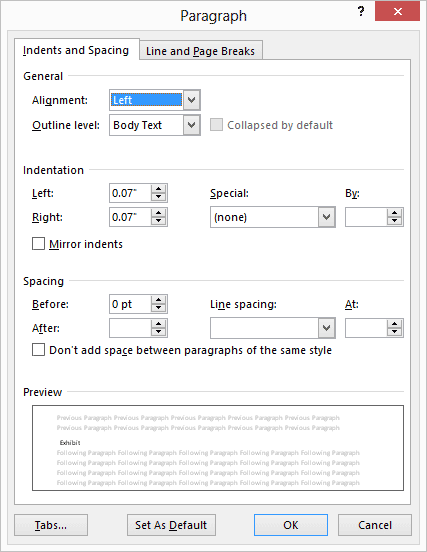
For a more streamlined method the only thing you can do is adjust the formatting of the text of your paragraph for the lines in your label. If you know that a lot of your labels will have long address lines (i.e., company names, etc.), this would most likely work well for you. You would create your mail merge document for your labels and then adjust text paragraphs to have hanging indents. For the uninitiated, this means that the first line of your text will be left-justified and additional lines will be indented to the degree you wish. The drawback is that using this method will not give you the ability to right-justify or center the lines that are too long. You will, however, not have to manually adjust the lines.
To learn how, follow the steps below:
- On your Ribbon, click the Mailings tab.
- Click the Start Mail Merge tool and select Step by Step Mail Merge Wizard. The Mail Merge task pane will display at the right side of your screen. Use the steps in the task pane to indicate that you would like to create labels and you want them in a new document.
- When prompted, specify a data source for your merge.
- You can now design how you would like your mailing labels to look using the fields available to you.
- Close the Mail Merge task pane.
- You should now have a sheet of labels on your screen and you are ready to format them to accommodate the long lines properly.
Now, follow these steps:
- Select your entire document by clicking CTRL + A.
- Depress your Shift key and simultaneously click your Left Arrow. This will deselect the final paragraph marker in your document, so that all text in your document is selected except the final paragraph marker. (Make sure you have your Show/Hide enabled so you can see the Pilcrow, which is the paragraph mark).
- Click the Home tab on your Ribbon.
- Click the small icon at the bottom right-hand side of the Paragraph group to display the dialog box.
- Using the Special drop-down list, select Hanging.
- Using the By field, delineate how far you would like the run-over lines indented.
- Click on OK.
Your labels are now finished and properly set and you can proceed with your mail merge as you normally would.
—

