


These days, if you take pictures, chances are you’ll post them somewhere like Facebook, your website, or even in an email. If you do, you should edit your images; especially their size. The problem is, many people don’t know how to use or can’t afford sophisticated programs like Photoshop. If you use Microsoft Office, you may be missing out on a very simple, but capable image editing program. It doesn’t stick out in the All Programs menu and that’s why many folks don’t know about it, but it’s called Microsoft Office Picture Manager and it’s located in the Microsoft Office Tools folder (which is inside the Microsoft Office folder).
Microsoft Office Picture Manager – access and usage
If you open the program directly, it displays your My Pictures folder. You can then go find the images you want to edit in your computer’s directory. However, I generally open the software by double-clicking on the image file I want to edit. I then click on Edit Pictures in the toolbar.

NOTE: In MS Office 2010, it’s called Microsoft Office 2010 in the title bar. In MS Office 2007, it’s called Microsoft Office Picture Manager in the title bar.
NOTE: If you are in a folder of images that you would like to continue to edit, there are previous/next arrows at the bottom of the image screen that allow you to keep editing images in that folder. ![]()
When you click Edit Pictures, the Edit Pictures panel opens on the right side of your window. For general use, these options are all you’ll need to make minimal, but important changes to your images. You can see how any change will affect your image and then decide to keep or discard it.
NOTE: As a rule, I always keep a copy of my original images in another folder when I edit. Once you re-size an image and save it, you can’t make it large again. That could be a problem if you want to print it later. Even when you’re careful, you may do things that are irreversible, even if the software allows for this. I recommend that you make a copy of your images and put them in a folder or on a DVD before editing them.

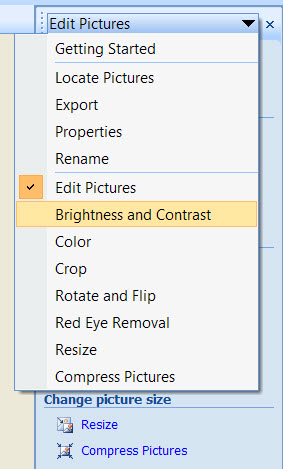
Once you start using the Editing panel, remember that you can also access the options in the drop-down box at the top of the panel.
Microsoft Office Picture Manager – options
Here’s a brief description of the options I use most frequently in the Edit Pictures panel:
Resizing: For me, this is the most important tool. I post images in many places on the web. They almost always need to be sized. For several reasons. If you post a huge picture on the web, it will take longer to load on the website it was put on. Sometimes I post smaller images because I don’t want people to download them and use them as their own; you can try to enlarge small images but they usually look bad. If I send an email with images, I usually size them so my recipients don’t see a huge nose when they open their mail. This editor makes it easy for you.
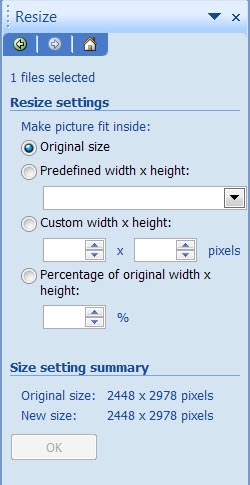

In the Predefined width x height drop-down box, you can select various suggested sizes for certain uses. Experiment with them, save the new image and view it at 100%. See if that’s what you’re looking for. You can customize the size of your image using the other options, but for me, the predefined options are quick and easy. Occasionally I will use the Percentage option for resizing.
NOTE: See the difference between your original image and the re-sized one in the Size setting summary at the bottom of the Resize panel.
Remember to click OK when you’re done.
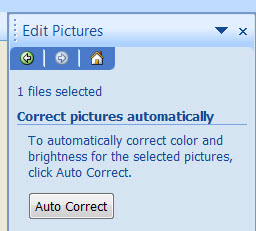
Auto Correct: If you click on the Auto Correct button, it instantly adjusts the color and brightness in your image. While this seems like something you may feel is warranted for all your images, (the software must know better – right?), you can immediately see if this is a wise choice or not. I find that this button does tend to wash out the color in faces, but in darker images without people, it does an OK job of correction. If you don’t like the change, click the Undo button in the toolbar. ![]()

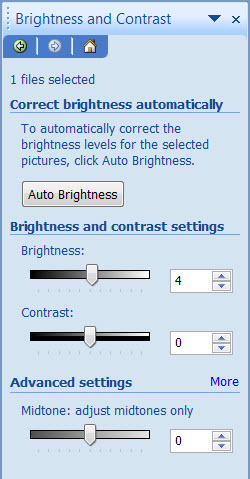
Brightness and Contrast: Once again, there’s an Auto button in this tool, but you’ll find that Auto isn’t always best. I generally use the Auto tool if my image is just too dark. Using the sliders for this tool is tricky as I tend to slide too much one way or the other. You might try using the up/down number boxes to adjust your brightness and contrast a little at a time.
Crop: Clicking on Crop immediately puts sizing bars around your image. You can drag the sizing bars towards the center of the image to cut out any unwanted background. Do this by placing your cursor on any of the sizing bars and when it turns to a T, you can start cropping.
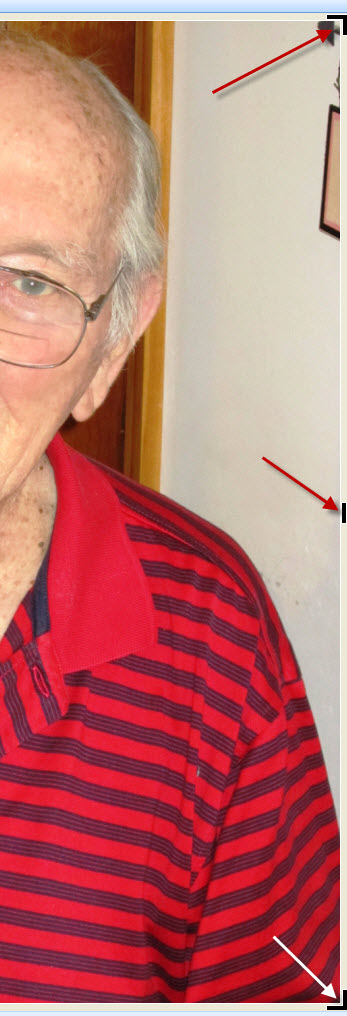

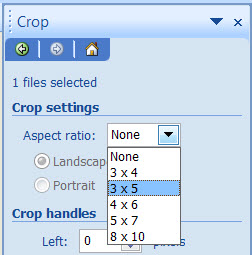
What is neat about the cropping tool in this editor is that you can also open the Aspect Ratio drop-down box and select a pre-determined size for your image in the event you are trying to fit it into a frame or other specific use. This is so much easier than trying to use rulers or cutting the image once you’ve printed it on paper. When the aspect ratio is selected, a moveable box appears over your image. Move the box until it sits over the image you want to retain. Click OK. The view size will be larger – don’t panic. Adjust the view to 100% to see what the actual size is.
NOTE: Any time you make changes, notice the image dimensions shown on the bottom of the Crop panel.
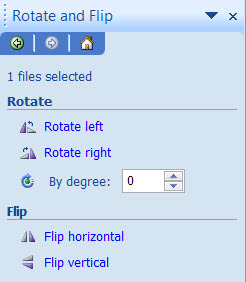
Rotate and Flip: This tool is obviously necessary if your picture is upside down or sideways. Fixing it here in the Image Editor won’t guarantee that you won’t need to fix it again elsewhere, like Facebook. However, there’s no sense trying to edit an image if it is wrong side up. Click on any of the options shown or manage your rotation by degree. It’s fairly self-explanatory. Thank goodness they don’t use those irritating counter-clockwise by 90 degrees language; I always choose the wrong one.
Well, that’s some image editing in a nutshell. Experiment with the software to get used to it and try some other features that weren’t explained here. For quick and easy image editing, the Microsoft Office Picture Manager gets my vote. Keep in mind, too, that if you have to make heavy color, brightness or contrast adjustments to an image, it may just be a bad image. While digital darkrooms like this one are handy, the results they produce can be terribly obvious if not used with a little finesse. If you really want to master image editing as a professional, you will probably need a more sophisticated program.


This changes the pixels and the MBs, but then it becomes a tiny picture in a huge screen.
How can I change the MBs for easier emailing but still have a decent size picture for my recipients to look at.
Tony – Most resizing features will reduce physical size of images. If you’d like to maintain a certain physical size as well as reduce file size, you may need to install something like FILEMinimizer Pictures, which utilizes compression methods: http://www.davescomputertips.com/fileminimizer-pictures-free-image-compression-software/
When saving some downloaded images after changing their size the color changes and becomes warmer. how can I prevent this from occurring.