
(Article originally submitted under the title: “On the Synthesis of Search Terms in the Application of the Windows Search Algorithm to the Location of Desired Objects, with Particular Reference to the Precepts of Symbolic Logic Established by Professor Boole”.)
In the first part of this two-part series, we did the groundwork for an efficient search index configuration, and rebuilt and tested the index. Now we’re going to go further than simply typing in words and phrases as search terms, to look at how we can set up and combine search terms and conditions using the Advanced Query Syntax.
If you just type “aardvark” into the search box, either on the Start screen or in File Explorer, Windows Search will dutifully go away and start looking for aardvarks. There is a problem with this: Search doesn’t know whether you meant it to look for files with “aardvark” as part of the filename, or as part of any text there might be in the file, or photos of aardvarks, or songs about aardvarks. If you meant any or all of these, then you did the right thing. Search will come back with EthiopianAnimals.docx as well as aardvarksforever.dat. But if you wanted only files with names containing the character sequence “aardvark”, your search will be very inefficient, because Search will also plough through all the text in all the text-based files as well, to no good purpose. How can we do better?
Data and Metadata
The answer to this question lies in understanding the difference between the data in the file, and the file metadata. The metadata is data about the file, such as its name, creation date, type (text, music, picture, video), author (who wrote, or performed, or took it), size, and many other properties and attributes. These properties make up much of the metadata, and make it possible for specialised programs to recognise the characteristics of the data that they are to handle. For instance, a graphics manipulation program such as the GIMP or PhotoShop can extract from an image file its image dimension properties (800 x 600 pixels), image colour depth (24-bit, 32-bit), who produced it, what make the camera was, and so on. The attributes are listed in the file’s property sheet, which you can look at by right-clicking on the file and selecting Properties, then the Details tab.
For example, right-clicking on my MP3 of “Dueling Banjos” and selecting Properties | Details reveals that the title of the track is “Dueling Banjos”, that it was released in 2005, it’s track #1 of the Pop album Dueling Banjos (US Release), that it lasts 3:16 minutes, was recorded at a bit-rate of 247kbps, takes up 6.05 MB, and a lot more. All these are properties of the file in question. In fact we can change some of them, or remove them if we wish. Not all the properties can be changed, but we can use the editable ones to help distinguish the file. Aardvarks are not known for playing the banjo, so Search can pass on this one. Maybe.
In fact, when we type in “aardvark” and nothing else, Search looks through not only the filenames and any text in the file, but at all the other available properties as well. So the answer to our question “how can we do better?” is: tell Search whether we are looking for the value of a particular property or properties, or for a value actually within the data itself. How do we do this? We use Microsoft’s mysterious, semi-secret Advanced Query Syntax.
Limiting Search by using Properties
We can illustrate this in its simplest form by elaborating on our search for the word “genre”, from Part (1). I was actually looking for “genre” in an Adobe PDF. I should have structured my search using that knowledge as follows:
Search term: genre ext:.pdf
or: genre ext:pdf
or: genre type:.pdf
Any of these would do. The effect would be to look for the word “genre” both in the file properties, (including filename), and the contents, but for PDFs only. The other results that I got last time would have been ruled out. See the search results below, and compare them with the search window graphic in the previous article:
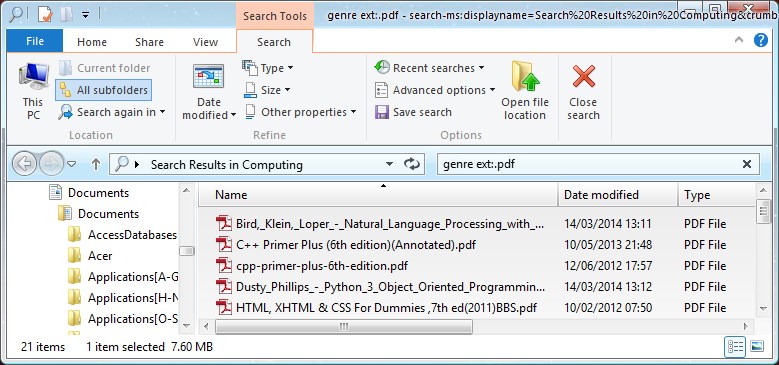
There are many other properties on which you can search, dependent on the type of file you are looking for. For music files, you might search by specifying Album, or Artist, or Duration, using, for example:
artist:”Elton John”
For instance, I might be looking for an MP3 music track that I vaguely remember from the classic album “Dueling Aardvarks”, in which Eric Aardvark played second banjo (it’s music written for the film “Aardvark Deliverance”. Go with it).
I have a variety of choices. I could search the whole of Libraries, by pointing File Explorer there, but I know this is music, so I’ll navigate to the Music Library, or in fact just the Music folder. Then I just type into the search box
album:”Dueling Aardvarks”
The result is shown below. The Details Pane button has been pressed, under “View”.
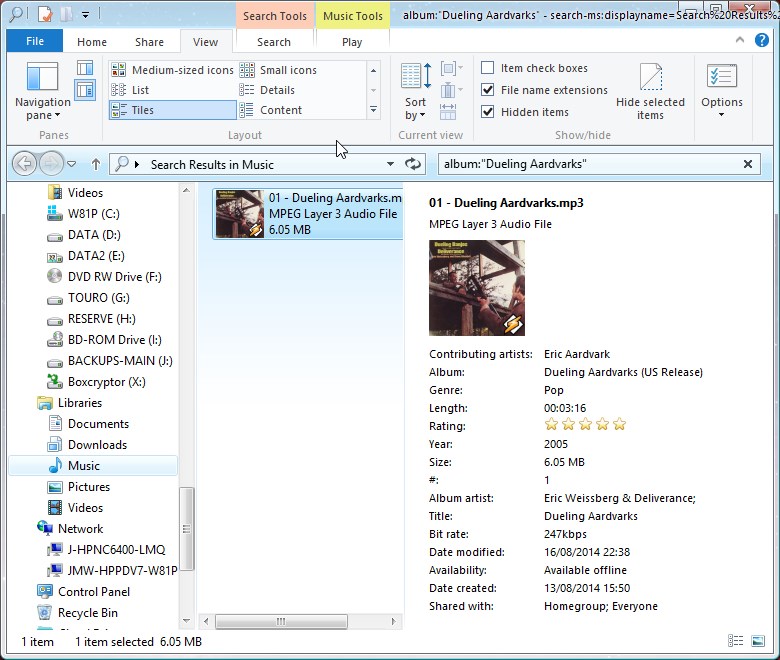
Notice that the album cover image is part of the metadata.
For photos, there is something similar. When Eric Aardvark was doing a tour in Indonesia, he lent his camera to his friend, Lulu, to take a selfie. I know he sent me the picture, but where is it? I can’t remember the filename or folder, but Lulu took it (author:Lulu), with Eric’s Aardvark Retina camera (cameramodel:aardvark retina). So I’ll point File Explorer to Pictures and type in the search box:
author:Lulu cameramodel:aardvark retina

There you go, found it straight away.
You’ll have guessed that I’ve doctored the properties here, but that’s the point: you can change the editable properties to your own values, as well as adding identifying tags, to give yourself the best chance of finding what you want later. If you look at the search result above, you’ll notice the picture was tagged with the name of Lulu’s media company, Monkey Studios. If I had wanted to search for all her company’s photos, I could have used the search term:
tag:Monkey Studios
I’m not going to go into great detail about the properties available, or how to add tags. You can get a list of properties and tagging help in the excellent free Search chapter extracted from Mike Halsey’s book Windows 7 Power User’s Guide (available for download, with his kind permission, here: Win7PowerSearch ), as well in the references given below.
To change editable properties, you can either go to the file’s properties tab, or highlight the file in File Explorer, select the View tab, press the Details Pane button, and then highlight the file. Hovering the mouse over the properties will show you which can be edited. After making changes, click Apply, or the Save button that appears in the Details Pane.
You’ll need to do this by navigating to the actual folder in which the file resides, as it doesn’t work for files displayed in the Search results pane. To do so, just right-click the file and select “Open file location”. You will then be viewing the file in the context of the folder structure, rather than in the Search results pane.
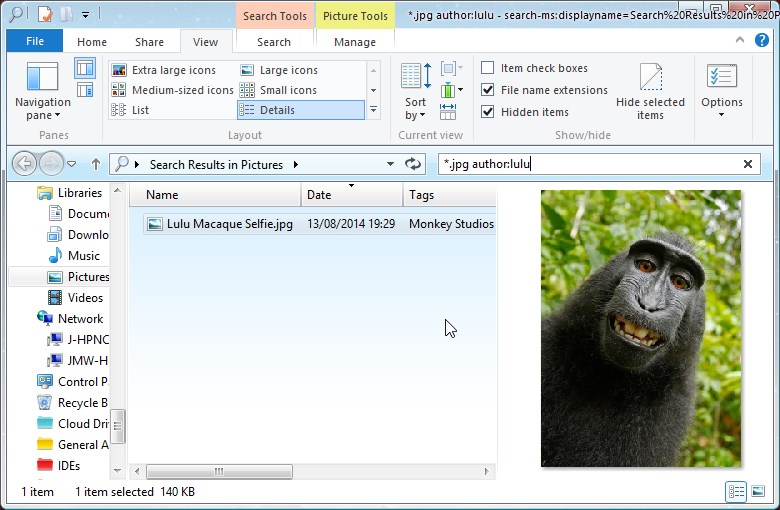
You can experiment with this syntax to see how flexible it is. If you have ever searched for all files of any extension using *.*, or for all JPEG files using *.jpg, you can try that here. If I search for:
*.jpg author:Lulu
then I find Lulu’s picture, shown here in the Preview Pane. She’s a stunner, isn’t she?
*.png author:Lulu
nothing turns up. There are no PNG images authored by Lulu.
If all you can remember is that the photo was a selfie, just try typing selfie, or tag:selfie, if you are in the habit of tagging your photos. Search will go through all the text it’s got, but at least you’ll find the photo in the end. All this stuff works from the Start screen Search box; I invite you to experiment and prove this for yourself.
Let’s be Logical about this
Searches are most useful when you have only hazy knowledge of the details associated with the thing you are looking for. Let’s suppose that we are looking for a photo, but we can’t remember who took it, or any of the details about it except that it was probably taken between the end of June 2014 and the beginning of August. So we need to narrow the search by looking for all photos taken after 30/06/2014 but before 01/08/2014. The photo is presumably in the Pictures Library, but we can actually just point File Explorer at Libraries, or even just go to the Start search box, and type this search term:
taken:>30/06/14 <01/08/14
or even:
taken:30/06/14..01/08/14
where the “..” symbol is used to express a date range. Search will help fill in the dates, and then bring up a list of files satisfying these conditions, and that might be enough to identify the photo. If it isn’t, after a bit of head-scratching we might remember that we gave the photo a five-star rating, so we can add rating:5 stars to the search term.
taken:>30/06/14 <01/08/14 rating:5 stars
This nails it, as you can see from the graphic. There is only one photo that satisfies all our criteria.
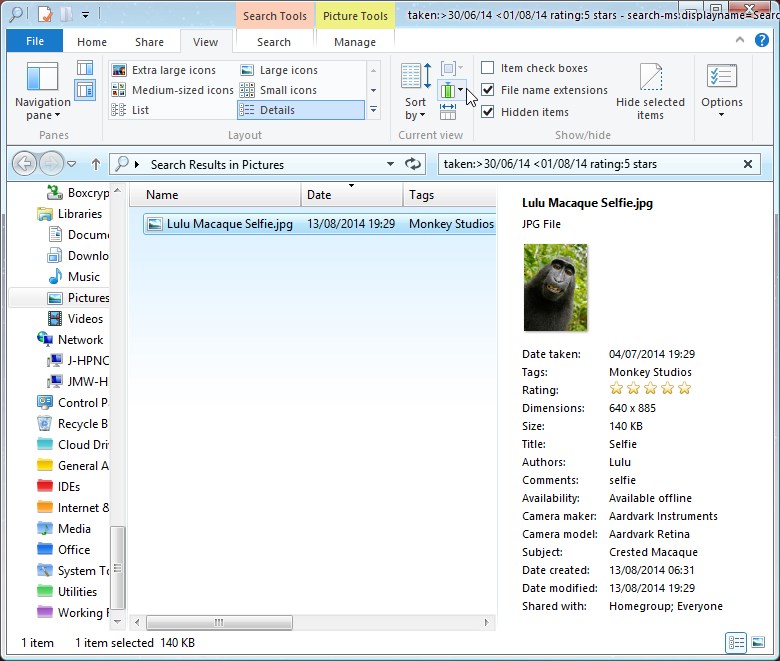 Look at the logic behind this term. We are asking for the photo which was:
(taken after 30/06/14) AND (taken before 01/08/14) AND (has a 5-star rating).
This is a logical combination of conditions (known as a Boolean expression) all of which have to be true for the object to be what we want. In fact we could even put it in the search box like that (try pasting it):
(taken:>30/06/14) AND (taken:<01/08/14) AND (rating: 5 stars)
(don’t forget the colons). The default way of constructing search terms that we have seen so far assumes that the relationship between the conditions is an AND relationship.
Logic can be tricky
It turns out that Lulu’s company Monkey Studios was actually involved with the production of “Dueling Aardvarks”, and as a result she is named as Publisher (publisher:lulu). When I try the search term
publisher:lulu
Search finds the Duelling Aardvarks track, as expected. Now we can look at a situation where the conditions need to be expressed rather differently. Suppose we want all the files on which Lulu is named either as an author or as publisher. Naively, we might try:
author:lulu publisher:lulu
No results. Oh dear. OK, we want results for Lulu as an author and Lulu as publisher, so let’s try
author:lulu AND publisher:lulu
No results. (This search term is actually equivalent to the same one without the AND.)
Scratch head and think hard about this one. Wait – any single file among the ones we are looking for will name Lulu either as Author, or as Publisher. We want files, each of which satisfies either the condition “Lulu is the Author” or the condition “Lulu is the Publisher”. Let’s try:
author:Lulu OR publisher:lulu
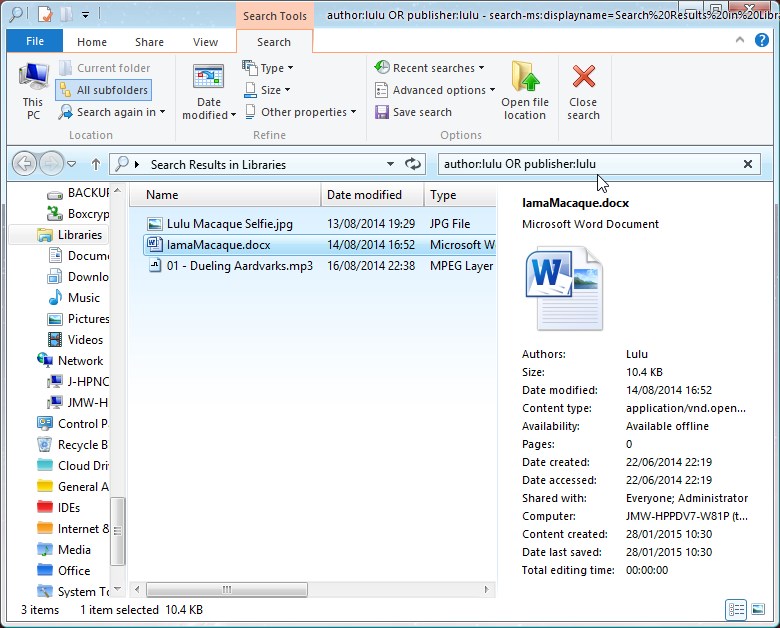 Bingo! It’s obvious when you think about it, or if you’re a programmer or mathematically inclined, but perhaps puzzling if it’s your first formal contact with Boolean logic. Note that AND and OR must be in capitals (upper case) for Boolean combinations to work.
You can see that for a more complicated search like this, you have to think carefully through how your conditions should relate. It’s common to get mixed up and put AND where you meant OR, and vice versa. This is important, and probably a significant reason why people sometimes don’t find the files they expect to.
So we get the selfie for which Lulu is the author, and the Dueling Aardvarks track for which she is publisher. Of these two files, Lulu is either the author OR the publisher. But also – surprise! -because we had pointed File Explorer to Libraries, the Documents Library has been searched as well, and Search has come up with Lulu’s autobiography, of which she is clearly the Author.
If there had been a lot of Microsoft Word files around, our picture and music files would have been swamped by them. If we had realised in advance that that might happen, we could have said “but NOT Word files please!”. How? We would have constructed a search expression to exclude them, like this:
(author:Lulu OR publisher:lulu) AND (NOT ext:.docx)
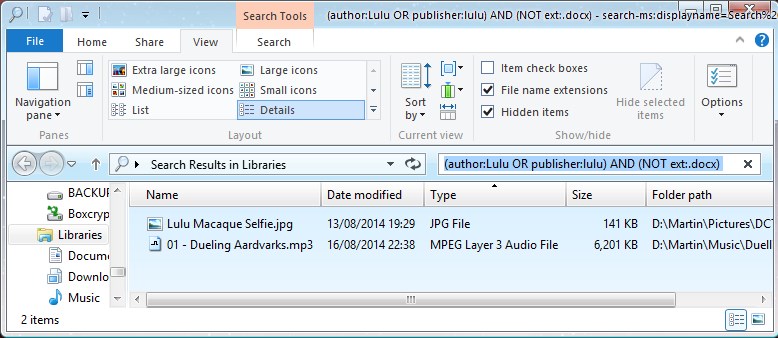 since current Word files have the .docx extension. Note the use of brackets; you can always put brackets in if you think they make the logic clearer. As I said earlier, the AND isn’t really necessary, as it is assumed to be there between two property expressions, unless otherwise stated. So the expression
(author:Lulu OR publisher:lulu) (NOT ext:.docx)
would do.
NOT ext:.docx is the same thing as saying ext:<>.docx, where “<>” means “not equal to”. So we could shorten our query further by writing:
(author:Lulu OR publisher:lulu) ext:<>.docx
 If you want to see one of these files in the context of the folder structure, rather than in the Search results pane, just right-click it and select “Open file location”.
Interestingly, when I was doctoring these file properties for research purposes, I found that naming Lulu as a Contributing Artist on a music file had the same effect as naming her as an Author on document and picture files. In other words, the query author:lulu also found music files on which she was a contributing artist, or, to put it another way, the author property of document and picture files corresponds to the contributing artist property on music files. Not many people know that.
The Advanced Query Syntax
It should be clear by now that the search syntax is simply expressed by combinations of a few symbols. < means less than or “before”; > means greater than or “after”; <= means “less than or equal to”, or “before or on [that date]”; >= means “greater than or equal to”, “on or after [that date]”; <> means “not equal to”. The actual property name is always terminated by a colon, like so:
date:
size:
name:
and so on. Search will generally cope with any spaces that you leave after the colon. These property names are actually shortened forms of full names; for instance, “name:” can also be written “filename:”, or in its full form “System.filename”. Search is pretty good about turning whatever abbreviation you type in into the correct form, and will often prompt you to click on the appropriate search filter entry in a drop-down box below the search box.
There is a Search mode called “natural language search” which enables you to express search criteria more simply, without expressing the property queries and Boolean relations so formally. To illustrate:
picture lulu taken last month
For Windows 7, natural language search has to be turned on in Control Panel | Folder Options | Search, but in Windows 8 it’s already there as part of Smart Search, so you can just go ahead and use it.
The trouble with natural language search is that, when it works at all, it also pulls in a lot of other results of dubious relevance. The query “pictures lulu” came up with the Lulu images right enough, but it also produced the Word document I am now writing, plus some other apparently unrelated files. “music lulu” didn’t find the track on which Lulu was publisher. It’s not clear to me whether that’s the expected result or not.
So I don’t bother with natural language search. Experiment, and see if you can get it to work for you. If so, well done. In my opinion, Windows Search only works properly in two scenarios:
a) You are looking for files with certain key words or phrases in the data or metadata, and are prepared to sift through a number of results;
b) You are looking for files satisfying certain well-defined criteria, with a query that you have crafted carefully from your knowledge of file properties.
So for casual use of Search, just type in a keyword or two and then sort through the results. For more professional use, to get accurate results you’ll need to know the details of specific properties and the logical relationship between them. Then you can craft a precise query as we did above.
The syntax is summarised in Microsoft’s Advanced tips for searching in Windows , which nominally applies to Windows 7 but in fact applies generally to Windows.
There is more detail in MSDN’S Advanced Query Syntax , and still more excruciating detail, for those of you who have some programming or maths experience, in Using Advanced Query Syntax Programmatically .
You can try all this out for yourself by selecting one or two files and changing their properties, then searching for them by using various combinations of search terms.
Note that you can save a search for future re-use – just select Save Search on the Search tab. Then you can select it from Saved Searches when you want to use it again. If you right-click on the saved search and select Send to | Desktop, you can just double-click on the search icon on the desktop when you want it done, and File Explorer will pop up and do it.
Don’t forget that you can always paste the search text into the box directly from a document like this one.
Everyday Search Terms
The search term I use most is undoubtedly
name:~=
This means “find the file whose name contains the following characters”. It stops Search trudging wearily through its entire collection of indexed text when all you wanted was to find a file by its name. The “~” symbol actually means that what follows refers to a string of characters. Hence “name:~=dvark” finds all files with the string of characters “dvark” anywhere in the filename. Another common one is
name:~<“aard” (with or without the quotes)
which means “find the file whose name begins with ‘aard'”.
name:>k will find all files with filenames starting with a letter after k in the alphabet, i.e. lulupic.jpg, mantaray.mp3, etc. There is also
size:>100mb
which means “find all files of size greater than 100 MB”, and a couple of others like “datemodified:”, “datecreated:”, and “ext:” or “type:”.
Be careful with the = symbol. It means “exactly equal to”. So using
album:=”Dueling Aardvarks”
in the search above will not find the album, since its exact title is ” Dueling Aardvarks (US Release)”.
author:<>Lulu will give you all the files whose author is not Lulu; “<>” stands for “not equal to”.
Try some other combinations of properties and operator symbols. You can have hours of fun with this logic stuff.
Finally, don’t forget that the old stand-by wildcards still work:
* for any number of any characters;
*.* for all files, all extensions;
aa?dva?k for all names containing the stated characters, with any single character in the position of the ?
If all else fails…
If you really can’t make Windows Search work properly, even after rebuilding the index and checking that indexing is complete, there may be a problem with the indexing system on your installation. As I said previously (part 1), the only way to cure this may be to reinstall Windows. Understandably, you may regard that prospect with horror, in which case you could try Copernic Desktop Search (www.copernic.com) which has a free Lite version. It is index-based like Windows Search, and seems to have a very good performance.
Finally, I always keep Agent Ransack installed. Also known as FileLocator Lite, and written by Mythicsoft (http://www.mythicsoft.com/agentransack/download), it searches through filenames ab initio, without an index, at lightning speed. If the file is there, AR will find it, guaranteed. It will also search by file text content, although its capabilities in this respect are less than Windows Search, and it is slow in that mode of operation, but again you are guaranteed a decisive result. It is easy and intuitive to use, and free.
Afterthought
Microsoft is one of the world’s biggest software companies, selling a very expensive operating system which touts as its centrepiece its sophisticated searching capabilities, of which it expects its customers to take full advantage. Yet the only Microsoft documentation, available to its customers, of the Advanced Query Syntax needed to exploit fully those capabilities consists of two terse web-pages. One refers only to the four main editions of Windows 7, and the other is on the Microsoft Developer Network (MSDN) site, dates from well before 2010, comes under the heading “Legacy Windows Environment Features”, and is acknowledged on the page itself to refer to Windows Search 2.x, which it states is obsolete after Windows XP. Then it redirects you to a page called “Windows Search Overview”, which gives you no useful information at all. Go figure. Then write to Satya Nadella.
Short articles for further reading
- Use Windows Search for locating files and other items (http://www.winhelp.us/use-windows-search.html)
- How to Perform Natural Language Searches in Windows 8.1 (http://www.7tutorials.com/how-perform-natural-language-searches-windows-81)
- Introducing Windows 8.1: How Does Search Work & How to Use It? (http://www.7tutorials.com/introducing-windows-81-how-does-search-work-how-use-it#main-content)
**Catch up with Part 1 of this article here: The Art and Craft of Windows Search – (1) Groundwork

When I start my search in Vista using the START button in the lower left-hand corner, I receive a message stating ‘SEARCH FAILED TO INITIALIZE’. Googling this message suggested that I rebuild the index which I did, but did not correct my problem.
Any thoughts?
Thanks,
Dan
Dan – What happens when you start your search from the Windows Search tool (after pressing Windows + F keys)?
Go into “Services” and make sure Windows Search and Remote Procedure Call (RPC) services are both started and set to automatic.