SnapDraw – This screenshot capture/editor/annotation software from CrossGL has previously been available as shareware but the developer has now, very recently, made his terrific program available to everyone for free!
SnapDraw’s screen capture capabilities offer nothing out of the ordinary, but it is when we move into the editing/annotation side of things that it really shines and comes into its own.
SnapDraw definitely involves a learning curve which is not exactly helped by the lack of associated Help files, and online help is pretty basic and meager with details too. So, navigating around, accessing features and getting everything working properly is pretty much a matter of trial and error.
It took me a couple of hours clicking on menu items and generally investigating options before I was able to confidently produce the desired results. Strangely enough, once one gains a familiarity with the software, it is pretty comfortable to work with. That is largely down to a nice big preview pane which displays changes/edits in real time.
Comparisons are obviously going to be made with the freeware PicPick and the not so free Snagit. As far as PicPick is concerned; PicPick is easier to use than SnapDraw but its annotation tools are far more basic too. If you are happy with the basics then I would say PicPick is for you but if you are looking for more advanced annotation features/options then SnapDraw is well ahead of the game.
As for comparisons with Snagit; well Snagit really is the standout in this genre. However, SnapDraw is not all that far behind and even provides an improved range of options in a couple of areas.
That said, SnapDraw is not exactly quirk free. The GUI is not terribly intuitive, there is a lot of duplication and I believe that adds a little to the initial confusion. It took me quite a while to work out how to save/preserve preferences so I wouldn’t need to keep selecting and inputting the same settings for each individual capture, more on that later.
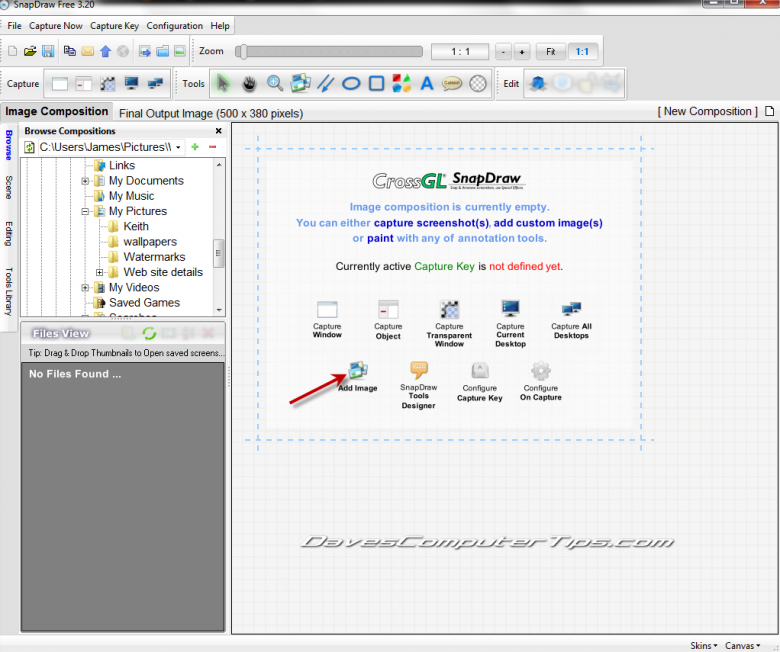
Here is the interface:
In the main pane you will see buttons for all the basic capture options, I have added an arrow pointing out the “Add Image” button which can be used to import and edit existing images. It seems obvious now, but it took an embarrassing amount of time for me to actually locate that option.
Taking a screenshot is a simple matter of clicking on the required capture option; e.g. to ‘Capture Window’, click on that button and then move the mouse cursor over an open window, a red frame will appear around the perimeter, then just press ‘Enter’. There are also options available to configure specific capture hotkeys.
The captured screenshot will be displayed in the main pane, replacing the list of options. Now we can access and utilize all the editing/annotation tools. As you can see, I have added a screenshot of the time zone clock display from my system tray:
Down the left hand panel you will see four options; Browse, Scene, Editing and Tools Library. Click on “Scene” and this is where you can select and save output preferences:
Clicking on tabs under ‘Scene Rendering Options’ will give access to additional settings for each element. Most are enabled by default so it is necessary to go into each one and disable those you do not require.
Note the “Watermark” element, watermarks can be either text or image. Text can be customized to a degree; font type, size, color and positioning but that is about it. Advanced options such as levels of transparency, shadow and other effects are not available. Images include options for adjustable levels of transparency and scaling.
Now we come to the bit I struggled with. In order to preserve often used preferences for future use you will need to save them to a new profile: Select all required preferences and then click on the little plus sign under ‘Scene Profiles’ (right at the bottom). A new smaller overlay window will appear, simply type in a suitable name for the profile and click Save. The newly created profile will now be selectable under the ‘Scene Profiles’ drop down menu.
Now we can access the ‘Tools Library’ to add effects and annotations:
The usual text, lines, ellipses and rectangles are all available, but there are also several rather unique additional categories. I have highlighted “Callouts” because I had absolutely no idea what that might be. As you can see, it provides a variety of different shaped dialogue containers which can point to a certain aspect or feature within the screenshot. Simply select a particular shape, input your customized text and, when satisfied, click anywhere inside the screenshot display to add. Positioning is very exact and a simple matter of drag and release.
The “Shapes” section also includes a fair array of symbols; pointers, smileys, several social icons, signs and emoticons. The ‘Magnifiers’ category contains some neat tools for enlarging and highlighting certain areas or text. All can be added and positioned in the same easy manner as already described.
Here is the Time Zone screenshot again with some added effects:
This is after just a few hours tinkering with the software, there is much more yet to be discovered, including:
- Put multiple screenshots into the one capture scene.
- Add arbitrary images or photos.
- Set background color or background image.
- Add 3D effect
- Design and save customized tools.
You can read more about features HERE.
I’ve thoroughly enjoyed using and learning about SnapDraw and, as far as I am concerned, it is a definite keeper!
Download: 16.3MB executable
Supports: Windows 7/Vista/XP (nothing mentioned about 64-bit but the software works fine in my Windows 7 64-bit system).


Thanks for the hint about the “add Image” button. I already spent some time on this and I don’t know if I would ever have found it… I never regarded these icons as actually representing functions.