I get a lot of questions about SmartArt. Everyone wants to know what it is and how do they use it.
SmartArt is simply one of the graphics features that Microsoft really worked on in version 2007 and they have expanded it even further in version 2010.
The best way to learn is by doing, so follow along in this exercise and amaze yourself! You will find the images I have used below in Documents | Sample Pictures.
- Launch MS Word 2010.
- Open a new document or go to an empty paragraph in an existing document. You can do most of this in version 2007 too but the shapes that are available to you are more limited and some of the steps may be a bit different.
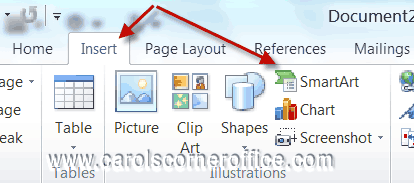
- On your Insert tab, click the SmartArt button.
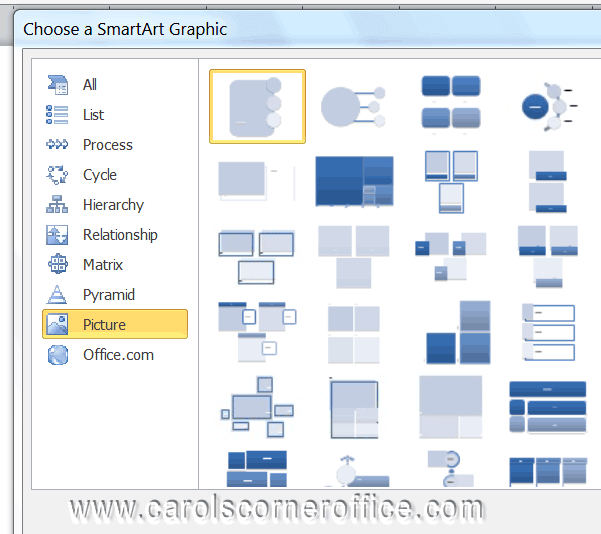
- On the Choose a SmartArt Graphic window, click Picture on the left and select Accented Picture – the first one in that group.
- Note that even though you select one of the SmartArt shapes here, your selection is not set in stone. You can change it to another shape later on.
- Click OK.
- The SmartArt object is added to your document.
- In our example, we do not want any text for the main image, the tulips, so click away from the large text box into the blue rectangular area. The handles should be around the rectangle.
- Click the image icon in the middle of the large rectangle to open the Insert Picture window.
- Navigate to the image you want, select it and click Insert. Don’t worry about the text. We will take care of that later.
- Now click on one of the circles and click the image icon in the middle of it and select an image. Repeat for the other two images.
Now you will add your text for the images. There are various ways to do this. You can add one object at a time by clicking [Text] and adding your own words or you can use the Text Pane window to add them all at once. Either click the Text Pane button on the toolbar or click the blue Left/Right arrows on the middle left of the SmartArt object’s canvas.
In my example, I entered the words Koalas, Jellyfish and Penguins. I entered a space instead of text for the large tulip image. Be careful though! If you delete the text box for the large image the image will be deleted as well.

You can now add color and effects:
You may now be satisfied with your results but there is much more you can do with your SmartArt object.
I would like you to experiment with at least the ones below on the Tools Ribbon | Design tab.
- SmartArt Styles group: Hover over the thumbnail options to see how different effects will look.
- Layouts group: Hover over the thumbnail options to change the layout of the objects.
- Right to Left button in the Create Graphic group: Switches the small images in the circles on the right to the left side of the large image. Click again to go back.
- Add Shape button in the Create Graphic group: Adds an extra circle to the default set of three. Keep clicking to add even more! To delete a circle, select its text box and click your Delete key.
On the SmartArt Tools ribbon | Format tab, try these:
- Shape Fill: Changes the background color of the SmartArt object.WordArt Styles group: Allows you to change the style of the font, its outline and inner color, and add text effects.
- WordArt Styles group: Allows you to change the style of the font, its outline and inner color, and add text effects.
To change the font size for all text on the SmartArt object, select the entire object and go to the Home tab and select a font size and family as you normally would for text in the body of your document. To change the font size for just one text object, select just that text object and change the font size and family as you normally would.
Keep in mind that if you use SmartArt objects that are available in versions 2007 and 2010 documents, it is very unlikely that they will be backwards compatible with version 2003. So if anyone is going to open your fancy version 2010 document in version 2003, it is likely all your SmartArt will revert to plain text.


I have created an organisational hierarchy using smartArt. As the content increases, the boxes and text size automatically shrink to fit. How do I increase the size for proper visibilty. Also I need to take a printout of the document. The contents will have to be spread to more than 1 page for this. Please help asap.
regards,
mamta
I am curious what the response to “mamta” posting above is…I am having the same problems.
Thanks in advance!
You can select all of your boxes at once by holding down your Shift key and clicking on each shape. Then use the drag handles to change the size to one that is acceptable to you. You can similarly change the font size.
If you find that your organization chart is too large to fit on one page, you might consider using another layout, such as bullet points. If that is not an option, try using next page section breaks and continuing your chart from page to page.
I hope this has answered your questions. If not, post back here and I will continue to help you.
I would like to make a multiple page hierarchy chart but for some reason it won’t let me go on to multiple pages. I tried what you said and it didn’t work, any suggestions on how to make this work?
Did you use Next Page Breaks in your document? That should absolutely work for you. Please post back and let me know.
How do I delete a text box in smart art without deleting the whole piece
To delete a box, simply click the border of the box you would like to delete and press Delete on your keyboard.
Where can I find smart art styles and 3d in compter cuz I only see smart art graphic
Click the SmartArt graphic whose style you would like to change, and under SmartArt Styles on the Design tab in the SmartArt Tools group, and click the SmartArt style you would like to use.
If you do not see the SmartArt Tools or Design tab, be certain that you have slected the Graphic whose style you would like to change.
My students have a constant problem with resizing their Smart Art graphics. When they click the border and go in to the Format | Size group, although they can change the numbers, the graphic itself doesn’t change size. If they click around on the page for several minutes and come back to it, they are finally able to resize it. This is starting to cause some real frustration! Unfortunately, I haven’t been able to figure out what they are doing wrong, as they do exactly what I would do–click the border and try to change the size directly. Help!