
In Part 1 of this article, I explained the process for creating system image backups using the excellent Aomei Backupper Standard (free). Now I’m going to explain how to restore those images you’ve created. At the end of Part 1, I advised that you test the bootable media you’ve created ASAP, to make sure it is working properly. Here’s how:
Booting From USB Flash Drive
You’ll need to access the Boot Menu on your particular machine. The Boot Menu allows you to select a specific device to boot from. Common keys for accessing the boot menu are Esc, F2, F8, F10, F12, with F10 and F12 being the most common. The specific key to press is usually indicated on the computer’s BIOS splash screen at startup.
With the bootable USB flash drive connected, start or restart the machine and as soon as the BIOS splash screen appears, immediately start tapping whichever key is required to bring up the Boot Menu. In the Boot Menu, you will see a list of connected bootable devices. Use the arrow keys on your keyboard to highlight the bootable USB flash drive and then hit Enter. If everything goes according to plan, you should end up with Aomei Backupper’s interface displayed on the screen.
Restoring An Image
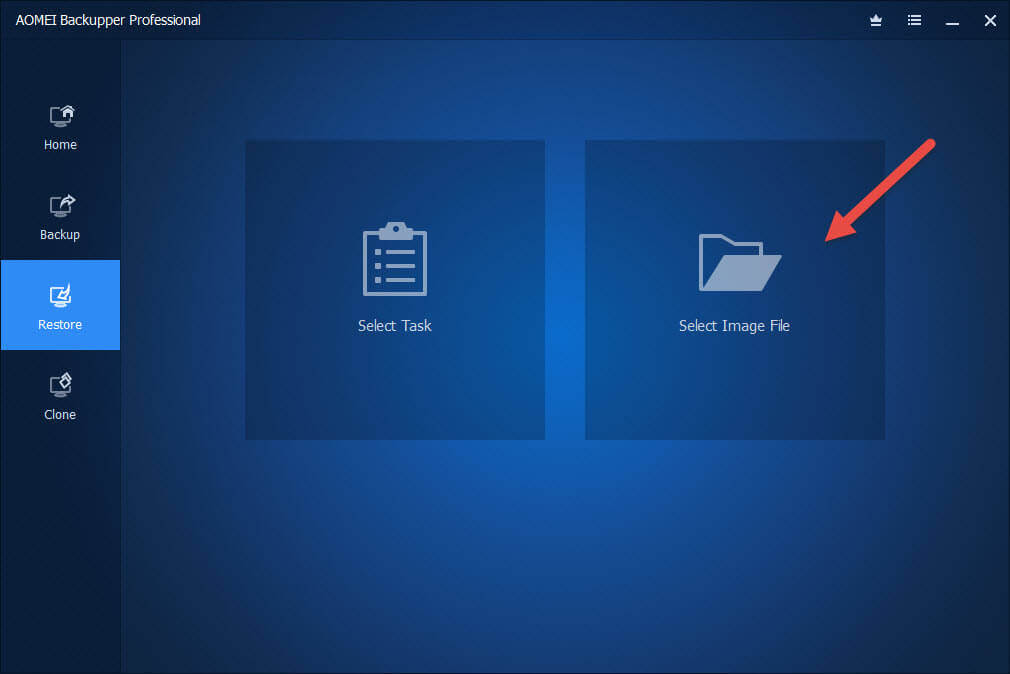
Connect the USB external drive containing your saved image(s) and boot your machine from the bootable USB flash drive. When fully booted you’ll see Aomei Backupper Standard’s interface. Click the Restore button in the left-hand menu and then click Select Image File:
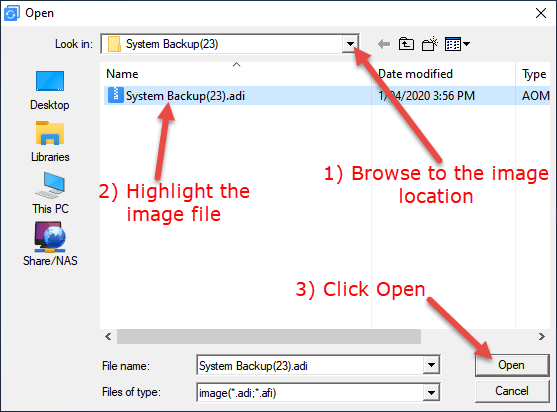
In the window that opens, browse to the folder on the external drive where you saved your images, click the image backup you want to restore (highlight it) and then click Open:
You will now see the system partitions that were saved in the image listed ready for restoration:

No need to change anything on this page. The Restore this system backup option will be enabled by default and the image backup will automatically be restored to the system drive. The option I’ve highlighted at the bottom — Restore system to other location –– is only to be enabled if you don’t want to restore the image back to its original drive (location) but rather to a different drive (location).
Click Next and you’ll see a summary of the operation to be performed:

Click Start Restore and you’re on your way. It can take a while, depending on your PC’s particular hardware specs. For example, the process will be a lot quicker with an SSD than with an HDD. Once the process has completed, you should now be able to boot back into your operating system which will be in the exact same state as when you created the image backup.
Full vs Differential vs Incremental Backups
In each case, the common starting point is to first create a full system image backup and, from there, you can then choose to either keep creating full system image backups, differential backups, or incremental backups. The difference between differential and incremental backups has always caused a bit of confusion. Hopefully, I can help clarify:
Full Image Backups: as the name suggests, backs up the entire contents/data of all system partitions every time. Full system image backups consume more space and take longer to create but, if you save multiple full system image backups, each one is fully restorable on its own.
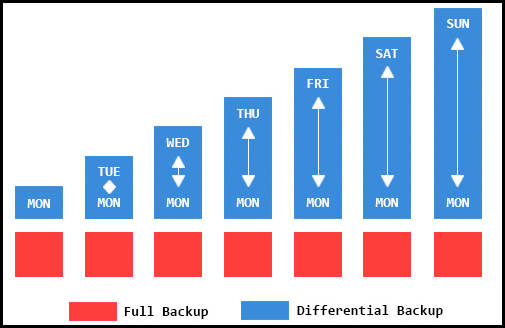
Differential Backups: will backup only those changes made since the last full system image backup. Less space-consuming and faster than creating full system image backups. Restoration requires restoring the latest full system image backup plus the latest differential backup only.
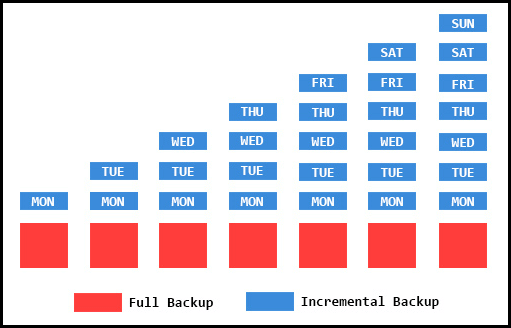
Incremental Backups: backs up only those changes made since the last incremental backup. Consumes the least amount of space and is the quickest but restoration involves restoring the latest full system image backup plus each and every incremental backup created since.
Incremental backups were introduced primarily as a space-saving method. Unless free space on your destination media (where you save your images) is at a premium I would not recommend this method. Incremental backups are smaller and quicker during the creation process but can definitely create hassles for restoration.
If your destination media (where you save your image backups) has plenty of free space, I would recommend either creating full system image backups or the differential backup method rather than incremental. Personally, my destination media has more than enough free space and I always create full system image backups. This gives me the peace of mind that if the latest full system image backup has somehow been corrupted or doesn’t restore properly, I can always fall back to the second latest full system image backup, and so on.
NOTE: If you do choose to go the differential or incremental route, do not leave it too long before creating a fresh full system image backup. In other words, after creating a full system image backup do not then go on creating differential or incremental backups indefinitely. Occasionally, start the process over again with a fresh full system image backup.
How often you create a new system image backup depends largely on how much you use the computer. I create a new full system image backup every 2- 3 weeks. I keep three full system images saved at all times, deleting the oldest image each time I create a new one. I also create a new full system image backup each time there are any major changes to the system, such as following Windows Updates or installing a new program. Bear in mind, the more up-to-date your images are, the less catching up you’ll have to do following a restore.
Image Backups & Personal Data
Personal data includes all data/files contained within your user folders– Documents, Pictures, Music, Videos, Downloads, etc. If you keep all your personal data saved on the system partition, along with your operating system, it will all be included in the system image backups. However, if you keep all your personal data saved on a separate (non-system) partition or drive, it will not be included in the system image backup and you’ll need to back up this data by some other means. You can still use Aomei Backupper to backup your personal data by using either the Disk Backup or Partition Backup options:

NOTES:
If, after restoring an image backup, the system doesn’t come back as expected — e.g. not everything loads properly — don’t panic. This can happen occasionally and is usually fixed with a simple restart.
When you read through Parts 1 and 2 of this article, it all sounds quite a lot to take in but trust me, it is nowhere near as complicated as it sounds written down. Once you’ve gone through the process, particularly the creating images process, several times, it will become second nature. Hopefully, you won’t need to go through the restore process too many times but it’s imperative you know how if/when the occasion arises.
Covering each and every detail and circumstance in an article such as this while, at the same time, trying to keep it concise is not easy. I’ve tried to cover as much as possible, however, if you have any questions, please ask via the comments section and I’ll do my best to provide an answer.
More Aomei Backupper Guides: Aomei has published a slew of easy to follow guides covering just about every aspect of Aomei Backupper, all categorized and clearly labeled: Aomei Backupper Help Guides
This is Part 2 of a two-part article. Please read Part 1 to learn how to create system images: Simple Guide To Creating & Restoring System images – Part 1 (Creating Images)
—
Thanks Jim,
Easy to follow instructions for computer users who have little or no knowledge
relating to back-ups or afraid of creating a ‘stuff-up’ or tampering within the realms of the the unknown.
I cleaned up a computer for a neighbour last week (socially apart and hand washing 😉 and my written back-up instructions from last year were not followed through (annoying).
Your colourful, step by step instructions I will put on a USB, copy to computers of friends, neighbours etc; with a colourful shortcut on the desktops/lap-tops screens.
Regards,
Jonno
Cheers Jonno.
Some of my really bad clients, as in have no clue about computers, I create an image of their system while it is in good nick and keep the image stored on an external hard drive in a folder under the client’s name. Comes in handy occasionally..
Jim, which letter had #1 in it, I am missing that one for some reason.
Hey Don,
I’m pretty sure it was in the newsletter immediately before the last one. There is a link to Part 1 right at the end of this article (in blue).
Here is a link to Part 1: https://davescomputertips.com/simple-guide-to-creating-restoring-system-images-part-1/
Hi, I was wondering what would happen if I used Aomei Backupper as above but selected to restore the system image not back to the drive it came from, but to another drive that was larger, and still had more than enough space free for the image once fully expanded? Would it work, & would it wipe anything?
Hi Luke,
Yes, you can restore an image to any hard drive, does not have to be back to the original drive. Restoring the image would normally wipe any existing data on the drive. However, if the drive were to be partitioned, say into two separate partitions, you could retain any existing data on one partition and restore the image to the other partition.