I recently wrote about setting up a basic home network. Read here: How To Set Up A Home Network
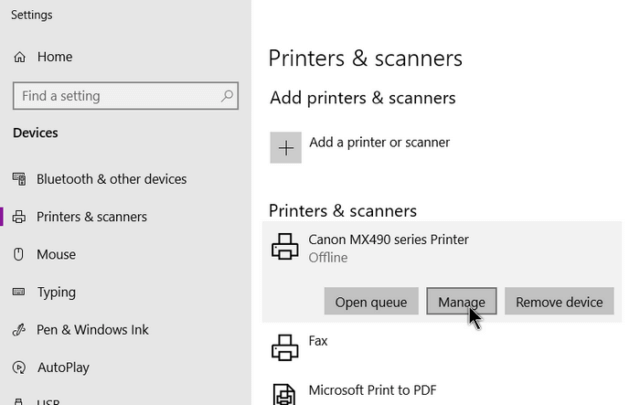
If you got your network set up and working, you might want to add your printer to the network. First, you have to make sure your printer is shared. Go to the search bar and type Printers and scanners. Click on it when it appears on the menu list. Do this on the computer with the direct printer connection. Click on your printer as listed and click on Manage in the drop-down menu.
Then click on Printer properties. In the window that opens, click on the Sharing tab and select Share this printer. I also have Render print jobs on client computers checked. Then click on OK.
Now, go to another computer on your network and type Printers and scanners in the search, and click on it in the menu. You should then see the Add a printer or scanner option next to a square with a plus sign. Click on it. Wait a bit to see if it can pick it up. Also, make sure your printer is powered on at this point.
My printer is hooked up to my Asus directly, and I’m going to start by connecting up my Gateway desktop. On my Gateway, I clicked on the add printer option. It couldn’t find it. I got the message, The printer that I want isn’t listed. So I clicked on that line.
This opened up a box with different options to install your printer. I chose the Select a shared printer by name. Couldn’t find my printer with the browse button so I started typing in the IP address of my printer, my IP address for my Asus, in my case: \\192.168.0.4\. When I got to this point the auto-complete option dropped down with the full printer path, so I clicked on it: \\192.168.0.4\Canon MX490 series Printer, then Next.
It started looking for and installing the drivers. When finished, I clicked on next.
Then I got a You’ve successfully added Canon MX490 series Printer on 192.168.0.4 message. With the option to print a test page, which I did. And it worked. I clicked on Finish.
So now, I have to try to hook up one of my laptops and try this with the wireless. I went with the Acer Aspire 5315. It’s slow but it works.
So I ran the same procedures, going to printer and scanners, clicking on add printer, adding the IP address manually, but it came up with a unique error. Windows couldn’t connect to the printer. Operation failed with error 0x0000011b.
An online search suggested it was caused by a Microsoft update. I could try to hunt down the update and uninstall it but decided to just add the registry tweak.
Run this solution on all PCs in your network. I didn’t do this on my Gateway, if it ain’t broke… Open the registry editor by typing regedit in the search, and click on it in the menu. Proceed with caution, as always.
Navigate in the Registry to:
HKEY_LOCAL_MACHINE\System\CurrentControlSet\Control\Print, right-click on the right-hand side of the editor and click on New, DWORD (32-bit) Value and type RpcAuthnLevelPrivacyEnabled. Its default value is 0 so leave it at that. Restart your system.
Otherwise, create a text file with the following:
Windows Registry Editor Version 5.00
[HKEY_LOCAL_MACHINE\System\CurrentControlSet\Control\Print]
“RpcAuthnLevelPrivacyEnabled”=dword:00000000
Save it with a reg extension. Then double-click to add it to the registry. Accept all prompts. Restart system.
I did this on both my Asus and my Acer laptop. Now when I tried to access the printer on my laptop it didn’t give that error message anymore but it did complain about not being able to find the drivers. Luckily, I had the CD that came with the printer and installed the drivers with no problem. And my laptop can now see my printer and it works. I successfully printed up the test page.
Now, two more laptops and one more desktop to go. Repeat these procedures for all computers that you want to be able to access your printer.
—


I don’t know if it is just my Netgear router or something I am doing. I am not being a big fan of Netgear right now as in the past connecting through my ASUS was pretty much automatic. The best info I can find out is that the only way you can do this through the Netgear router is to connect the printer directly to the router, via USB. Does anyone know if I am looking at the wrong thing or is this the final answer?
I first tried hooking my printer up to my router but through Eastlink tech support (my ISP), I discovered that the USB port on my router is not active. Get in touch with your ISP, who you get your internet from, they might be able to give you some advice.
https://www.downloads.netgear.com/files/GDC/ReadySHARE_Apps/ReadySHARE_Printer_UM_EN.pdf
That is my whole problem. If I wanted wires strung all over my living room floor I would never have purchased a WiFi router. I THought the days of the old Ethernet routers and switches were done with. I should just take this poorly designed Netgear back to the store and trade it for an Ausu which actually functions the way I wanted.
Or you could try to get a printer with the wireless built-in.
Should I anticipate any problems sharing a printer if one of my computers prints wirelessly and my other printer is cabled to the printer?
Dan
oops! change ‘my other printer’ to ‘my other computer’ …thnx!
Being a bit pessimistic, I always expect problems. 🙂 I wrote an article before concerning fixing some common printer issues. https://davescomputertips.com/how-to-fix-printer-not-printing
Thanks for the link, and hopefully I won’t have to use it!
Dan