If you have been following my articles for a while you might have seen one, ‘How to Add End Date on Your Google Ads.’ After that article, I wrote one on how to promote a YouTube video with Google Ads. You can find them here:
The reason I bring these two up is that Google has finally updated how to set your end dates. The end date for your YouTube Video Promotions was not offered to you when creating your ad — until now! That is right, after me (and probably many others) complaining to them, they have finally made it way easier to find this option and set it. Since I found and researched this update, it is time to share my new knowledge with you.
Set End Date On YouTube Video Promotions
I will be showing you this on the YouTube website. We will be using some of the same steps from my article, ‘How To Promote A YouTube Video With Google Ads’, see link above.
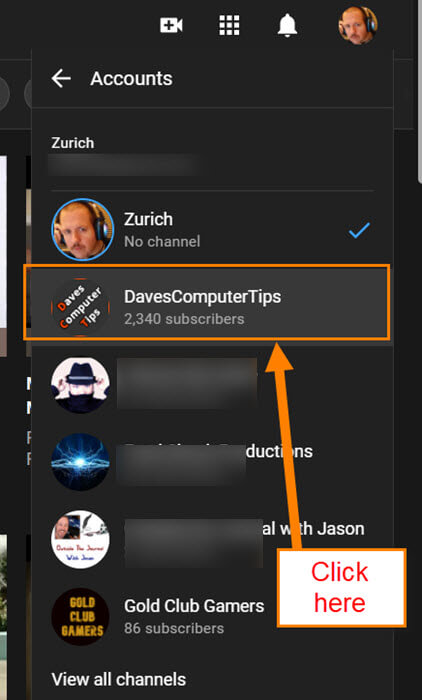
Step 1: Make sure you are logged in to the Gmail account that is attached to your YouTube channel. All of mine are attached under my main Gmail. Once logged into your YouTube channel, click the top right Profile Image. Since I manage multiple channels, I will need to click on Switch Account to get to the correct account before going to Step 2, if you weren’t originally on the correct account.
Step 2: This will give you a list of the channels/accounts you have on YouTube. We want to choose DavesComputerTips.
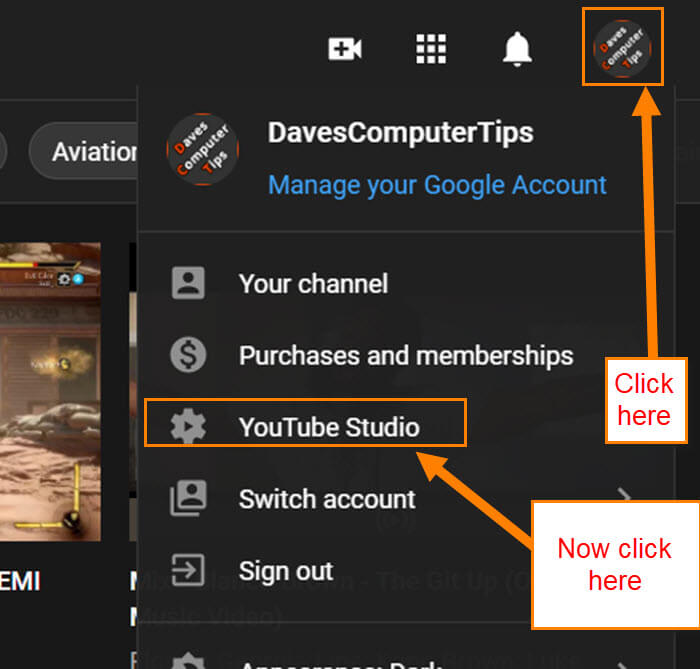
Step 3: Once in the correct account, click the Profile Image at the top right again. On this menu, click on YouTube Studio.
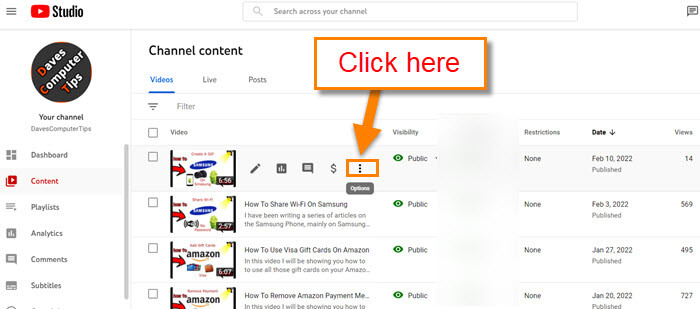
Step 4: On the Channel Dashboard, look to the left menu. Click on the Content option.
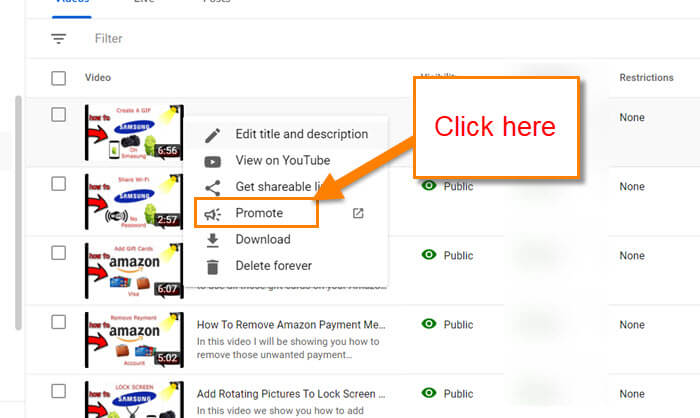
Step 5: Once in the Channelcontent screen, find the video you wish to promote. Hover your mouse cursor over the video and you will see some options. Click on the three dots.
Step 6: A menu will appear with some more options. On this menu, click on the Promote option.
Step 7: Now you will be taken to the Google Ads site. On this screen, click the Get Started button near the bottom left.
Step 8: On the first screen you will see, “How do you want your ad to show on YouTube?” For this article we are choosing the top option Automatically played before.
Step 9: After that, enter a Landing Page for this. You will see this option under the wording “After viewers click your ad, where do you want to send them?“. Here you want to add the URL of the website you wish them to go to. Now click the NEXT button on the bottom right.
Step 10: The next screen is where you choose the location your ad will be shown and what the language is. After you have chosen, click the NEXT button at the bottom of the screen.
Step 11: Now we get to target our ad more. We do this by choosing gender, age, and parental status. Click the NEXT button at the bottom when done.
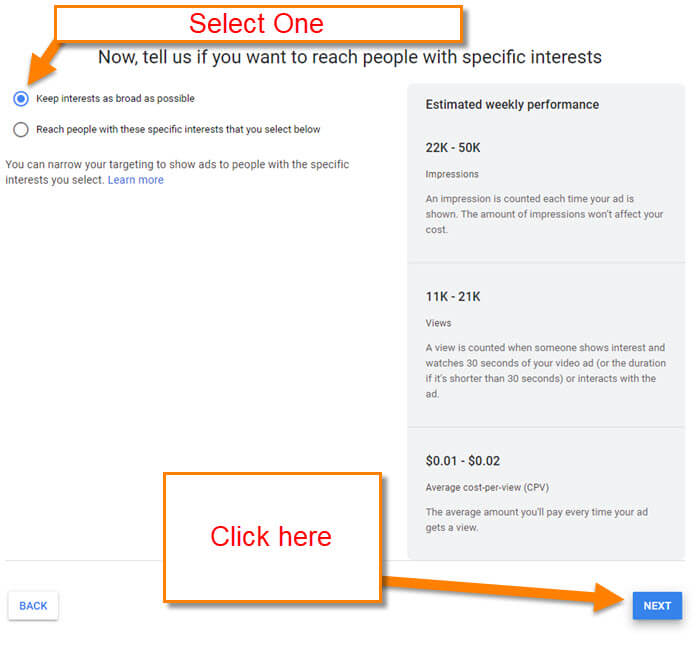
Step 12: If you wish to reach people with specific interests, this is where that happens. Sometimes I choose the option, “KeepInterests as broad as possible.” On my gaming videos, I make sure to choose the Entertainment category and then Gamers. Once you are done, click NEXT.
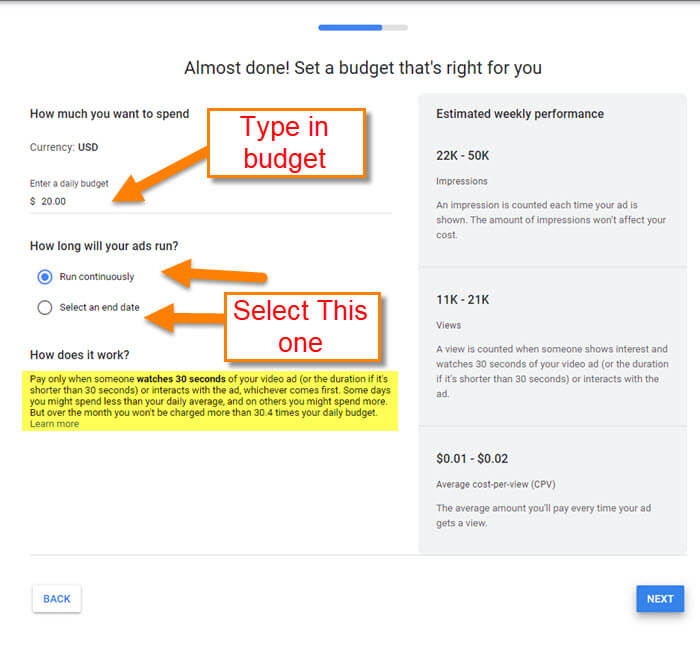
Step 13: Here is the screen that Google has updated for us. You are given two sections to work with:
How much you want to spend
How long will your ads run?
The first one is easy, so choose how much you want to spend daily. After that, we get two choices:
Run continuously
Select an end date (this is the new option I was talking about)
Click on the dot to the left of Select an end date.
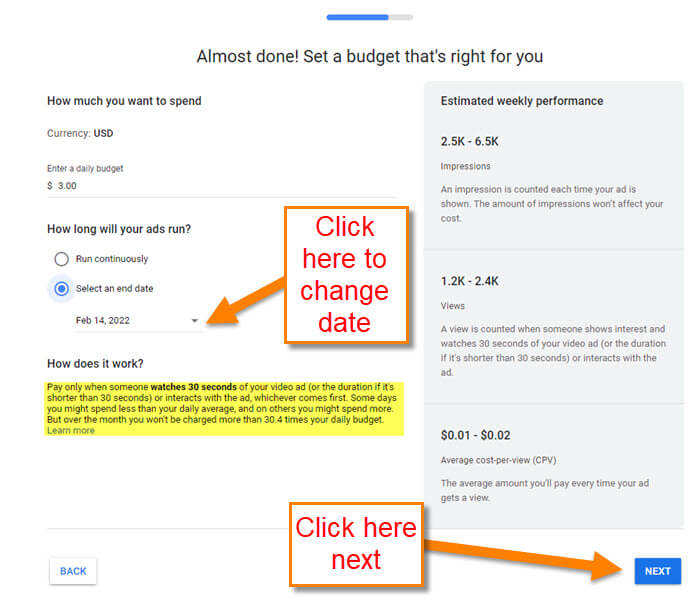
Step 14: Once you click on that dot you will see the end date appear. Click the down arrow to the right of the date. This will open a calendar you can change the end date on. Choose the date and if you are happy click the NEXT button at the bottom of the screen.
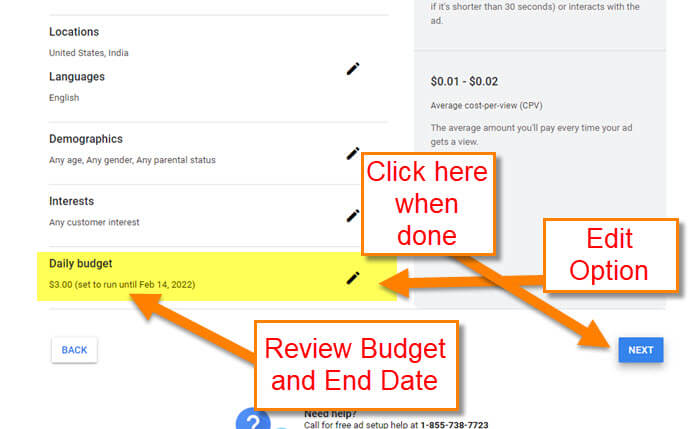
Step 15: Here is the review screen to make sure everything looks good. You can edit any section by clicking the edit pencil icon to the right of each section. Looking further right you will see an estimated weekly performance review. Scroll down to the bottom and you should see the section where you set the end date and amount (under Daily budget). If everything looks good, click the next button at the bottom. DONE!
Now you don’t have to hunt down the end date option on your Google Ad account anymore. Glad they updated this. Time to share your new knowledge with your friends and family.
Jason Shuffield is a 20 year veteran of the computer and general tech fields with experiences in running a computer repair company, in-home consultations for the tech challenged, and social media management. He enjoys writing tech articles and producing how-to videos for the technology challenged, and takes great pride in being able to help people from all levels learn to make the most of the technology around them. He feels technology should be accessible to everyone.