This is the second part of the “Pretty Good E-mail” series which follows on from an earlier introductory article. For those who are not terribly familiar with email encryption and the tools involved, I suggest you start off by reading Part I which is a guide to getting started… you can catch up with Part I here: Pretty Good E-mail Encryption – The Snowden Way.

This is Adele. When I said previously that she was a cracker, I meant of course that she’s really good at cracking encrypted messages. She’s a friendly German lady whose only job is to reply to PGP e-mails. To check that everything is working, you could send her your public certificate. (On no account ever send anyone your private certificate (“secret key”)).
You can do this either by sending her a few friendly words and attaching your public certificate file, or by pasting the public key in-line at the end of your message. Once you have sent it, you may have to wait a few minutes for her reply (depends whether she’s on a coffee-break). Her e-mail address is adele-en@gnupp.de (she speaks English) or adele@gnupp.de (German). She will send you her public certificate, in-line as ASCII-armoured text. You can copy and paste it into a text file, save it as filename.asc (not filename.txt), and then import it into your keyring so that you can encrypt your next message to her. When you send that message, she will let you know that she has received your encrypted message and decrypted it successfully. (She tends to keep her conversation to the bare minimum, and no-one has ever successfully asked her out on a date).
Now you really need to have a partner to work with. It is possible to test the technique by e-mailing messages to yourself, but it gets confusing, because you have all the keys present on the same key-ring. (Another way is by e-mailing yourself using two e-mail accounts to and from a system inside a virtual machine like VirtualBox, but that may be going a bit far.) So either set up a different e-mail address on a different computer, or collaborate with one of the people you actually want to communicate with. Then you can start exchanging encrypted e-mail straight away.
OpenPGP with Thunderbird and Outlook
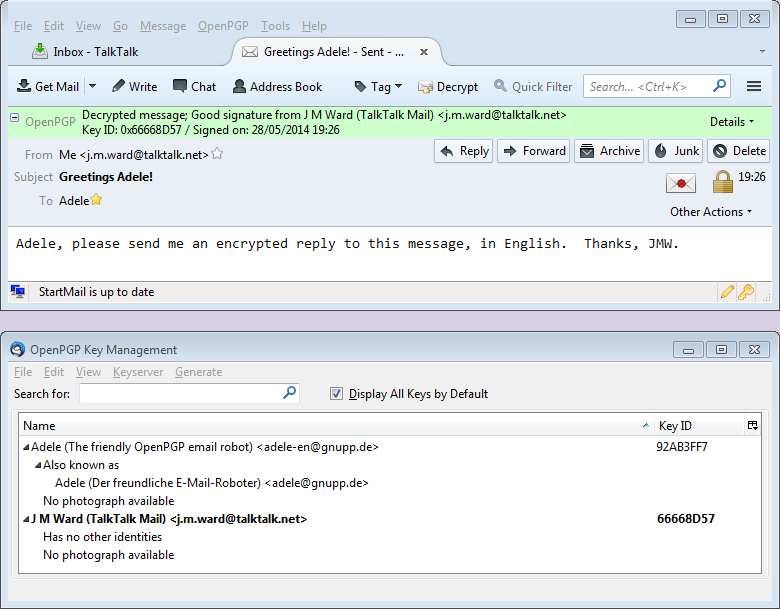
You may have guessed that there are ways of avoiding all that copying and pasting of ciphertext. You can use the Thunderbird e-mail client (http://www.mozilla.org/en-GB/thunderbird/ ), in which case Tools | Addons will enable you to install the Enigmail add-on. This automates the encryption, decryption and signing of e-mails, and has its own efficient key manager. There is an excellent manual for it here: https://www.enigmail.net/documentation/handbook.php (I recommended it in my last encryption article). You should now be able to read and understand it without too much difficulty. Here is a typical view of Thunderbird and Enigmail, showing the Key Manager, and the saved and decrypted copy of my message to Adele:
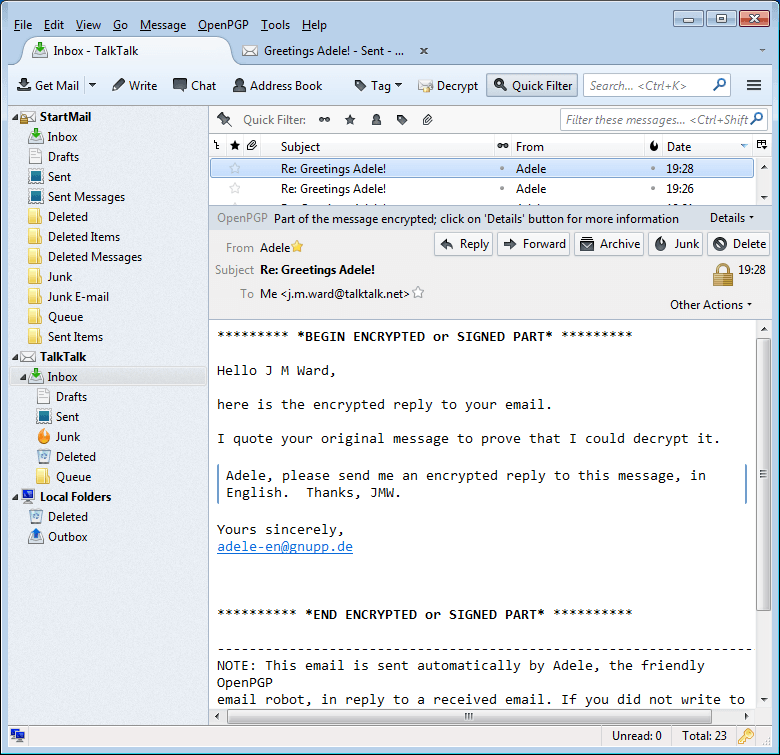
And here is Adele’s reply to the message I sent:
Note that Thunderbird can also handle S/MIME encryption via Tools | Account Settings. Select Security for your account, then View Certificates. Select the Your Certificates tab, then import your S/MIME certificate (filename.pfx or filename.p12). On the Security dialog, select your certificate for both Encryption and Digital Signing.
Now before you send a message, select Options | Digitally Sign This Message and/or Options | Encrypt This Message, as appropriate. See my previous article for more on S/MIME encryption: https://davescomputertips.com/e-mail-encryption-encryption-encryption/
Don’t confuse the S/MIME and PGP options. They are completely different and independent. I have no idea what happens if you try to use them both at the same time, but I would guess it isn’t good.
Alternatively, if you use Outlook 2010, you will find that the GpgOL extension that you installed with GPG4Win has its own tab there, from which you can start and use Kleopatra, and encrypt, decrypt, and sign automatically. You may have to start Kleopatra yourself before this will work. GpgOL seems to prefer the Kleopatra key manager to GPA, but the two are very similar.
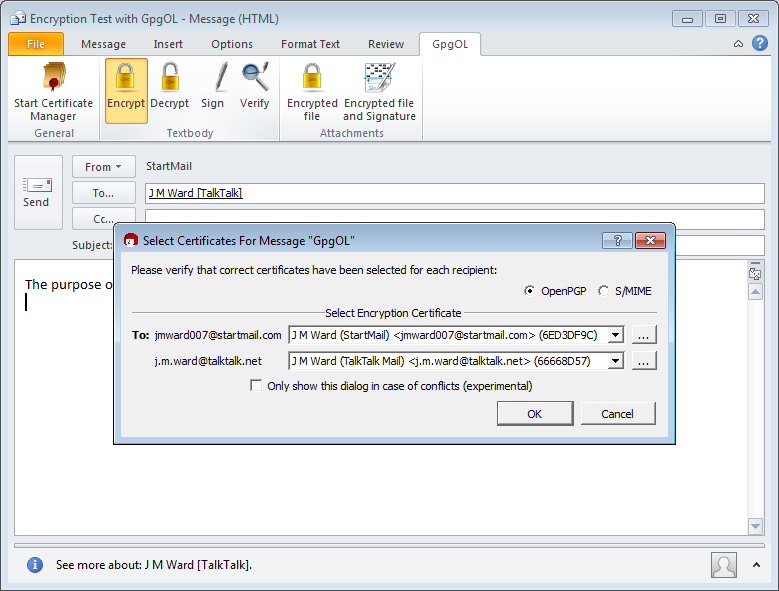
Here is Outlook almost ready to send a PGP message. Notice that it is encrypted to the sender, as well as to the recipient, so that you have an encrypted copy. Unfortunately, if you open the copy of the sent message and then try to close it, Outlook will offer to save the modified (i.e. unencrypted) message. Don’t do this, or you will have the plaintext in your Sent Messages.
The message as received by J M Ward [TalkTalk] is shown below immediately before decryption:
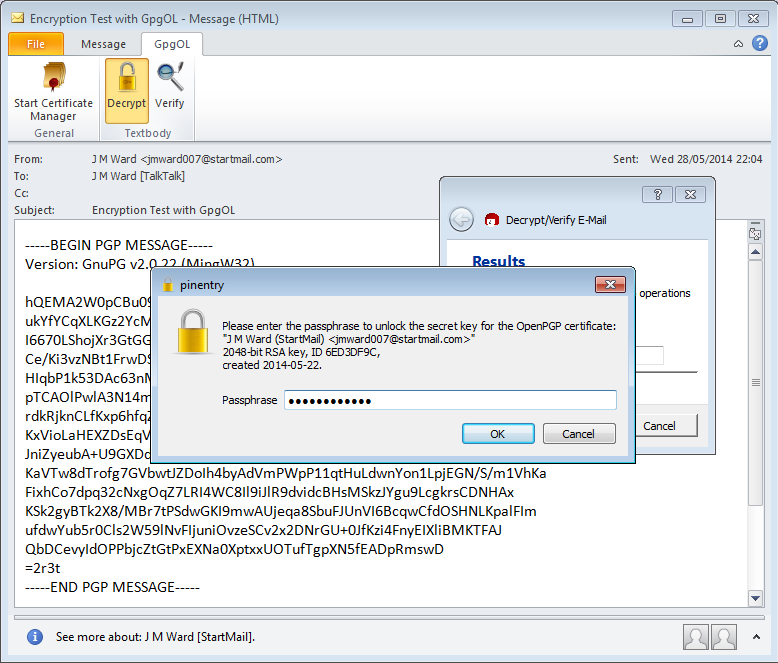
And immediately after decryption it looks like this:
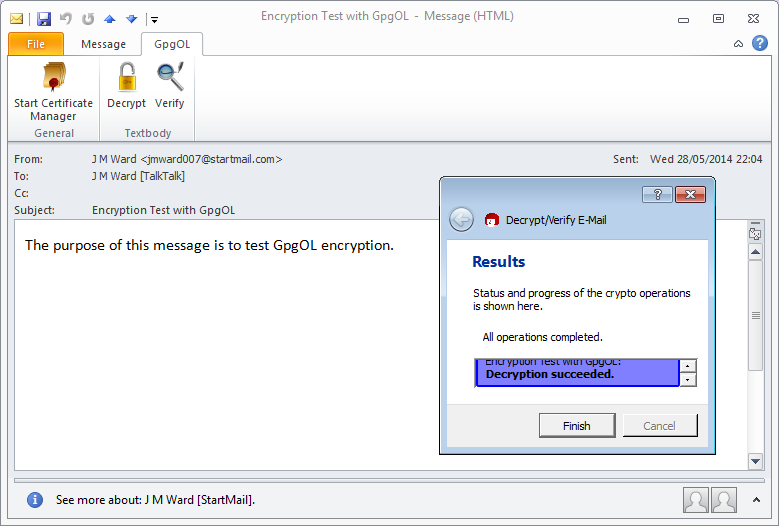
So GpgOL basically works, but it does have one or two quirks which can be a little awkward. If you would like a high-powered version, you could try gpg4o Home and Student, from Giegerich & Partner GmbH, but unfortunately at the moment it costs €47. I found it on a special offer for €10, so if you really want it after evaluating their trial version, it might be worth negotiating, or just keeping an eye on the website.
For more help and detail on Gpg4Win and encryption generally, please read the GPG4win Compendium, which was installed together with Gpg4win, or you can find it here: http://www.gpg4win.org/documentation.html. It starts off with a simple introduction to encryption, and finishes with a simple demonstration of the mathematics involved, if you’re interested.
Key Confusion
Let’s try to clarify the terms used when talking about keys, private and public. For PGP encryption, you create a key-pair – the combination of your private and public keys, kept in one file. It is also known as a PGP security certificate. Confusingly this private key-pair is also sometimes referred to as your secret key, for short, since the certificate as a whole must be kept secret.
The public key is also sometimes referred to as a public certificate, which you want to publish, i.e. make available to other people. The private key, on the other hand, never leaves the security of the original certificate. Only you have it, and only you can decrypt text encrypted with your public key.
Signing Messages, Documents, and Keys – The Web of Trust
You have Sabira’s public key. She has yours and can send you encrypted messages. However, she uses a variety of disposable e-mail addresses, so can you be sure that a message that you receive really comes from her, and not from her unpleasant government, which can also get your public key? Suppose her apparent message inviting you to a clandestine meeting, even though encrypted with your public key, is actually a trap?
![]() This is why both you and Sabira, as soon as you are sure who you are really in contact with, should start digitally signing your messages to each other. It works like this. Sabira composes her message, then adds some special ciphertext to the end of it. That ciphertext is produced by combining all the characters of her original plaintext message in a special way that results in a number called the message hash, or message digest, which is typically 160 bits long. That number is then encrypted with Sabira’s private key, and the result is tacked onto the end of her plaintext message. The whole thing is then encrypted with your public key.
This is why both you and Sabira, as soon as you are sure who you are really in contact with, should start digitally signing your messages to each other. It works like this. Sabira composes her message, then adds some special ciphertext to the end of it. That ciphertext is produced by combining all the characters of her original plaintext message in a special way that results in a number called the message hash, or message digest, which is typically 160 bits long. That number is then encrypted with Sabira’s private key, and the result is tacked onto the end of her plaintext message. The whole thing is then encrypted with your public key.
Perhaps you can see where this is going. When you get her message, you decrypt it with your private key. Then GPA or your e-mail client computes the hash value for her plaintext message in the same way she did. Finally, her public key is used to decrypt the message hash that she encrypted with her private key. Now the two hash results are compared. If they are the same, the message was signed with her secret key and so is definitely from her. If they are different, there are two possibilities: it’s not her signature, and the message is bogus; or the message text itself has been modified somehow in transit. This can very rarely happen accidentally, but in either case you should reject the message.
But, you may object, what if the enemy puts together a false message with exactly the same hash as the real one? Wouldn’t that make the signature useless? It would, if the enemy could do that. Unfortunately for the enemy, the mathematical hashing algorithm is cunningly designed so that no two different messages can ever have the same hash value. That’s not quite accurate: there is a very low probability that it could happen, but you would have to hash messages for many years before you found two matching hashes. Over a normal time period it’s virtually impossible, and even less likely that you could actually produce a useful decoy message with the same hash.
So a correct digital signature both authenticates the message (you know who signed it) and verifies its integrity (you know the message hasn’t been changed in transit).
Still, you may not entirely trust that messages apparently from Sabira are really from her. What if someone else has intercepted her messages, substituted their own public key, and is pretending to be her? You can check this out by getting in direct contact with her or meeting her, and checking her key “fingerprint” directly. The fingerprint, which you can see in the Key Manager image(s) above, is essentially the hash value of her public key. If you check your version of that value with her directly, or through someone you both trust, the two should match. Often it is enough just to check the key ID, which is the last eight characters of the fingerprint. Just for the record, fingerprints and key IDs are expressed in hexadecimal digits (0 to 9, then A to F), each of which represent four bits. The 40-character fingerprint therefore consists of 160 bits. Sabira’s key fingerprint is 2644 2C94 B9D9 08E6 C660 F149 F31A 4113 2EBE 5FA7, so her key ID is 2EBE5FA7.
 Public keys can themselves be signed by the secret keys of other people. If Sabira’s key has been signed by someone you know well, GPA will check it out on your keyring and indicate that the key validity is better than Unknown. If you have signed her key, which you would only do by meeting her directly and exchanging signatures, her key will be fully valid for you, although it may not be for other people. Of course, your own key is fully valid as far as you are concerned – see the Key Manager display above. Just for your own private purposes, you can also indicate how much you trust the owner of the key by right-clicking it and setting its Owner Trust level – see the Owner Trust column in the same display. GPA automatically sets the Owner Trust for your own key to Ultimate when you generate it, since presumably you trust yourself absolutely, and it also automatically signs your public key so that the key is Fully Valid for you. This is called “self-signing” your key. With other key managers you may have to do this yourself.
All this is part of the process of certifying key owners through the PGP Web of Trust. The more people have signed your public key, the more trusted you are. Notice the difference from the PKI (S/MIME) keys we looked at in the first article, on S/MIME encryption: https://davescomputertips.com/e-mail-encryption-encryption-encryption/, where the trust comes through a hierarchy from an ultimately trusted authority. If you look at Adele’s public key in her decrypted first message to you, you will see that it is much longer than yours. That’s because a lot of people have signed it as being trusted.
Digital signing is important. It can be used to authenticate important documents, such as legal transactions. Encryption does not have to be involved.
Finally, you can easily make your public key available to others without having to send them it directly. Above, I mentioned the MIT public key server (http://pgp.mit.edu/). I have uploaded my own public key there, as shown below, where the GPA Key Manager is overlaid on the MIT web page for comparison.
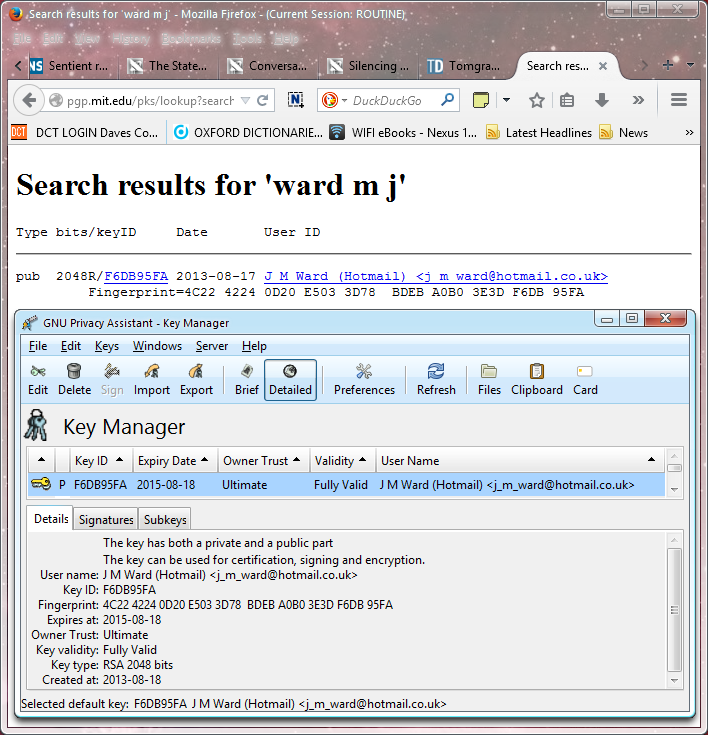
You can see that the search for my name has produced a result which includes the fingerprint, as well as the type and strength of the key. This is not an invitation to send me encrypted e-mail! If you do, I will try to reply, but if a lot of people send me messages it may not be possible. And I definitely won’t reply if you don’t include your public key!
There are several PGP servers, which regularly update each other, so if you upload your key to one, it will gradually spread to the others. Uploading is a simple matter, which any key manager makes quite simple. In GPA, Server | Send Keys… will upload to hkp://keys.gnupg.net by default, and the key will be distributed from there.
It’s up to you now. Use the tools, Reset The Net (https://www.resetthenet.org/), and stay secure!
